Vyper入门:1.HelloVyper
文档摘要
title: 1. Hello Vyper tags: vyper basic WTF Vyper教程: 1. Hello Vyper 我最近在重新学Vyper,巩固一下细节,也写一个“Vyper极简入门”,供小白们使用(编程大佬可以另找教程),每周更新1-3讲。 推特:@WTFAcademy 社区:Discord|微信群|官网 wtf.academy 所有代码和教程开源在github: github.com/WTFAcademy/WTF-Vyper Vyper简述 Vyper 是一种面向合约的类似于 Python 的编程语言,专为 设计。与Solidity不同,Vyper强调简单性和安全性,而Solidity则提供更多灵活性和复杂特性。
title: 1. Hello Vyper tags: - vyper - basic
WTF Vyper教程: 1. Hello Vyper
我最近在重新学Vyper,巩固一下细节,也写一个“Vyper极简入门”,供小白们使用(编程大佬可以另找教程),每周更新1-3讲。
推特:@WTFAcademy_
所有代码和教程开源在github: github.com/WTFAcademy/WTF-Vyper
Vyper简述
Vyper 是一种面向合约的类似于 Python 的编程语言,专为EVM设计。与Solidity不同,Vyper强调简单性和安全性,而Solidity则提供更多灵活性和复杂特性。
开发环境
与Solidity不同,Remix只支持Vyper 0.2.16 以下的版本,而最新版是Vyper 0.3.10,因此我们不得不转向其他开发环境。
这里,我们主要介绍两个开发环境
- 本地开发(推荐),需要在本地安装
Vyper和ApeWorx。 - 浏览器IDE:链接
本地开发
1. 安装Vyper
使用 Docker 和 PIP 可安装Vyper。此处使用 PIP,其他安装方法见Vyper官方文档。
pip3 install vyper # 或 pip3 install vyper==0.3.9
安装的Vyper版本取决于当前Python版本。
2. 安装ApeWorX
ApeWorX是一个与Vyper完全兼容的智能合约开发框架。另一框架brownie已停止更新。ApeWorX官网: ApeWorX。
pip3 install eth-ape
3. 安装插件
开发常用插件包括 hardhat 和 alchemy。使用alchemy需要本地设置key,详情见这里。
ape plugins install hardhat alchemy
4. 初始化项目
ape init
ape-config.yaml 文件示例配置
以 ethereum-fork 为例的配置信息:
name: HelloVyper plugins: - name: alchemy - name: etherscan - name: hardhat default_ecosystem: ethereum ethereum: default_network: mainnet-fork mainnet_fork: default_provider: hardhat transaction_acceptance_timeout: 99999999 mainnet: transaction_acceptance_timeout: 99999999 hardhat: port: auto fork: ethereum: mainnet: upstream_provider: alchemy enable_hardhat_deployments: true test: mnemonic: test test test test test test test test test test test junk number_of_accounts: 5
遇 PUSH0 错误时,在 ape-config 文件中添加:
vyper: evm_version: paris
编写第一个Vyper合约
我们的第一个Vyper合约非常简单,仅包含几行代码:
# @version 0.3.9 greet: public(String[12]) @payable @external def __init__(): self.greet = "Hello Vyper!"
代码逐行分析:
- 指定Vyper编译器版本
0.3.9或>=0.3.9。 - 声明
public变量greet:public(String[12])。 @payable和@external装饰器。__init__:合约的构造函数。- 设置
greet变量的初始值。
编译并部署代码
在合约文件夹下输入命令进行编译:
ape compile

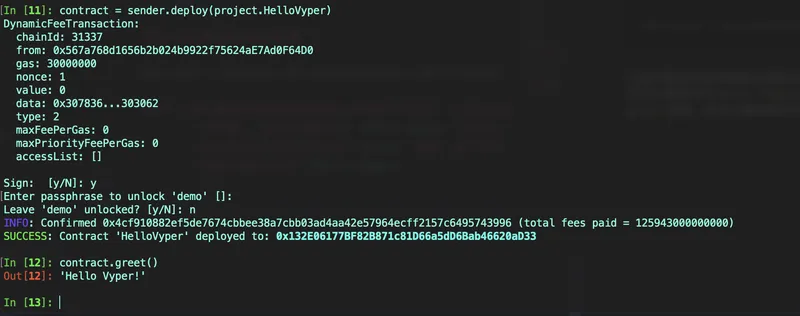
部署合约步骤:
- 进入
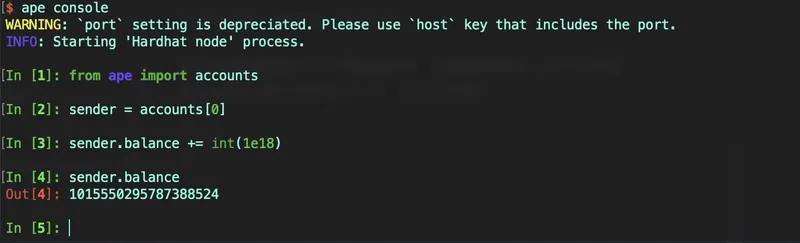
ape控制台,部署到ethereum-fork。 ape分配测试账户并添加ETH:
from ape import accounts accounts[0].balance += int(1e18)
- 执行部署命令:
contract = accounts[0].deploy(project.HelloVyper)
使用浏览器IDE开发
对于简单的合约,你可以在https://try.vyperlang.org/网站托管的jupyter notebook上进行开发。
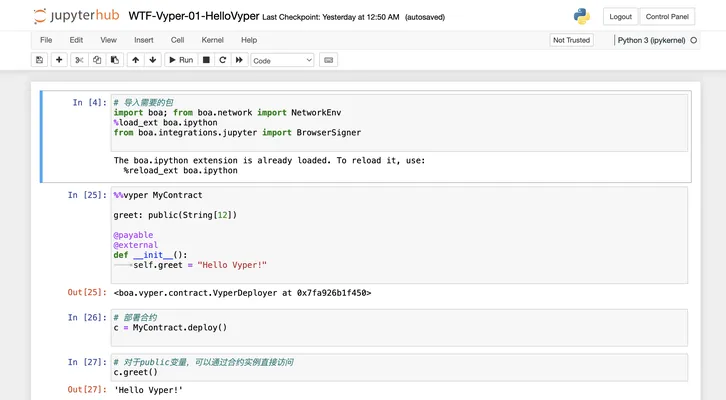
首先,你需要导入boa包,它是一个Vyper解释器,支持在jupyter notebook中运行Vyper合约。
# 导入需要的包 import boa; from boa.network import NetworkEnv %load_ext boa.ipython from boa.integrations.jupyter import BrowserSigner
第二步,复制粘贴我们的Vyper合约。
%%vyper MyContract greet: public(String[12]) @payable @external def __init__(): self.greet = "Hello Vyper!"
第三步,部署Vyper合约,并赋值给合约变量c:
# 部署合约 c = MyContract.deploy()
最后一步,与部署好的合约c交互,读取greet变量的值,将输出'Hello Vyper!'。
# 对于public变量,可以通过合约实例直接访问 c.greet()
总结
这一讲,我们介绍了Vyper语言,它的开发环境,并编写和部署第一个合约 HelloVyper。后续我们将更深入的学习Vyper!