通过互联网控制夜灯-Wio终端
文档摘要
通过互联网控制夜灯 - Wio终端 物联网设备需要编程,以便使用MQTT与test.mosquitto.org通信,发送带有光传感器读数的遥测值,并接收用于控制LED的命令。 在本课的一部分中,你将连接你的Wio终端到一个MQTT代理。 安装WiFi和MQTT Arduino库 为了与MQTT代理通信,你需要安装一些Arduino库来使用Wio终端中的WiFi芯片,并与MQTT进行通信。在为Arduino设备开发时,你可以使用大量的包含开源代码的库,这些库实现了广泛的功能。Seeed为Wio终端发布了库,使其能够通过WiFi通信。其他开发者已经发布了与MQTT代理通信的库,你将在设备上使用这些库。 这些库作为源代码提供,可以自动导入到PlatformIO并为你的设备编译。
通过互联网控制夜灯 - Wio终端
物联网设备需要编程,以便使用MQTT与test.mosquitto.org通信,发送带有光传感器读数的遥测值,并接收用于控制LED的命令。
在本课的一部分中,你将连接你的Wio终端到一个MQTT代理。
安装WiFi和MQTT Arduino库
为了与MQTT代理通信,你需要安装一些Arduino库来使用Wio终端中的WiFi芯片,并与MQTT进行通信。在为Arduino设备开发时,你可以使用大量的包含开源代码的库,这些库实现了广泛的功能。Seeed为Wio终端发布了库,使其能够通过WiFi通信。其他开发者已经发布了与MQTT代理通信的库,你将在设备上使用这些库。
这些库作为源代码提供,可以自动导入到PlatformIO并为你的设备编译。这样Arduino库可以在任何支持Arduino框架的设备上工作,前提是该设备具有该库所需的特定硬件。例如,Seeed的WiFi库是针对某些特定硬件的。
库可以全局安装并编译,或者安装到特定项目中。对于本次作业,库将安装到项目中。
✅ 你可以了解更多关于库管理以及如何查找和安装库的详细信息,请参阅PlatformIO库文档。
任务 - 安装WiFi和MQTT Arduino库
安装Arduino库。
-
在VS Code中打开nightlight项目。
-
将以下内容添加到文件的末尾
platformio.ini:lib_deps = seeed-studio/Seeed Arduino rpcWiFi @ 1.0.5 seeed-studio/Seeed Arduino FS @ 2.1.1 seeed-studio/Seeed Arduino SFUD @ 2.0.2 seeed-studio/Seeed Arduino rpcUnified @ 2.1.3 seeed-studio/Seeed_Arduino_mbedtls @ 3.0.1这会导入Seeed的WiFi库。
@ <number>syntax refers to a specific version number of the library.You can remove the
@ <number>to always use the latest version of the libraries, but there are no guarantees the later versions will work with the code below. The code here has been tested with this version of the libraries.This is all you need to do to add the libraries. Next time PlatformIO builds the project it will download the source code for these libraries and compile it into your project.
-
Add the following to the
lib_deps:knolleary/PubSubClient @ 2.8这会导入PubSubClient,这是一个Arduino MQTT客户端。
连接WiFi
现在Wio终端可以连接到WiFi。
任务 - 连接到WiFi
连接Wio终端到WiFi。
-
在
srcfolder calledconfig.h. You can do this by selecting thesrcfolder, or themain.cpp文件内创建一个新文件,并从资源管理器中选择新建文件按钮。当你把光标放在资源管理器上时,这个按钮才会出现。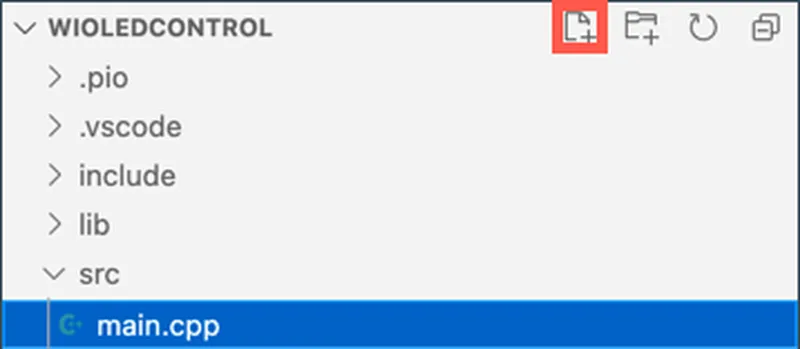
-
向此文件添加以下代码,以定义你的WiFi凭证的常量:
#pragma once #include <string> using namespace std; // WiFi credentials const char *SSID = "<SSID>"; const char *PASSWORD = "<PASSWORD>";替换
<SSID>with the SSID of your WiFi. Replace<PASSWORD>with your WiFi password. -
Open the
main.cppfile -
Add the following
#include指令到文件顶部:#include <PubSubClient.h> #include <rpcWiFi.h> #include <SPI.h> #include "config.h"这包括了之前添加的库的头文件,以及配置头文件。这些头文件需要告诉PlatformIO从库中引入代码。如果不显式包含这些头文件,部分代码将不会被编译,你将收到编译错误。
-
在
setup函数上方添加以下代码:void connectWiFi() { while (WiFi.status() != WL_CONNECTED) { Serial.println("Connecting to WiFi.."); WiFi.begin(SSID, PASSWORD); delay(500); } Serial.println("Connected!"); }这段代码会在设备未连接到WiFi时循环运行,并尝试使用配置头文件中的SSID和密码进行连接。
-
在
setup函数底部的引脚配置之后,调用此函数:connectWiFi(); -
将此代码上传到设备,检查WiFi连接是否正常工作。你应该在串行监视器中看到这个结果。
> Executing task: platformio device monitor < --- Available filters and text transformations: colorize, debug, default, direct, hexlify, log2file, nocontrol, printable, send_on_enter, time --- More details at http://bit.ly/pio-monitor-filters --- Miniterm on /dev/cu.usbmodem1101 9600,8,N,1 --- --- Quit: Ctrl+C | Menu: Ctrl+T | Help: Ctrl+T followed by Ctrl+H --- Connecting to WiFi.. Connected!
连接到MQTT
一旦Wio终端连接到WiFi,它可以连接到MQTT代理。
任务 - 连接到MQTT
连接到MQTT代理。
-
在
config.h文件底部添加以下代码,以定义MQTT代理的连接详情:// MQTT settings const string ID = "<ID>"; const string BROKER = "test.mosquitto.org"; const string CLIENT_NAME = ID + "nightlight_client";替换
<ID>with a unique ID that will be used the name of this device client, and later for the topics that this device publishes and subscribes to. The test.mosquitto.org broker is public and used by many people, including other students working through this assignment. Having a unique MQTT client name and topic names ensures your code won't clash with anyone else's. You will also need this ID when you are creating the server code later in this assignment.You can use a website like GUIDGen to generate a unique ID.
The
BROKERis the URL of the MQTT broker.The
CLIENT_NAMEis a unique name for this MQTT client on the broker. -
Open the
main.cppfile, and add the following code below theconnectWiFifunction and above thesetup函数:WiFiClient wioClient; PubSubClient client(wioClient);这段代码使用Wio终端的WiFi库创建了一个WiFi客户端,并用它创建了一个MQTT客户端。
-
在这段代码下方添加以下内容:
void reconnectMQTTClient() { while (!client.connected()) { Serial.print("Attempting MQTT connection..."); if (client.connect(CLIENT_NAME.c_str())) { Serial.println("connected"); } else { Serial.print("Retying in 5 seconds - failed, rc="); Serial.println(client.state()); delay(5000); } } }这个函数测试连接到MQTT代理,并在未连接时重新连接。只要未连接,它就会一直循环,并尝试使用配置头文件中定义的唯一客户端名称进行连接。
如果连接失败,它将在5秒后重试。
-
在
reconnectMQTTClient函数下方添加以下代码:void createMQTTClient() { client.setServer(BROKER.c_str(), 1883); reconnectMQTTClient(); }这段代码设置客户端的MQTT代理,并设置当收到消息时的回调。然后它会尝试连接到代理。
-
使用以下代码调用
createMQTTClientfunction in thesetupfunction after the WiFi is connected. -
Replace the entire
loop函数:void loop() { reconnectMQTTClient(); client.loop(); delay(2000); }这段代码首先重新连接到MQTT代理。这些连接很容易断开,所以定期检查并必要时重新连接是有价值的。然后它会调用MQTT客户端的
loop方法来处理订阅主题上等待的任何消息。由于这个应用程序是单线程的,因此无法在后台线程上接收消息,所以在主线程上需要分配时间来处理等待的消息。最后,延迟2秒确保光强度不会发送得太频繁,从而减少设备的功耗。
-
将代码上传到你的Wio终端,并使用串行监视器查看设备连接到WiFi和MQTT的情况。
> Executing task: platformio device monitor < source /Users/jimbennett/GitHub/IoT-For-Beginners/1-getting-started/lessons/4-connect-internet/code-mqtt/wio-terminal/nightlight/.venv/bin/activate --- Available filters and text transformations: colorize, debug, default, direct, hexlify, log2file, nocontrol, printable, send_on_enter, time --- More details at http://bit.ly/pio-monitor-filters --- Miniterm on /dev/cu.usbmodem1201 9600,8,N,1 --- --- Quit: Ctrl+C | Menu: Ctrl+T | Help: Ctrl+T followed by Ctrl+H --- Connecting to WiFi.. Connected! Attempting MQTT connection...connected
你可以在这个代码所在的code-mqtt/wio-terminal文件夹中找到它。
你已经成功地将设备连接到了MQTT代理。
声明:
本文件灏天文库团队进行了翻译。尽管我们力求准确,但请注意,翻译可能包含错误或不准确之处。原文档以其原始语言为准。我们不对因使用此翻译而产生的任何误解或误译负责。