存储位置数据
文档摘要
存储位置数据 本课概述的草图笔记 草图笔记由 Nitya Narasimhan 制作。点击图片查看大图。 预习测验 预习测验 引言 在上一课中,你学习了如何使用GPS传感器捕获位置数据。为了使用这些数据来可视化装载食品的卡车的位置及其行程,需要将这些数据发送到云端的IoT服务,并进行存储。 在本课中,你将学习不同的方式来存储IoT数据,并了解如何使用无服务器代码将数据从IoT服务存储起来。 本课我们将涵盖以下内容: 结构化和非结构化数据 将GPS数据发送到IoT Hub 热、温、冷路径 使用无服务器代码处理GPS事件 Azure存储帐户 将你的无服务器代码连接到存储 结构化和非结构化数据 计算机系统处理数据,这些数据有各种各样的形状和大小。
存储位置数据

草图笔记由 Nitya Narasimhan 制作。点击图片查看大图。
预习测验
引言
在上一课中,你学习了如何使用GPS传感器捕获位置数据。为了使用这些数据来可视化装载食品的卡车的位置及其行程,需要将这些数据发送到云端的IoT服务,并进行存储。
在本课中,你将学习不同的方式来存储IoT数据,并了解如何使用无服务器代码将数据从IoT服务存储起来。
本课我们将涵盖以下内容:
- 结构化和非结构化数据
- 将GPS数据发送到IoT Hub
- 热、温、冷路径
- 使用无服务器代码处理GPS事件
- Azure存储帐户
- 将你的无服务器代码连接到存储
结构化和非结构化数据
计算机系统处理数据,这些数据有各种各样的形状和大小。它可以是从单个数字到大量文本,再到视频和图像,甚至是IoT数据。数据通常可以分为两类——结构化数据和非结构化数据。
-
结构化数据是具有明确、固定结构的数据,这种结构不会改变,并且通常映射到带有关系的数据表。例如一个人的详细信息,包括他们的姓名、出生日期和地址。
-
非结构化数据是没有明确、固定结构的数据,包括可以频繁改变结构的数据。例如文档,如书面文档或电子表格。
✅ 做一些研究:你能想到其他一些结构化和非结构化数据的例子吗?
还有一种半结构化数据,它具有一定的结构但不适用于固定的表格数据。
IoT数据通常被认为是非结构化数据。
想象一下,你在一家大型商业农场的车辆车队中添加了IoT设备。你可能希望为不同类型的车辆使用不同的设备。例如:
- 对于农用车辆如拖拉机,你需要GPS数据以确保它们在正确的田地上工作。
- 对于运送食品到仓库的运输卡车,你需要GPS数据以及速度和加速度数据,以确保驾驶员安全驾驶,并通过驾驶身份和开始/停止数据确保驾驶员遵守当地关于工作时间的法律。
- 对于冷藏卡车,你还需温度数据以确保食物不会过热或过冷而损坏。
这些数据会不断变化。例如,如果IoT设备位于卡车驾驶室内,则其发送的数据可能会随着拖车的变化而变化,例如仅在使用冷藏拖车时发送温度数据。
✅ 你还可能捕获哪些其他IoT数据?思考一下卡车可以承载的各种负载,以及维护数据。
这些数据因车辆而异,但所有数据都发送到同一个IoT服务进行处理。IoT服务需要能够处理这种非结构化数据,并以一种允许搜索或分析的方式进行存储,同时适应不同结构的数据。
SQL与NoSQL存储
数据库是一种允许存储和查询数据的服务。数据库分为两种类型——SQL和NoSQL。
SQL数据库
最早的数据库是关系型数据库管理系统(RDBMS),也称为关系数据库。这些数据库也被称为SQL数据库,因为使用结构化查询语言(SQL)与它们交互以添加、删除、更新或查询数据。这些数据库由一个模式组成——一组定义好的数据表,类似于电子表格。每个表有多个命名列。当你插入数据时,你向表中添加一行,并将值放入每一列中。这保持了数据的高度结构化——尽管你可以为空列留空,如果你想添加新列,必须在数据库中进行操作,并填充现有行的值。这些数据库是关系型的——即一张表可以与其他表相关联。
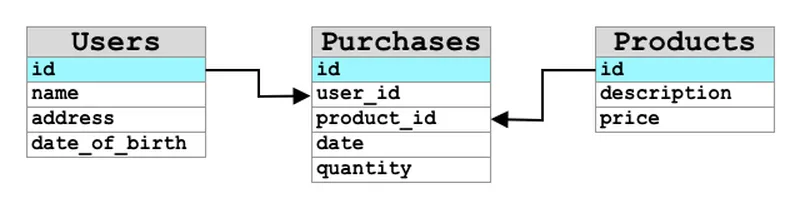
例如,如果你在一个表中存储用户个人信息,你会有一个用于用户的内部唯一ID,这个ID用于包含用户名和地址的表中的一行。然后,如果你想要在另一张表中存储该用户的其他信息,如购买记录,你可以在新表中为该用户的ID设置一列。当你查找用户时,你可以使用其ID从一个表中获取其个人信息,从另一个表中获取其购买记录。
SQL数据库非常适合存储结构化数据,并且当你希望确保数据符合你的模式时也非常有用。
✅ 如果你之前没有使用过SQL,花点时间阅读一下 SQL维基百科页面。
一些知名的SQL数据库包括 Microsoft SQL Server、MySQL 和 PostgreSQL。
✅ 做一些研究:阅读这些SQL数据库及其功能。
NoSQL数据库
NoSQL数据库被称为NoSQL是因为它们不像SQL数据库那样具有相同的严格结构。它们也被称为文档数据库,因为它们可以存储非结构化数据,如文档。
尽管名字如此,一些NoSQL数据库允许你使用SQL查询数据。
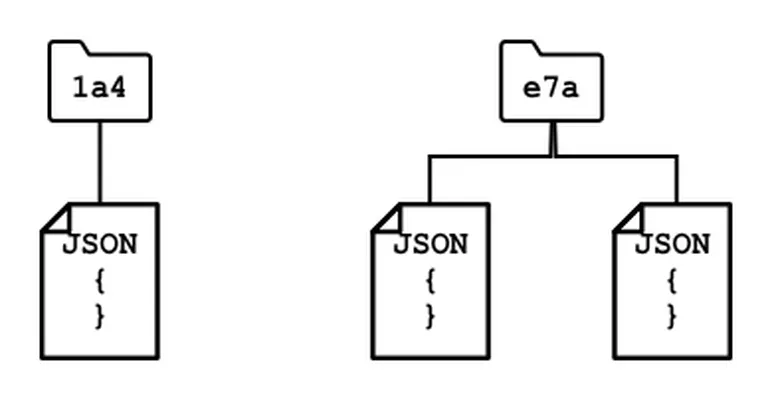
NoSQL数据库没有预先定义的模式来限制数据的存储方式,相反,你可以插入任何非结构化的数据,通常使用JSON文档。这些文档可以按文件夹组织,类似于计算机上的文件。每个文档可以与其他文档有不同的字段——例如,如果你正在存储来自农场车辆的IoT数据,有些可能有加速度计和速度数据字段,其他可能有拖车温度字段。如果你要添加新的卡车类型,比如安装了秤来跟踪所运货物重量的卡车,那么你的IoT设备可以添加这个新字段,并将其存储而不必对数据库进行任何更改。
一些知名的NoSQL数据库包括 Azure CosmosDB、MongoDB 和 CouchDB。
✅ 做一些研究:阅读这些NoSQL数据库及其功能。
在本课中,你将使用NoSQL存储来存储IoT数据。
将GPS数据发送到IoT Hub
在上一课中,你从连接到IoT设备的GPS传感器捕获了GPS数据。为了在云端存储这些IoT数据,你需要将数据发送到IoT服务。你将再次使用Azure IoT Hub,这是你在前一个项目中使用的相同IoT云服务。
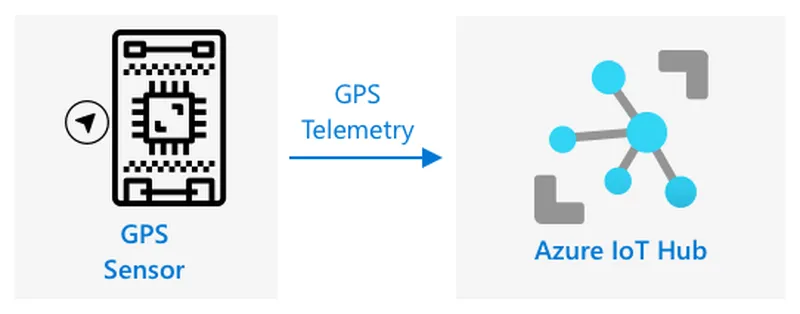
任务 - 将GPS数据发送到IoT Hub
-
创建一个新的IoT Hub,使用免费层级。
⚠️ 如果需要,可以参考 第2课第4节创建IoT服务的说明。
记得创建一个新的资源组。将新资源组命名为
gps-sensor,并将新IoT Hub命名为基于gps-sensor的唯一名称,例如gps-sensor-<your name>。如果你仍然有来自上一个项目的IoT Hub,你可以重复使用它。记得在创建其他服务时使用此IoT Hub的名称及其所在资源组。
-
向IoT Hub添加一个新设备。将此设备命名为
gps-sensor。获取该设备的连接字符串。 -
更新你的设备代码,使用上一步中的设备连接字符串将GPS数据发送到新的IoT Hub。
⚠️ 如果需要,可以参考 第2课第4节将设备连接到IoT服务的说明。
-
当你发送GPS数据时,请以如下格式作为JSON发送:
{ "gps" : { "lat" : <latitude>, "lon" : <longitude> } } -
每分钟发送一次GPS数据,以免用完每日消息配额。
如果你使用的是Wio终端,请记得添加所有必要的库,并使用NTP服务器设置时间。你的代码还需要确保在发送GPS位置之前读取串口中的所有数据,使用上一课中的现有代码。使用以下代码构造JSON文档:
DynamicJsonDocument doc(1024); doc["gps"]["lat"] = gps.location.lat(); doc["gps"]["lon"] = gps.location.lng();
如果你使用的是虚拟IoT设备,请记得使用虚拟环境安装所有所需的库。
对于Raspberry Pi和虚拟IoT设备,使用上一课中的现有代码获取纬度和经度值,然后使用以下代码以正确的JSON格式发送它们:
message_json = { "gps" : { "lat":lat, "lon":lon } } print("Sending telemetry", message_json) message = Message(json.dumps(message_json))
你可以在 code/wio-terminal、code/pi 或 code/virtual-device 文件夹中找到此代码。
运行你的设备代码,并使用 az iot hub monitor-events CLI command.
Hot, warm, and cold paths
Data that flows from an IoT device to the cloud is not always processed in real time. Some data needs real time processing, other data can be processed a short time later, and other data can be processed much later. The flow of data to different services that process the data at different times is referred to hot, warm and cold paths.
Hot path
The hot path refers to data that needs to be processed in real time or near real time. You would use hot path data for alerts, such as getting alerts that a vehicle is approaching a depot, or that the temperature in a refrigerated truck is too high.
To use hot path data, your code would respond to events as soon as they are received by your cloud services.
Warm path
The warm path refers to data that can be processed a short while after being received, for example for reporting or short term analytics. You would use warm path data for daily reports on vehicle mileage, using data gathered the previous day.
Warm path data is stored once it is received by the cloud service inside some kind of storage that can be quickly accessed.
Cold path
THe cold path refers to historic data, storing data for the long term to be processed whenever needed. For example, you could use the cold path to get annual mileage reports for vehicles, or run analytics on routes to find the most optimal route to reduce fuel costs.
Cold path data is stored in data warehouses - databases designed for storing large amounts of data that will never change and can be queried quickly and easily. You would normally have a regular job in your cloud application that would run at a regular time each day, week, or month to move data from warm path storage into the data warehouse.
✅ Think about the data you have captured so far in these lessons. Is it hot, warm or cold path data?
Handle GPS events using serverless code
Once data is flowing into your IoT Hub, you can write some serverless code to listen for events published to the Event-Hub compatible endpoint. This is the warm path - this data will be stored and used in the next lesson for reporting on the journey.
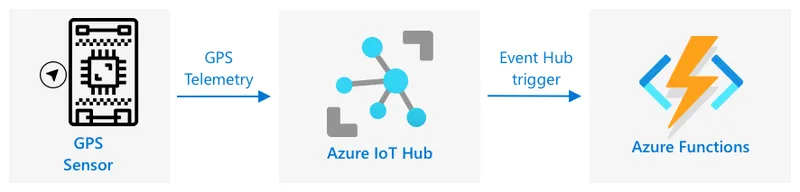
Task - handle GPS events using serverless code
-
Create an Azure Functions app using the Azure Functions CLI. Use the Python runtime, and create it in a folder called
gps-trigger, and use the same name for the Functions App project name. Make sure you create a virtual environment to use for this.⚠️ You can refer to the instructions for creating an Azure Functions Project from project 2, lesson 5 if needed.
-
Add an IoT Hub event trigger that uses the IoT Hub's Event Hub compatible endpoint.
⚠️ You can refer to the instructions for creating an IoT Hub event trigger from project 2, lesson 5 if needed.
-
Set the Event Hub compatible endpoint connection string in the
local.settings.jsonfile, and use the key for that entry in thefunction.json文件确保消息流入IoT Hub。 -
使用Azurite应用程序作为本地存储模拟器
-
运行你的函数应用,确保其正在接收来自GPS设备的事件。确保你的IoT设备也在运行并发送GPS数据。
Python EventHub trigger processed an event: {"gps": {"lat": 47.73481, "lon": -122.25701}}
Azure存储帐户
Azure存储帐户是一种通用存储服务,可以以多种方式存储数据。你可以将数据存储为块Blob、队列、表或文件,而且可以同时使用所有这些方式。
Blob存储
“Blob”这个词的意思是二进制大对象,但它已成为任何非结构化数据的术语。你可以将任何数据存储在Blob存储中,从包含IoT数据的JSON文档到图像和电影文件。Blob存储具有“容器”的概念,容器是你可以存储数据的命名桶,类似于关系数据库中的表。这些容器可以有一个或多个文件夹来存储Blob,每个文件夹可以包含其他文件夹,类似于计算机硬盘上的文件存储方式。
你将在本课中使用Blob存储来存储IoT数据。
✅ 做一些研究:阅读有关 Azure Blob存储 的资料。
表存储
表存储允许你存储半结构化数据。实际上,表存储是一种NoSQL数据库,因此不需要预先定义一组表,但它是设计用来将数据存储在一个或多个表中,每行都有唯一的键来定义。
✅ 做一些研究:阅读有关 Azure表存储 的资料。
队列存储
队列存储允许你将最多64KB的消息存储在队列中。你可以将消息添加到队列的末尾,并从队列的前端读取消息。队列将消息无限期地存储,只要还有存储空间,因此允许长期存储消息,然后在需要时读取。例如,如果你想要运行一个每月处理GPS数据的任务,你可以每天向队列添加一个月的数据,然后在月底一次性处理队列中的所有消息。
✅ 做一些研究:阅读有关 Azure队列存储 的资料。
文件存储
文件存储是在云端存储文件,并且任何应用程序或设备都可以使用行业标准协议进行连接。你可以将文件写入文件存储,然后将其挂载为PC或Mac上的驱动器。
✅ 做一些研究:阅读有关 Azure文件存储 的资料。
将你的无服务器代码连接到存储
现在你的函数应用需要连接到Blob存储以存储来自IoT Hub的消息。有两种方法可以做到这一点:
- 在函数代码内部,使用Blob存储Python SDK连接到Blob存储并将数据作为Blob写入
- 使用输出函数绑定将函数的返回值绑定到Blob存储,从而使Blob自动保存
在本课中,你将使用Python SDK来了解如何与Blob存储交互。

数据将被保存为以下格式的JSON Blob:
{ "device_id": <device_id>, "timestamp" : <time>, "gps" : { "lat" : <latitude>, "lon" : <longitude> } }
任务 - 将你的无服务器代码连接到存储
-
创建一个Azure存储帐户。将其命名为类似
gps<你的名字>的名称。⚠️ 如果需要,可以参考 第2课第5节创建云资源的说明。
如果你仍然有来自前一个项目的存储帐户,你可以重复使用它。
你将能够在本课稍后部署Azure函数应用时使用相同的存储帐户。
-
运行以下命令以获取存储帐户的连接字符串:
az storage account show-connection-string --output table \ --name <storage_name>替换
<storage_name>with the name of the storage account you created in the previous step. -
Add a new entry to the
local.settings.jsonfile for your storage account connection string, using the value from the previous step. Name itSTORAGE_CONNECTION_STRING -
Add the following to the
requirements.txt文件以安装Azure存储Pip包:azure-storage-blob在你的虚拟环境中安装此文件中的包。
如果遇到错误,则升级虚拟环境中的Pip版本到最新版本,使用以下命令,然后重试:
pip install --upgrade pip -
在
__init__.pyfile for theiot-hub-trigger中,添加以下导入语句:import json import os import uuid from azure.storage.blob import BlobServiceClient, PublicAccess在
main方法中,添加以下辅助函数:def get_or_create_container(name): connection_str = os.environ['STORAGE_CONNECTION_STRING'] blob_service_client = BlobServiceClient.from_connection_string(connection_str) for container in blob_service_client.list_containers(): if container.name == name: return blob_service_client.get_container_client(container.name) return blob_service_client.create_container(name, public_access=PublicAccess.Container)Python Blob SDK没有一个辅助方法来检查容器是否存在并创建它。此代码将从
local.settings.jsonfile (or the Application Settings once deployed to the cloud), then create aBlobServiceClientclass from this to interact with the blob storage account. It then loops through all the containers for the blob storage account, looking for one with the provided name - if it finds one it will return aContainerClientclass that can interact with the container to create blobs. If it doesn't find one, then the container is created and the client for the new container is returned.When the new container is created, public access is granted to query the blobs in the container. This will be used in the next lesson to visualize the GPS data on a map.
-
Unlike with soil moisture, with this code we want to store every event, so add the following code inside the
for event in events:loop in themainfunction, below thelogging语句加载连接字符串:device_id = event.iothub_metadata['connection-device-id'] blob_name = f'{device_id}/{str(uuid.uuid1())}.json'此代码从事件元数据中获取设备ID,然后使用它来创建Blob名称。Blob可以存储在文件夹中,设备ID将用于文件夹名称,因此每个设备的所有GPS事件都将存储在一个文件夹中。Blob名称是这个文件夹,后跟文档名称,使用正斜杠分隔,类似于Linux和macOS路径(类似于Windows,但Windows使用反斜杠)。文档名称是一个使用Python
uuidmodule, with the file type ofjson生成的独特ID。例如,对于设备ID为
gps-sensor的设备,Blob名称可能是gps-sensor/a9487ac2-b9cf-11eb-b5cd-1e00621e3648.json。 -
在这之后添加以下代码:
container_client = get_or_create_container('gps-data') blob = container_client.get_blob_client(blob_name)此代码使用
get_or_create_container辅助类获取容器客户端,然后使用Blob名称获取Blob客户端对象。这些Blob客户端可以引用现有的Blob,或者在这种情况下,引用新的Blob。 -
在这之后添加以下代码:
event_body = json.loads(event.get_body().decode('utf-8')) blob_body = { 'device_id' : device_id, 'timestamp' : event.iothub_metadata['enqueuedtime'], 'gps': event_body['gps'] }此代码构建将写入Blob存储的Blob主体。这是一个包含设备ID、发送到IoT Hub的时间戳和遥测数据中的GPS坐标的JSON文档。
使用消息入队时间而不是当前时间来获取消息发送的时间非常重要。如果Functions App未运行,消息可能在Hub上停留一段时间才被处理。
-
在这之后添加以下代码:
logging.info(f'Writing blob to {blob_name} - {blob_body}') blob.upload_blob(json.dumps(blob_body).encode('utf-8'))此代码记录即将写入Blob的信息,然后将Blob主体作为新Blob的内容上传。
-
运行函数应用。你会看到输出中记录所有GPS事件的Blob被写入:
[2021-05-21T01:31:14.325Z] Python EventHub trigger processed an event: {"gps": {"lat": 47.73092, "lon": -122.26206}} ... [2021-05-21T01:31:14.351Z] Writing blob to gps-sensor/4b6089fe-ba8d-11eb-bc7b-1e00621e3648.json - {'device_id': 'gps-sensor', 'timestamp': '2021-05-21T00:57:53.878Z', 'gps': {'lat': 47.73092, 'lon': -122.26206}}确保你没有在同一时间运行IoT Hub事件监视器。
你可以在 code/functions 文件夹中找到此代码。
任务 - 验证上传的Blob
-
要查看已创建的Blob,你可以使用 Azure Storage Explorer,这是一个免费工具,允许你查看和管理存储帐户,也可以从命令行进行。
-
若要使用命令行,首先你需要一个帐户密钥。运行以下命令以获取此密钥:
az storage account keys list --output table \ --account-name <storage_name>替换
<storage_name>with the name of the storage account.Copy the value of
key1。 -
运行以下命令以列出容器中的Blob:
az storage blob list --container-name gps-data \ --output table \ --account-name <storage_name> \ --account-key <key1>替换
<storage_name>with the name of the storage account, and<key1>with the value ofkey1你上一步复制的密钥。这将列出容器中的所有Blob:
Name Blob Type Blob Tier Length Content Type Last Modified Snapshot ---------------------------------------------------- ----------- ----------- -------- ------------------------ ------------------------- ---------- gps-sensor/1810d55e-b9cf-11eb-9f5b-1e00621e3648.json BlockBlob Hot 45 application/octet-stream 2021-05-21T00:54:27+00:00 gps-sensor/18293e46-b9cf-11eb-9f5b-1e00621e3648.json BlockBlob Hot 45 application/octet-stream 2021-05-21T00:54:28+00:00 gps-sensor/1844549c-b9cf-11eb-9f5b-1e00621e3648.json BlockBlob Hot 45 application/octet-stream 2021-05-21T00:54:28+00:00 gps-sensor/1894d714-b9cf-11eb-9f5b-1e00621e3648.json BlockBlob Hot 45 application/octet-stream 2021-05-21T00:54:28+00:00 -
使用以下命令下载一个Blob:
az storage blob download --container-name gps-data \ --account-name <storage_name> \ --account-key <key1> \ --name <blob_name> \ --file <file_name>替换
<storage_name>with the name of the storage account, and<key1>with the value ofkey1you copied in the earlier step.Replace
<blob_name>with the full name from theNamecolumn of the output of the last step, including the folder name. Replace<file_name>为要保存Blob到的本地文件名。
下载后,你可以在VS Code中打开JSON文件,可以看到包含GPS位置详情的Blob:
{"device_id": "gps-sensor", "timestamp": "2021-05-21T00:57:53.878Z", "gps": {"lat": 47.73092, "lon": -122.26206}} -
任务 - 将你的函数应用部署到云端
现在你的函数应用已经正常工作,你可以将其部署到云端。
-
创建一个新的Azure函数应用,使用你之前创建的存储帐户。将其命名为类似
gps-sensor-and add a unique identifier on the end, like some random words or your name.⚠️ You can refer to the instructions for creating a Functions app from project 2, lesson 5 if needed.
-
Upload the
IOT_HUB_CONNECTION_STRINGandSTORAGE_CONNECTION_STRING的名称。⚠️ 如果需要,可以参考 第2课第5节上传应用设置的说明。
-
将你的本地函数应用部署到云端。
⚠️ 如果需要,可以参考 第2课第5节部署你的函数应用的说明。
挑战
GPS数据并不是完全准确的,检测到的位置可能会偏离几米,尤其是在隧道和高层建筑区域。
思考一下卫星导航系统如何克服这个问题?你的卫星导航
- 了解结构化数据的相关信息,请参阅Wikipedia上的数据模型页面
- 了解半结构化数据的相关信息,请参阅Wikipedia上的半结构化数据页面
- 了解非结构化数据的相关信息,请参阅Wikipedia上的非结构化数据页面
- 在Azure存储文档中了解更多关于Azure存储及其不同存储类型的信息
作业
声明:
本文件灏天文库团队进行了翻译。尽管我们力求准确,但请注意,翻译可能包含错误或不准确之处。原文档以其原始语言为准。我们不对因使用此翻译而产生的任何误解或误译负责。