理解语言
文档摘要
理解语言 本课概览的草图笔记 草图笔记由 Nitya Narasimhan 制作。点击图片查看大图。 预习测验 预习测验 引言 在上一课中,你将语音转换成了文本。为了让这段代码能够用于编程一个智能计时器,你的代码需要理解所讲的内容。你可以假设用户会说出固定短语,例如“设置一个3分钟的计时器”,然后解析该表达式以获取计时器的时间。但这并不是非常用户友好的方法。如果用户说“为3分钟设置一个计时器”,你或我都能理解他们的意思,但代码则不会理解,因为它期望的是固定的短语。 这就是语言理解的用武之地,使用AI模型来解释文本并返回所需细节。例如,无论是“设置一个3分钟的计时器”还是“为3分钟设置一个计时器”,它都能理解需要设置一个3分钟的计时器。
理解语言

草图笔记由 Nitya Narasimhan 制作。点击图片查看大图。
预习测验
引言
在上一课中,你将语音转换成了文本。为了让这段代码能够用于编程一个智能计时器,你的代码需要理解所讲的内容。你可以假设用户会说出固定短语,例如“设置一个3分钟的计时器”,然后解析该表达式以获取计时器的时间。但这并不是非常用户友好的方法。如果用户说“为3分钟设置一个计时器”,你或我都能理解他们的意思,但代码则不会理解,因为它期望的是固定的短语。
这就是语言理解的用武之地,使用AI模型来解释文本并返回所需细节。例如,无论是“设置一个3分钟的计时器”还是“为3分钟设置一个计时器”,它都能理解需要设置一个3分钟的计时器。
在这节课中,你将学习语言理解模型,如何创建、训练和使用它们。
这节课我们将涵盖:
语言理解
人类已经使用语言交流了数十万年。我们通过词语、声音或动作进行交流,并理解所说的内容,不仅理解词语、声音或动作的意义,还理解其上下文。我们理解诚意和讽刺,使得相同的词语可以根据我们的语气表达不同的含义。
✅ 想想你最近的一些对话。有多少对话对于计算机来说由于需要上下文而难以理解?
语言理解,也称为自然语言理解,是人工智能领域的一部分,被称为自然语言处理(NLP),涉及阅读理解和尝试理解词语或句子的细节。如果你使用过Alexa或Siri这样的语音助手,你就使用过语言理解服务。这些是在幕后运行的AI服务,可以将“Alexa,播放Taylor Swift的最新专辑”转化为我的女儿在客厅里随着她最喜欢的歌曲跳舞。
尽管计算机有了很多进步,但它们在真正理解文本方面还有很长的路要走。当我们提到计算机的语言理解时,我们并不意味着任何接近人类交流水平的东西,而是指提取一些词语的关键细节。
作为人类,我们不假思索地理解语言。如果我让另一个人“播放Taylor Swift的最新专辑”,他们本能地就知道我的意思。对计算机而言,这是更困难的事情。它必须将词语从语音转换成文本,并找出以下信息:
- 需要播放音乐
- 音乐是由Taylor Swift创作的
- 特定的音乐是一整张按顺序排列的多首曲目的专辑
- Taylor Swift有许多专辑,因此需要按照时间顺序排序,最新的专辑是所需的那个
✅ 想想你在请求时说过的一些句子,比如点咖啡或让家庭成员递给你某样东西。试着将它们分解成计算机需要提取的信息。
语言理解模型是经过训练以从语言中提取特定细节的AI模型,并通过迁移学习进行特定任务的训练,就像你使用一小组图像训练自定义视觉模型一样。你可以使用一个模型,然后使用你想要它理解的文本对其进行训练。
创建语言理解模型

你可以使用LUIS(Microsoft提供的语言理解服务,属于认知服务)来创建语言理解模型。
任务 - 创建作者资源
要使用LUIS,你需要创建一个作者资源。
-
使用以下命令在你的
smart-timer资源组中创建一个作者资源:az cognitiveservices account create --name smart-timer-luis-authoring \ --resource-group smart-timer \ --kind LUIS.Authoring \ --sku F0 \ --yes \ --location <location>将
<location>替换为你创建资源组时使用的地理位置。⚠️ 并非所有区域都提供LUIS服务,因此如果遇到以下错误:
InvalidApiSetId: The account type 'LUIS.Authoring' is either invalid or unavailable in given region.请选择其他区域。
这将创建一个免费层级的LUIS作者资源。
任务 - 创建语言理解应用
-
在浏览器中打开LUIS门户,网址为 luis.ai,并使用你在Azure中使用的同一帐户登录。
-
按照对话框中的说明选择你的Azure订阅,然后选择刚刚创建的
smart-timer-luis-authoring资源。 -
在 对话应用 列表中,选择 新建应用 按钮来创建一个新的应用。将新应用命名为
smart-timer,并将 文化 设置为你使用的语言。在预测资源字段中有一个选项。你可以创建一个专门用于预测的第二个资源,但免费作者资源允许每月1,000次预测,这应该足够用于开发,所以你可以留空。
-
创建应用后,阅读出现的指南,了解训练语言理解模型所需的步骤。完成后关闭此指南。
意图和实体
语言理解基于 意图 和 实体。意图是词语的意图,例如播放音乐、设置计时器或点餐。实体是意图所指的对象,例如专辑、计时器的长度或食物类型。每个被模型解释的句子至少应有一个意图,可选地还可以有一个或多个实体。
一些示例:
| 句子 | 意图 | 实体 |
|---|---|---|
| “播放Taylor Swift的最新专辑” | 播放音乐 | Taylor Swift的最新专辑 |
| “设置一个3分钟的计时器” | 设置计时器 | 3分钟 |
| “取消我的计时器” | 取消计时器 | 无 |
| “订购3个大菠萝披萨和一份凯撒沙拉” | 订购食物 | 3个大菠萝披萨,凯撒沙拉 |
✅ 思考一下你之前想到的句子,它们的意图和实体是什么?
要训练LUIS,首先你需要设置实体。这些实体可以是一个固定列表的术语,也可以是从文本中学习到的。例如,你可以提供一个固定的食物菜单列表,包括每个词的不同变体(或同义词),如 egg plant 和 aubergine 作为 aubergine 的变体。LUIS还提供了一些内置实体,可以用来识别数字和位置。
对于设置计时器,你可以有一个实体使用内置的数字实体来识别时间,另一个实体用于单位,如分钟和秒。每个单位可以有多个变体以覆盖单数和复数形式,如分钟和分钟。
定义好实体后,你就可以创建意图了。这些意图是基于你提供的示例句子(称为语句)由模型学习得到的。例如,对于一个 设置计时器 意图,你可以提供以下句子:
设置一个1秒的计时器设置一个计时器为1分钟12秒设置一个计时器为3分钟设置一个9分30秒的计时器
You then tell LUIS what parts of these sentences map to the entities:
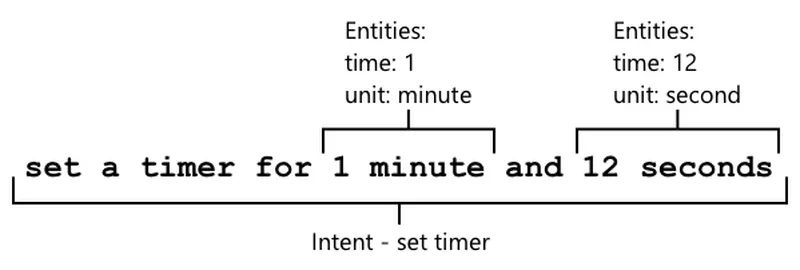
The sentence 设置一个计时器为1分钟12秒 has the intent of 设置计时器. It also has 2 entities with 2 values each:
| time | unit | |
|---|---|---|
| 1 minute | 1 | minute |
| 12 seconds | 12 | second |
To train a good model, you need a range of different example sentences to cover the many different ways someone might ask for the same thing.
As with any AI model, the more data and the more accurate the data you use to train, the better the model.
✅ Think about the different ways you might ask the same thing and expect a human to understand.
Task - add entities to the language understanding models
For the timer, you need to add 2 entities - one for the unit of time (minutes or seconds), and one for the number of minutes or seconds.
You can find instructions for using the LUIS portal in the Quickstart: Build your app in LUIS portal documentation on Microsoft docs.
-
From the LUIS portal, select the Entities tab and add the number prebuilt entity by selecting the Add prebuilt entity button, then selecting number from the list.
-
Create a new entity for the time unit using the Create button. Name the entity
时间单位and set the type to List. Add values for分钟and秒to the Normalized values list, adding the singular and plural forms to the synonyms list. Press返回after adding each synonym to add it to the list.Normalized value Synonyms minute minute, minutes second second, seconds
Task - add intents to the language understanding models
-
From the Intents tab, select the Create button to create a new intent. Name this intent
设置计时器. -
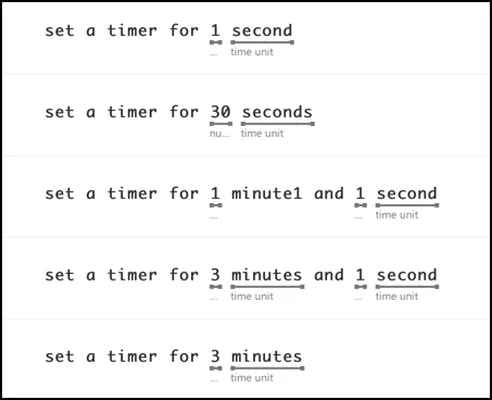
In the examples, enter different ways to set a timer using both minutes, seconds and minutes and seconds combined. Examples could be:
设置一个1秒的计时器设置一个4分钟的计时器设置一个四分六秒的计时器设置一个9分30秒的计时器设置一个计时器为1分钟12秒设置一个计时器为3分钟设置一个计时器为3分钟1秒设置一个计时器为三分钟1秒设置一个计时器为1分钟1秒设置一个计时器为30秒设置一个计时器为1秒
Mix up numbers as words and numerics so the model learns to handle both.
-
As you enter each example, LUIS will start detecting entities, and will underline and label any it finds.
Task - train and test the model
-
Once the entities and intents are configured, you can train the model using the Train button on the top menu. Select this button, and the model should train in a few seconds. The button will be greyed out whilst training, and be re-enabled once done.
-
Select the Test button from the top menu to test the language understanding model. Enter text such as
设置一个计时器为5分钟4秒and press return. The sentence will appear in a box under the text box that you typed it into, and blow that will be the top intent, or the intent that was detected with the highest probability. This should be设置计时器。意图名称后面会跟着检测到的意图的概率。 -
选择 检查 选项以查看结果的细分。你会看到得分最高的意图及其百分比概率,以及检测到的实体列表。
-
测试完后关闭 测试 面板。
任务 - 发布模型
要从代码中使用这个模型,你需要发布它。当你从LUIS发布时,你可以将其发布到测试环境或产品环境。在这个课程中,测试环境就足够了。
-
从LUIS门户中,选择顶部菜单中的 发布 按钮。
-
确保选择了 测试槽,然后选择 完成。发布完成后你会看到通知。
-
你可以使用curl来测试。为了构建curl命令,你需要三个值——端点、应用程序ID(App ID)和API密钥。这些可以从顶部菜单中选择的 管理 标签中访问。
-
从 设置 部分复制应用程序ID
-
从 Azure资源 部分,选择 作者资源,然后复制 主密钥 和 端点URL
-
-
在命令提示符或终端中运行以下curl命令:
curl "<endpoint url>/luis/prediction/v3.0/apps/<app id>/slots/staging/predict" \ --request GET \ --get \ --data "subscription-key=<primary key>" \ --data "verbose=false" \ --data "show-all-intents=true" \ --data-urlencode "query=<sentence>"将
<endpoint url>with the Endpoint URL from the Azure Resources section.Replace
<app id>with the App ID from the Settings section.Replace
<primary key>with the Primary Key from the Azure Resources section.Replace
<sentence>替换为你想要测试的句子。 -
此调用的输出将是一个JSON文档,详细描述查询、最高意图和按类型细分的实体列表。
{ "query": "set a timer for 45 minutes and 12 seconds", "prediction": { "topIntent": "set timer", "intents": { "set timer": { "score": 0.97031575 }, "None": { "score": 0.02205793 } }, "entities": { "number": [ 45, 12 ], "time-unit": [ [ "minute" ], [ "second" ] ] } } }上面的JSON来自使用
set a timer for 45 minutes and 12 seconds:- The
set timerwas the top intent with a probability of 97%. - Two number entities were detected,
45and12. - Two time-unit entities were detected,
minuteandsecond.
- The
Use the language understanding model
Once published, the LUIS model can be called from code. In previous lessons, you have used an IoT Hub to handle communication with cloud services, sending telemetry and listening for commands. This is very asynchronous - once telemetry is sent your code doesn't wait for a response, and if the cloud service is down, you wouldn't know.
For a smart timer, we want a response straight away, so we can tell the user that a timer is set, or alert them that the cloud services are unavailable. To do this, our IoT device will call a web endpoint directly, instead of relying on an IoT Hub.
Rather than calling LUIS from the IoT device, you can use serverless code with a different type of trigger - an HTTP trigger. This allows your function app to listen for REST requests, and respond to them. This function will be a REST endpoint your device can call.
Although you can call LUIS directly from your IoT device, it's better to use something like serverless code. This way when you want to change the LUIS app that you call, for example when you train a better model or train a model in a different language, you only have to update your cloud code, not re-deploy code to potentially thousands or millions of IoT device.
Task - create a serverless functions app
-
Create an Azure Functions app called
smart-timer-trigger, and open this in VS Code -
Add an HTTP trigger to this app called
speech-trigger查询的结果,使用以下命令从VS Code终端中执行:func new --name text-to-timer --template "HTTP trigger"这将创建一个HTTP触发器,名为
text-to-timer。 -
通过运行函数应用来测试HTTP触发器。当它运行时,你将在输出中看到端点列表:
Functions: text-to-timer: [GET,POST] http://localhost:7071/api/text-to-timer通过加载 http://localhost:7071/api/text-to-timer URL在浏览器中进行测试。
This HTTP triggered function executed successfully. Pass a name in the query string or in the request body for a personalized response.
任务 - 使用语言理解模型
-
LUIS的SDK可以通过Pip包获得。在
requirements.txt文件中添加以下行以添加对该包的依赖:azure-cognitiveservices-language-luis -
确保VS Code终端已激活虚拟环境,并运行以下命令以安装Pip包:
pip install -r requirements.txt如果收到错误,请可能需要升级pip,使用以下命令:
pip install --upgrade pip -
向
local.settings.json文件中添加Luis API密钥、端点URL和应用程序ID,这些信息可以在LUIS门户的 管理 标签中找到:"LUIS_KEY": "<primary key>", "LUIS_ENDPOINT_URL": "<endpoint url>", "LUIS_APP_ID": "<app id>"将
<endpoint url>with the Endpoint URL from the Azure Resources section of the MANAGE tab. This will behttps://<location>.api.cognitive.microsoft.com/.Replace
<app id>with the App ID from the Settings section of the MANAGE tab.Replace
<primary key>with the Primary Key from the Azure Resources section of the MANAGE tab. -
Add the following imports to the
__init__.py文件:import json import os from azure.cognitiveservices.language.luis.runtime import LUISRuntimeClient from msrest.authentication import CognitiveServicesCredentials这将导入一些系统库,以及与LUIS交互的库。
-
删除
main方法中的内容,并添加以下代码:luis_key = os.environ['LUIS_KEY'] endpoint_url = os.environ['LUIS_ENDPOINT_URL'] app_id = os.environ['LUIS_APP_ID'] credentials = CognitiveServicesCredentials(luis_key) client = LUISRuntimeClient(endpoint=endpoint_url, credentials=credentials)这将加载添加到
local.settings.jsonfile for your LUIS app, creates a credentials object with your API key, then creates a LUIS client object to interact with your LUIS app. -
This HTTP trigger will be called passing the text to understand as JSON, with the text in a property called
text. The following code extracts the value from the body of the HTTP request, and logs it to the console. Add this code to themain函数:req_body = req.get_json() text = req_body['text'] logging.info(f'Request - {text}') -
通过发送预测请求来请求预测,即包含要预测的文本的JSON文档。使用以下代码创建它:
prediction_request = { 'query' : text } -
然后可以使用该请求向LUIS发送请求,使用发布的应用程序的测试槽:
prediction_response = client.prediction.get_slot_prediction(app_id, 'Staging', prediction_request) -
预测响应包含最高意图——具有最高预测分数的意图,以及实体。如果最高意图是
set timer,那么可以从实体中读取所需的时间:if prediction_response.prediction.top_intent == 'set timer': numbers = prediction_response.prediction.entities['number'] time_units = prediction_response.prediction.entities['time unit'] total_seconds = 0numberentities wil be an array of numbers. For example, if you said "Set a four minute 17 second timer.", then thenumberarray will contain 2 integers - 4 and 17.The
time unitentities will be an array of arrays of strings, with each time unit as an array of strings inside the array. For example, if you said "Set a four minute 17 second timer.", then thetime unitarray will contain 2 arrays with single values each -['minute']and['second']。对于 "Set a four minute 17 second timer." 的JSON表示如下:
{ "number": [4, 17], "time unit": [ ["minute"], ["second"] ] }这段代码还定义了一个计数器来存储计时器的总时间(秒)。该计数器将由实体中的值填充。
-
实体没有链接,但我们可以做出一些假设。它们将按说话顺序排列,因此数组中的位置可用于确定哪个数字对应哪个时间单位。例如:
- "Set a 30 second timer" - 这将有一个数字,
30, and one time unit,secondso the single number will match the single time unit. - "Set a 2 minute and 30 second timer" - this will have two numbers,
2and30, and two time units,minuteandsecondso the first number will be for the first time unit (2 minutes), and the second number for the second time unit (30 seconds).
The following code gets the count of items in the number entities, and uses that to extract the first item from each array, then the second and so on. Add this inside the
if块。for i in range(0, len(numbers)): number = numbers[i] time_unit = time_units[i][0]对于 "Set a four minute 17 second timer.",这将循环两次,给出以下值:
循环次数 numbertime_unit0 4 minute 1 17 second - "Set a 30 second timer" - 这将有一个数字,
-
在这个循环中,使用数字和时间单位计算计时器的总时间,每分钟增加60秒,以及秒的数量。
if time_unit == 'minute': total_seconds += number * 60 else: total_seconds += number -
在这些实体的循环之外,记录计时器的总时间:
logging.info(f'Timer required for {total_seconds} seconds') -
需要将秒数作为HTTP响应从函数返回。在
if块的末尾添加以下内容:payload = { 'seconds': total_seconds } return func.HttpResponse(json.dumps(payload), status_code=200)这段代码创建一个包含计时器总秒数的负载,将其转换为JSON字符串,并以200状态码返回HTTP结果,这意味着调用成功。
-
最后,在
if块之外,处理未识别意图的情况,返回错误代码:return func.HttpResponse(status_code=404)404是 未找到 的状态码。
-
运行函数应用并使用curl进行测试。
curl --request POST 'http://localhost:7071/api/text-to-timer' \ --header 'Content-Type: application/json' \ --include \ --data '{"text":"<text>"}'将
<text>with the text of your request, for exampleset a 2 minutes 27 second timer替换为你想要测试的句子。你将看到函数应用的以下输出:
Functions: text-to-timer: [GET,POST] http://localhost:7071/api/text-to-timer For detailed output, run func with --verbose flag. [2021-06-26T19:45:14.502Z] Worker process started and initialized. [2021-06-26T19:45:19.338Z] Host lock lease acquired by instance ID '000000000000000000000000951CAE4E'. [2021-06-26T19:45:52.059Z] Executing 'Functions.text-to-timer' (Reason='This function was programmatically called via the host APIs.', Id=f68bfb90-30e4-47a5-99da-126b66218e81) [2021-06-26T19:45:53.577Z] Timer required for 147 seconds [2021-06-26T19:45:53.746Z] Executed 'Functions.text-to-timer' (Succeeded, Id=f68bfb90-30e4-47a5-99da-126b66218e81, Duration=1750ms)curl调用将返回以下内容:
HTTP/1.1 200 OK Date: Tue, 29 Jun 2021 01:14:11 GMT Content-Type: text/plain; charset=utf-8 Server: Kestrel Transfer-Encoding: chunked {"seconds": 147}计时器的秒数位于
"seconds"value.
You can find this code in the code/functions folder.
Task - make your function available to your IoT device
-
For your IoT device to call your REST endpoint, it will need to know the URL. When you accessed it earlier, you used
localhost, which is a shortcut to access REST endpoints on your local machine. To allow you IoT device to get access, you need to either publish to the cloud, or get your IP address to access it locally.⚠️ If you are using a Wio Terminal, it is easier to run the function app locally, as there will be a dependency on libraries that mean you cannot deploy the function app in the same way as you have done before. Run the function app locally and access it via your computers IP address. If you do want to deploy to the cloud, information will be provided in a later lesson on the way to do this.
- Publish the Functions app - follow the instructions in earlier lessons to publish your functions app to the cloud. Once published, the URL will be
https://<APP_NAME>.azurewebsites.net/api/text-to-timer, where<APP_NAME>将是你函数应用的名称。确保发布本地设置。
当使用HTTP触发器时,默认情况下它们通过函数应用密钥进行保护。要获取此密钥,请运行以下命令:
az functionapp keys list --resource-group smart-timer \ --name <APP_NAME>复制
defaultentry from thefunctionKeys部分的值。{ "functionKeys": { "default": "sQO1LQaeK9N1qYD6SXeb/TctCmwQEkToLJU6Dw8TthNeUH8VA45hlA==" }, "masterKey": "RSKOAIlyvvQEQt9dfpabJT018scaLpQu9p1poHIMCxx5LYrIQZyQ/g==", "systemKeys": {} }此密钥需要作为查询参数添加到URL中,因此最终的URL将是
https://<APP_NAME>.azurewebsites.net/api/text-to-timer?code=<FUNCTION_KEY>, where<APP_NAME>will be the name of your functions app, and<FUNCTION_KEY>will be your default function key.You can change the type of authorization of the HTTP trigger using
authlevelsetting in thefunction.jsonfile. You can read more about this in the configuration section of the Azure Functions HTTP trigger documentation on Microsoft docs.-
Run the functions app locally, and access using the IP address - you can get the IP address of your computer on your local network, and use that to build the URL.
Find your IP address:
- On Windows 10, follow the find your IP address guide
- On macOS, follow the how to find you IP address on a Mac guide
- On linux, follow the section on finding your private IP address in the how to find your IP address in Linux guide
Once you have your IP address, you will able to access the function at
http://<IP_ADDRESS>:7071/api/text-to-timer, where<IP_ADDRESS>will be your IP address, for examplehttp://192.168.1.10:7071/api/text-to-timer.Not that this uses port 7071, so after the IP address you will need to have
:7071。
这仅在你的物联网设备在同一网络上时才有效。
- Publish the Functions app - follow the instructions in earlier lessons to publish your functions app to the cloud. Once published, the URL will be
-
使用curl访问端点进行测试。
挑战
有很多方式可以要求同样的事情,例如设置一个计时器。想想不同的方法,并在你的LUIS应用中使用它们作为示例。测试这些,看看你的模型能应对多种请求计时器的方式。
课后测验
复习与自学
- 阅读更多关于LUIS及其功能的资料,请参阅 Microsoft Docs上的语言理解(LUIS)文档页面
- 阅读更多关于自然语言理解的资料,请参阅 Wikipedia上的自然语言理解页面
- 阅读更多关于HTTP触发器的资料,请参阅 Microsoft Docs上的Azure Functions HTTP触发器文档
作业
声明:
本文件灏天文库团队进行了翻译。尽管我们力求准确,但请注意,翻译可能包含错误或不准确之处。原文档以其原始语言为准。我们不对因使用此翻译而产生的任何误解或误译负责。