3.2 UIWindow 与 UIView 层级
3.2 UIWindow 与 UIView 层级
本节摘要:视图树是这本日记的核心隐喻,本节见到它的物理实体:UIWindow 是土壤表面,rootViewController 的视图是主干,addSubview 每调用一次就多一个子节点。讲清 superview 与 subviews 的父子关系、frame 与 bounds 两套坐标系、removeFromSuperview 与 hidden 的区别,并写一个"视图树听诊器"——递归打印整棵树,第 6 章排错全靠它做影像检查。
视图树的物理结构
上一节立了图纸,这一节挖开土看根。你在屏幕上看到的一切——标签、按钮、图片、列表——都是 UIView 或它的子类的实例,它们不是平铺在屏幕上,而是按父子关系挂成一棵树:
- 整棵树的树根是 UIWindow(每个 App 至少一个),它代表"这块屏幕归我";
- 窗口的根视图来自 rootViewController 的 view,通常称为根视图;
- 任何视图调用 addSubview,就把另一个视图挂成自己的孩子;孩子的 superview 指回父亲。
三个属性把这棵树串起来:superview(父节点)、subviews(子节点数组,按加入顺序排列,后加的在最上层绘制)、window(所在窗口,视图挂上树后非 nil)。界面上"谁盖住谁"由兄弟顺序决定,subviews 数组里排后面的绘制在上层。
图 3-2 阳台花园详情页的视图树实物图
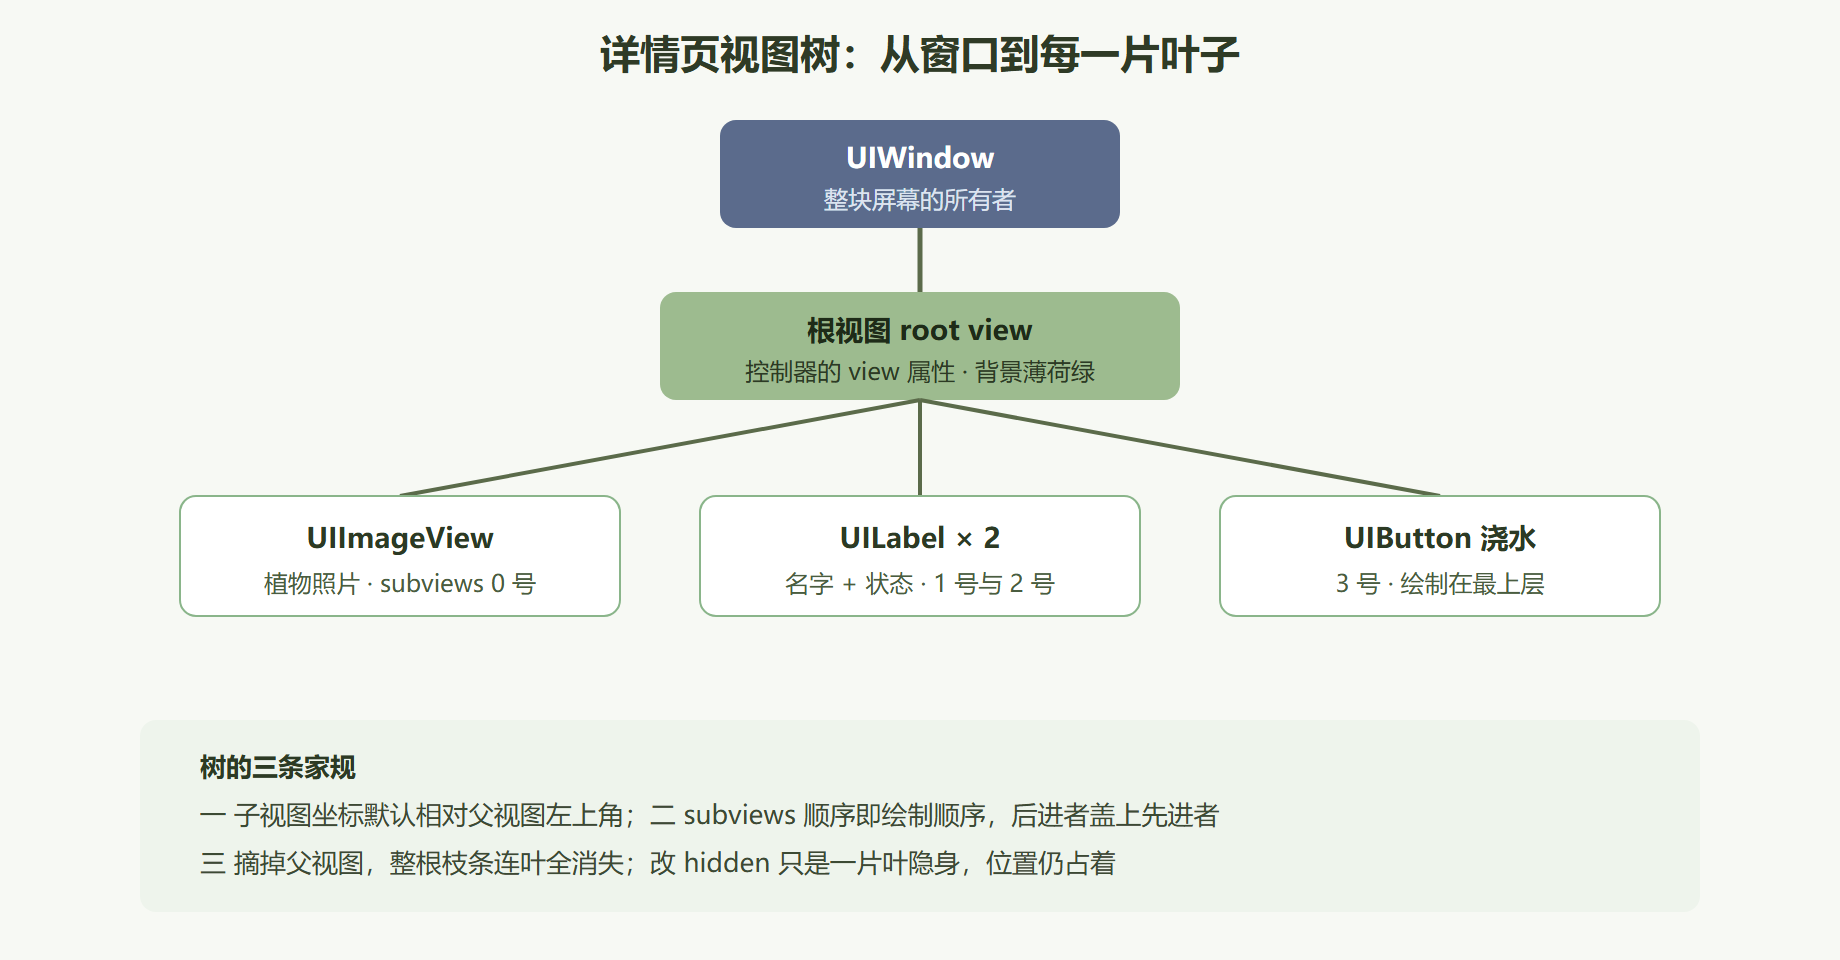
亲手种一棵,再听诊它
光看图不算数,动手种一棵并写代码验证。下面用纯代码搭出上图的结构,再递归打印整棵树——这个打印函数我称它"视图树听诊器",是第 6 章排错的第一件随身工具:
final class DetailViewController: UIViewController { override func viewDidLoad() { super.viewDidLoad() view.backgroundColor = .systemMint let photo = UIImageView() // 照片视图 photo.backgroundColor = .systemGray5 photo.translatesAutoresizingMaskIntoConstraints = false view.addSubview(photo) // 挂上树:成为根视图的 0 号孩子 let nameLabel = UILabel() nameLabel.text = "龟背竹" nameLabel.font = .boldSystemFont(ofSize: 24) nameLabel.translatesAutoresizingMaskIntoConstraints = false view.addSubview(nameLabel) // 1 号孩子 let waterButton = UIButton(type: .system) waterButton.setTitle("浇水", for: .normal) waterButton.translatesAutoresizingMaskIntoConstraints = false view.addSubview(waterButton) // 2 号孩子(绘制在最上) NSLayoutConstraint.activate([ photo.topAnchor.constraint(equalTo: view.safeAreaLayoutGuide.topAnchor, constant: 16), photo.centerXAnchor.constraint(equalTo: view.centerXAnchor), photo.widthAnchor.constraint(equalToConstant: 180), photo.heightAnchor.constraint(equalToConstant: 120), nameLabel.topAnchor.constraint(equalTo: photo.bottomAnchor, constant: 12), nameLabel.centerXAnchor.constraint(equalTo: view.centerXAnchor), waterButton.topAnchor.constraint(equalTo: nameLabel.bottomAnchor, constant: 16), waterButton.centerXAnchor.constraint(equalTo: view.centerXAnchor), ]) dumpTree(view, depth: 0) // 听诊器上场 } } extension UIViewController { func dumpTree(_ v: UIView, depth: Int) { // 递归打印整棵视图树 let indent = String(repeating: " ", count: depth) print("\(indent)├ \(type(of: v)) frame=\(v.frame)") for sub in v.subviews { dumpTree(sub, depth: depth + 1) } } } // 运行后控制台输出(节选): // ├ UIView frame=(0.0, 0.0, 393.0, 852.0) // ├ UIImageView frame=(106.5, 71.0, 180.0, 120.0) // ├ UILabel frame=(174.5, 203.0, 44.5, 29.0) // ├ UIButton frame=(181.0, 248.0, 31.0, 34.0)
输出即体检报告:每个节点的类型与 frame 一目了然。界面上"东西没显示出来"时,第一动作就是 dump 一棵树——frame 是零、或者根本不在树里,答案八成立现。
frame 与 bounds:两套坐标系
树有了,坐标系就有两套,这是新手第一困惑点:frame 是"我在父亲坐标系里的位置与大小";bounds 是"我自己的坐标系,原点几乎永远是零"。bounds 的 x、y 不为零只发生在滚动视图里——滚动=平移自己的坐标系原点。
let photo = UIImageView(frame: CGRect(x: 106, y: 71, width: 180, height: 120)) print(photo.frame) // (106.0, 71.0, 180.0, 120.0) 在父亲眼里我在哪 print(photo.bounds) // (0.0, 0.0, 180.0, 120.0) 我自己眼里世界从我开始 // 平移变换改 frame,不改 bounds——同一个视图、两种描述的差异 photo.transform = CGAffineTransform(translationX: 40, y: 0) print(photo.frame) // (146.0, 71.0, 180.0, 120.0) 父亲看到它挪了 print(photo.bounds) // (0.0, 0.0, 180.0, 120.0) 自己毫无感觉
记忆口诀:问位置用 frame(对父亲负责),做滚动用 bounds(平移自己)。第 4 章讲表格滚动时,bounds.origin 就是你滚了多远的账本。
案例:一次"按钮点了没反应"的树诊
背景:新手反馈详情页的浇水按钮点了没反应,代码检查 addTarget 没问题。操作:dump 视图树。
// dumpTree 输出(事故现场): // ├ UIView // ├ UIImageView // ├── UIImageView frame=(0.0, 0.0, 393.0, 852.0) ← 全屏照片压在最上层! // ├ UILabel // ├ UIButton
结果:事故版输出里照片视图的约束写错,铺满了全屏且排在按钮之后加入——按钮被照片整个盖住,触摸全被照片截走。解读:视图树是分层的物理世界,"看得见"不等于"点得着",盖在上面的兄弟会把触摸吃掉;hidden 掉照片(photo.isHidden = true)按钮立刻复活,这一步就是确诊实验。变式:调试期临时给每层视图加半透明背景色,遮挡关系肉眼可见;正式方案是修正照片的约束尺寸——那正是下一节 Auto Layout 的主题。
本节要点回顾
- 树的骨架:UIWindow → rootViewController 的根视图 → addSubview 长出层层子节点;
- 三个属性:superview 指父、subviews 有序且序即层级、window 挂上树才非 nil;
- frame 对父亲负责,bounds 属于自己,滚动靠平移 bounds 原点;
- 视图树听诊器:递归 dump 类型与 frame,是界面排错的第一件随身工具;
- 遮挡吃触摸:看得见的控件可能被上层兄弟盖住而点不到。
树有了骨架,还差生长节律——下一节看 UIViewController 的一生。