4.2 UICollectionView:自由的花冠
4.2 UICollectionView:自由的花冠
本节摘要:表格是单列叶序,集合视图是多维花冠——网格、瀑布、轮播、环形都是它。关键升级在布局对象被抽成独立类:UICollectionViewLayout 负责回答"每个格子在哪个矩形",默认的 Flow 布局用行距、间距、滚动方向三组参数排网格,自定义布局则把排布权彻底交还给你。本节实现收藏页的植物卡片网格,再写一个扇形自定义布局打开天花板。
网格需求:把卡片排成花冠
上一节的表格把列表排成单列,"收藏"页想更有花园气息:两列卡片,左图右文,滚动流畅。集合视图与表格共享同一套问答协议(数据源答行数与格子内容、委托管点击与尺寸),差别全在布局——表格的布局焊死在里面,集合视图把布局做成可替换的独立对象:
final class FavoriteViewController: UIViewController { private var favorites: [Plant] = PlantStore.shared.favorites() private var collectionView: UICollectionView! override func viewDidLoad() { super.viewDidLoad() title = "收藏" // —— 布局对象先行:流水布局,网格的参数就这三组 —— let flow = UICollectionViewFlowLayout() flow.itemSize = CGSize(width: 168, height: 120) // 尺寸:先定死,后面讲自适应 flow.minimumInteritemSpacing = 12 // 横向:格子之间最小间距 flow.minimumLineSpacing = 16 // 纵向:行与行最小间距 flow.sectionInset = UIEdgeInsets(top: 16, left: 16, bottom: 16, right: 16) flow.scrollDirection = .vertical // 方向:纵向滚动(改 .horizontal 即成轮播) collectionView = UICollectionView(frame: .zero, collectionViewLayout: flow) collectionView.backgroundColor = .systemGroupedBackground collectionView.translatesAutoresizingMaskIntoConstraints = false view.addSubview(collectionView) NSLayoutConstraint.activate([ collectionView.topAnchor.constraint(equalTo: view.safeAreaLayoutGuide.topAnchor), collectionView.bottomAnchor.constraint(equalTo: view.bottomAnchor), collectionView.leadingAnchor.constraint(equalTo: view.leadingAnchor), collectionView.trailingAnchor.constraint(equalTo: view.trailingAnchor), ]) collectionView.register(CardCell.self, forCellWithReuseIdentifier: "card") collectionView.dataSource = self collectionView.delegate = self } }
问答协议的问法几乎照搬表格——API 名里 row 换成了 item:
extension FavoriteViewController: UICollectionViewDataSource { func collectionView(_ cv: UICollectionView, numberOfItemsInSection section: Int) -> Int { favorites.count // 问一:多少格子 } func collectionView(_ cv: UICollectionView, cellForItemAt indexPath: IndexPath) -> UICollectionViewCell { let cell = cv.dequeueReusableCell(withReuseIdentifier: "card", for: indexPath) if let card = cell as? CardCell { // 注册的是自定义卡片,向下转型 card.configure(with: favorites[indexPath.item]) } return cell // 复用机制与表格同源 } } extension FavoriteViewController: UICollectionViewDelegate { func collectionView(_ cv: UICollectionView, didSelectItemAt indexPath: IndexPath) { print("点了收藏卡:\(favorites[indexPath.item].name)") // 输出示例:点了收藏卡:龟背竹 } }
自定义卡片单元是集合视图的日常——系统单元格太素,花园要的是图加两行字:
final class CardCell: UICollectionViewCell { private let imageView = UIImageView() private let titleLabel = UILabel() private let subtitleLabel = UILabel() override init(frame: CGRect) { super.init(frame: frame) contentView.backgroundColor = .white contentView.layer.cornerRadius = 12 contentView.layer.shadowOpacity = 0.1 // 卡片轻阴影,层次感 contentView.layer.shadowOffset = CGSize(width: 0, height: 2) [imageView, titleLabel, subtitleLabel].forEach { $0.translatesAutoresizingMaskIntoConstraints = false contentView.addSubview($0) // 挂 contentView,别挂 cell 本身 } titleLabel.font = .boldSystemFont(ofSize: 15) subtitleLabel.font = .systemFont(ofSize: 12) subtitleLabel.textColor = .secondaryLabel NSLayoutConstraint.activate([ imageView.topAnchor.constraint(equalTo: contentView.topAnchor, constant: 12), imageView.centerXAnchor.constraint(equalTo: contentView.centerXAnchor), imageView.widthAnchor.constraint(equalToConstant: 56), imageView.heightAnchor.constraint(equalToConstant: 56), titleLabel.topAnchor.constraint(equalTo: imageView.bottomAnchor, constant: 8), titleLabel.centerXAnchor.constraint(equalTo: contentView.centerXAnchor), subtitleLabel.topAnchor.constraint(equalTo: titleLabel.bottomAnchor, constant: 2), subtitleLabel.centerXAnchor.constraint(equalTo: contentView.centerXAnchor), ]) } required init?(coder: NSCoder) { fatalError("纯代码") } func configure(with plant: Plant) { // 复用纪律:每次借出必须整体重填 titleLabel.text = plant.name subtitleLabel.text = plant.kind.rawValue imageView.backgroundColor = plant.shouldWater ? .systemRed : .systemGreen } }
图 4-2 Flow 布局的网格数学与自适应行宽
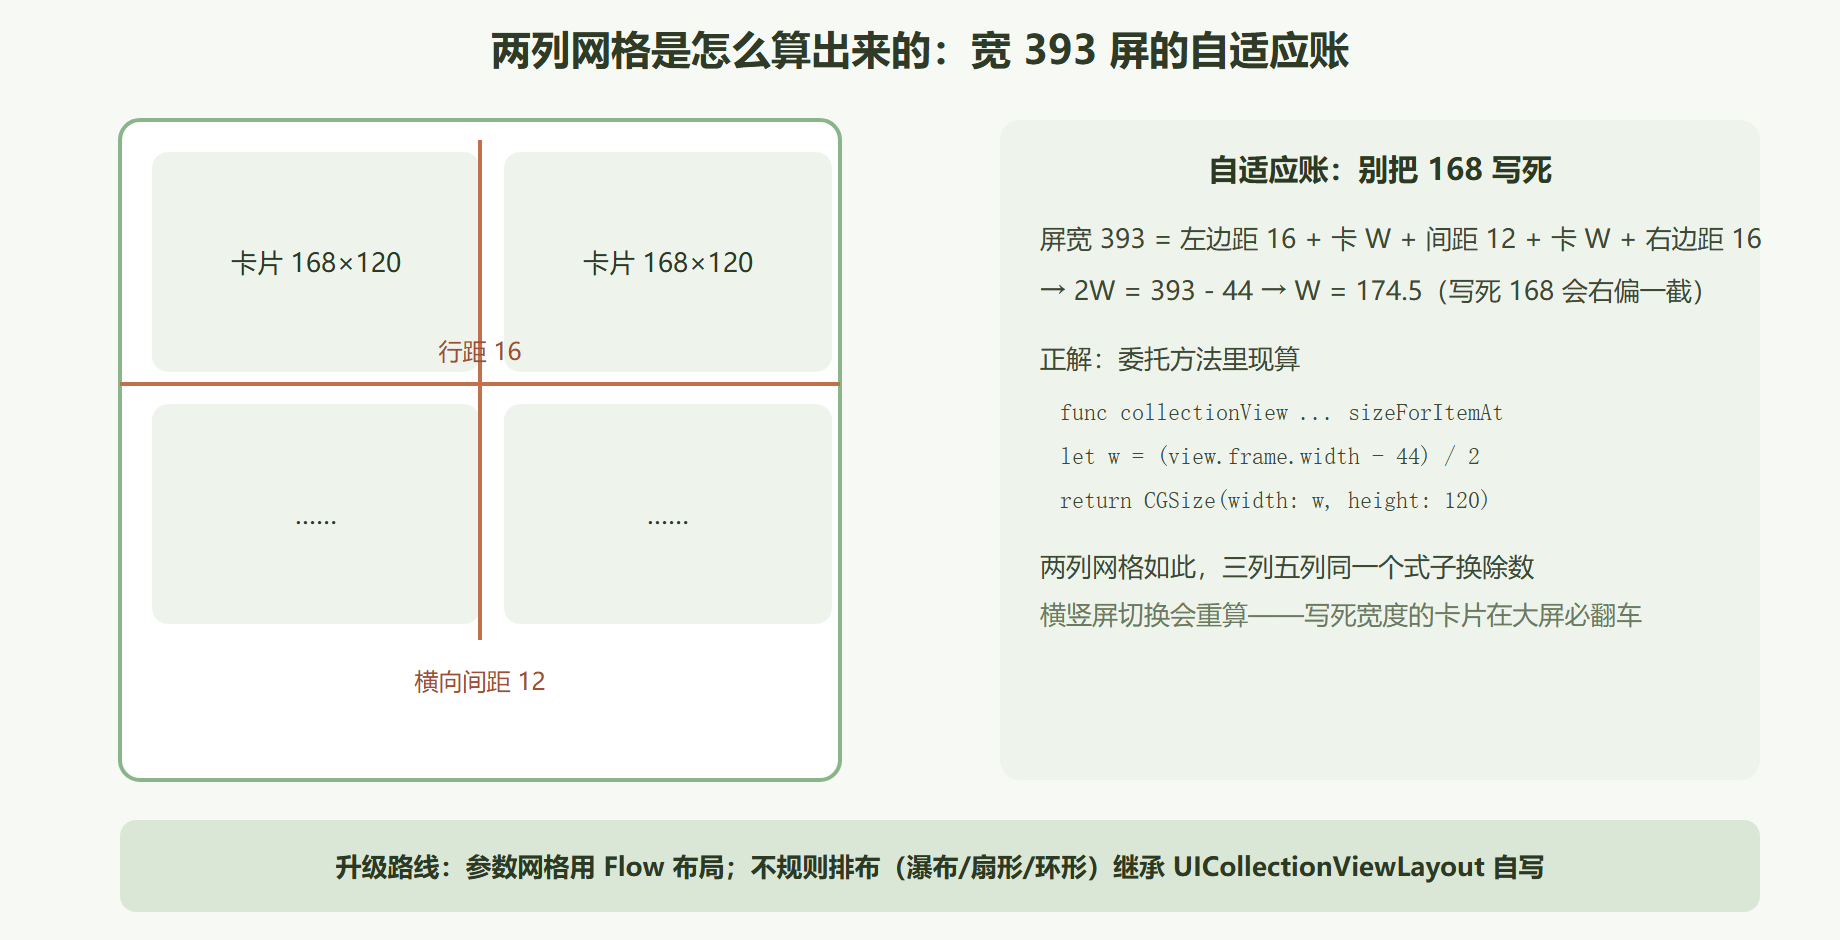
自适应尺寸与自定义布局的天花板
Flow 布局只做"参数化网格",排布自由度到头了。瀑布流(每列独立滚高)、扇形陈列这类需求要走自定义布局——继承布局类,回答"布局准备"与"每个格子的矩形"两问:
class FanLayout: UICollectionViewLayout { private var attributes: [UICollectionViewLayoutAttributes] = [] // 问一:布局准备——整个布局的几何在此一次性算好 override func prepare() { super.prepare() guard let cv = collectionView else { return } attributes.removeAll() let count = cv.numberOfItems(inSection: 0) let center = CGPoint(x: cv.bounds.width / 2, y: cv.bounds.height + 40) for i in 0..<count { // 扇形:角度均分,半径固定 let angle = -Double(i) * 0.35 - 1.9 // 从左下起扇开 let radius = cv.bounds.height * 0.72 let x = center.x + CGFloat(cos(angle)) * radius let y = center.y + CGFloat(sin(angle)) * radius let attr = UICollectionViewLayoutAttributes(forCellWith: IndexPath(item: i, section: 0)) attr.size = CGSize(width: 72, height: 96) attr.center = CGPoint(x: x, y: y) attr.transform = CGAffineTransform(rotationAngle: CGFloat(angle) + .pi / 2) // 卡片随角度躺倒 attributes.append(attr) } } // 问二:内容总尺寸(决定可滚动范围) override var collectionViewContentSize: CGSize { collectionView.map { CGSize(width: $0.bounds.width, height: $0.bounds.height) } ?? .zero } // 问三:某个格子的矩形(滚动中系统来查) override func layoutAttributesForElements(in rect: CGRect) -> [UICollectionViewLayoutAttributes]? { attributes.filter { $0.frame.intersects(rect) } // 只交出与可见区相交的 } override func layoutAttributesForItem(at indexPath: IndexPath) -> UICollectionViewLayoutAttributes? { attributes[indexPath.item] } } // 使用:把布局对象换掉即可,数据源委托一行不改 collectionView.setCollectionViewLayout(FanLayout(), animated: true)
布局对象与数据彻底解耦——换布局不换数据源,这正是布局被抽成独立类的回报。
案例:收藏页从两列到自适应的完整过程
背景:两列卡片在 iPhone 上正好,接到 iPad 上右侧空出大片。操作:把定死尺寸改成委托现算。结果:sizeForItemAt 按 view.frame.width 现算列宽,iPhone 两列、iPad 自动变宽卡;旋转设备同样成立。解读:布局参数的"真值来源"永远应该是容器尺寸而非具体机型数字;这是 3.5 约束思想在集合视图上的翻版——描述关系(占宽减边距除列数),不写坐标。变式:想按内容高度排瀑布流,在 prepare 里给每列维护一个"当前最低点"数组,新格子塞进最低列,列号存进字典供问三查询——思路与本节扇形一致:prepare 算全局,问三查局部。
⚠️ 常见坑:自定义单元忘了注册,或注册的标识符与出队不一致,运行即崩且栈信息很难读。注册与出队这对字符串务必收进常量,复制粘贴是崩点搬运工。
本节要点回顾
- 集合视图 = 表格的问答协议 + 可替换布局对象,item 替换 row;
- Flow 布局三组参数:尺寸、两类间距、滚动方向,横向滚动即轮播;
- 卡片尺寸按容器现算(屏宽减边距除列数),写死数字必翻车;
- 自定义布局三问:prepare 备全局、contentSize 定范围、attributesForElements 交可见区;
- 换布局不换数据源,几何与数据解耦是集合视图设计的最大红利。
看得见的排布自由了,摸得着的手势还没有——下一节给界面装触觉。