19.云中的数据科学:使用“AzureMLSDK”的方法
文档摘要
云中的数据科学:使用“Azure ML SDK”的方法 速写由 (@sketchthedocs) 创作 :---: 云中的数据科学:Azure ML SDK - 速写由 @nitya 创作 目录: 云中的数据科学:使用“Azure ML SDK”的方法 课前测验 引言 1.1 什么是Azure ML SDK? 1.2 心力衰竭预测项目和数据集介绍 使用Azure ML SDK训练模型 2.1 创建Azure ML工作区 2.2 创建计算实例 2.3 加载数据集 2.4 创建笔记本 2.5 训练模型 2.5.1 设置工作区、实验、计算集群和数据集 2.5.2 自动机器学习配置与训练 使用Azure ML SDK部署模型及端点消费 3.1 保存最佳模型 3.2 模型部署 3.
云中的数据科学:使用“Azure ML SDK”的方法
 |
|---|
| 云中的数据科学:Azure ML SDK - _速写由 @nitya 创作 _ |
目录:
课前测验
1. 引言
1.1 什么是Azure ML SDK?
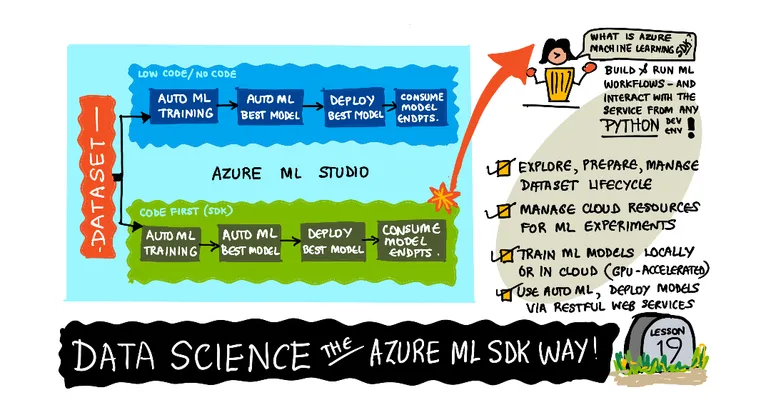
数据科学家和AI开发者使用Azure Machine Learning SDK来构建和运行机器学习工作流。你可以在任何Python环境中与服务进行交互,包括Jupyter笔记本、Visual Studio Code或你最喜欢的Python集成开发环境。
SDK的关键领域包括:
- 探索、准备和管理用于机器学习实验的数据集的生命周期。
- 管理用于监控、日志记录和组织机器学习实验的云资源。
- 在本地或使用云资源(包括GPU加速的模型训练)上训练模型。
- 使用自动化机器学习,接受配置参数和训练数据。它会自动遍历算法和超参数设置以找到最佳模型进行预测。
- 部署Web服务,将训练好的模型转换为RESTful服务,可以在任何应用程序中使用。
了解更多关于Azure Machine Learning SDK的信息
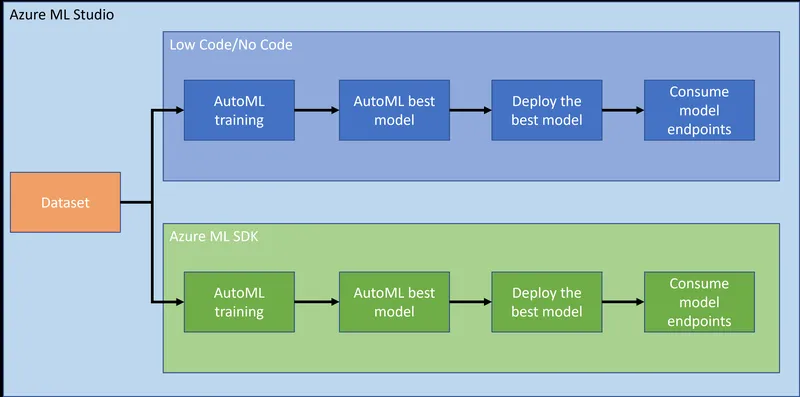
在上一课中,我们看到了如何以低代码/无代码的方式训练、部署和使用模型。我们使用了心力衰竭数据集来生成和预测心力衰竭的模型。在这节课中,我们将使用Azure Machine Learning SDK来做同样的事情。
1.2 心力衰竭预测项目和数据集介绍
请参阅这里了解心力衰竭预测项目和数据集的介绍。
2. 使用Azure ML SDK训练模型
2.1 创建Azure ML工作区
为了简单起见,我们将在一个Jupyter笔记本中工作。这意味着你已经有了一个工作区和一个计算实例。如果你已经有一个工作区,可以直接跳到2.3节“笔记本创建”。
如果没有,请按照上一课中的2.1 创建Azure ML工作区部分的说明创建一个工作区。
2.2 创建计算实例
在我们之前创建的Azure ML工作区中,转到计算菜单,你会看到不同的计算资源。
翻译后的文本保留了原文的结构,并且尽量使译文自然流畅。注意保留了所有的非翻译内容,如注释、实体名称、URL和路径等。
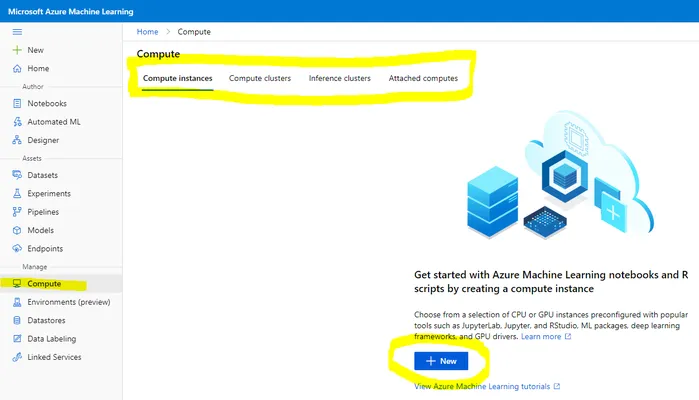 让我们创建一个计算实例来配置一个Jupyter笔记本。 1. 点击“+ 新建”按钮。 2. 给你的计算实例起个名字。 3. 选择你的选项:CPU或GPU,VM大小和核心数量。 4. 点击“创建”按钮。 恭喜,你刚刚创建了一个计算实例!我们将使用这个计算实例来创建笔记本。参见“创建笔记本”部分(#23-创建笔记本)。 ### 2.3 加载数据集 如果你还没有上传数据集,请参阅上一课的**2.3 加载数据集**部分。 ### 2.4 创建笔记本 > **_注意:_** 对于下一步,你可以从头开始创建一个新的笔记本,或者你可以在Azure ML Studio中上传我们创建的笔记本[notebook.ipynb](notebook.ipynb)。要上传它,只需点击“笔记本”菜单并上传笔记本。 笔记本是数据科学过程中的重要组成部分。它们可以用于进行探索性数据分析(EDA),调用计算机集群训练模型,调用推理集群部署端点等。 要创建笔记本,我们需要一个提供Jupyter笔记本实例的计算节点。返回到[Azure ML工作区](https://ml.azure.com/),点击计算实例。在计算实例列表中,你应该能看到我们之前创建的计算实例。 1. 在应用程序部分,点击Jupyter选项。 2. 勾选“我理解”复选框,然后点击继续按钮。 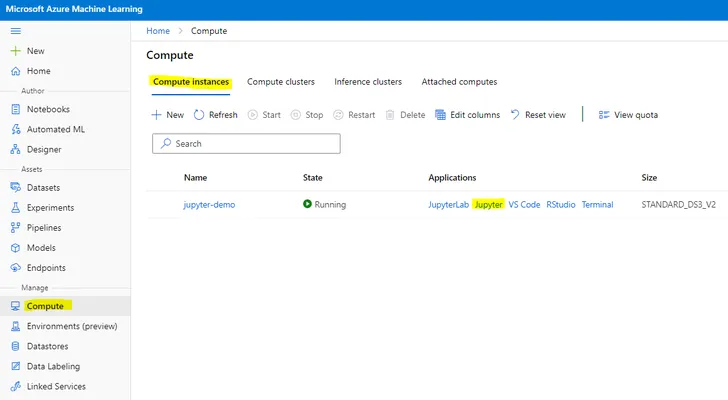 3. 这将打开一个新的浏览器标签页,显示你的Jupyter笔记本实例。点击“新建”按钮创建一个笔记本。 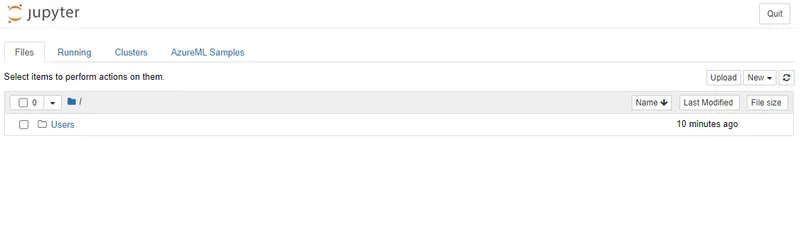 现在我们有了一个笔记本,我们可以开始使用Azure ML SDK训练模型了。 ### 2.5 训练模型 首先,如果有任何疑问,请参阅[Azure ML SDK文档](https://docs.microsoft.com/python/api/overview/azure/ml?WT.mc_id=academic-77958-bethanycheum&ocid=AID3041109)。该文档包含了本课程中要学习的所有模块的必要信息。 #### 2.5.1 设置工作区、实验、计算集群和数据集 你需要从配置文件加载``workspace``,使用以下代码: ```python from azureml.core import Workspace ws = Workspace.from_config()
这将返回一个类型为Workspace that represents the workspace. The you need to create an experiment的对象,使用以下代码:
from azureml.core import Experiment experiment_name = 'aml-experiment' experiment = Experiment(ws, experiment_name)
要从工作区获取或创建实验,请使用实验名称请求实验。实验名称必须为3-36个字符,以字母或数字开头,只能包含字母、数字、下划线和破折号。如果在工作区中找不到该实验,则会创建一个新的实验。
现在,你需要使用以下代码创建一个计算集群来进行训练。请注意,此步骤可能需要几分钟时间。
from azureml.core.compute import AmlCompute aml_name = "heart-f-cluster" try: aml_compute = AmlCompute(ws, aml_name) print('Found existing AML compute context.') except: print('Creating new AML compute context.') aml_config = AmlCompute.provisioning_configuration(vm_size = "Standard_D2_v2", min_nodes=1, max_nodes=3) aml_compute = AmlCompute.create(ws, name = aml_name, provisioning_configuration = aml_config) aml_compute.wait_for_completion(show_output = True) cts = ws.compute_targets compute_target = cts[aml_name]
你可以通过以下方式从工作区获取数据集:
dataset = ws.datasets['heart-failure-records'] df = dataset.to_pandas_dataframe() df.describe()
2.5.2 自动机器学习配置和训练
要设置自动机器学习配置,请使用AutoMLConfig类。
如文档所述,有许多参数可以调整。对于本项目,我们将使用以下参数:
experiment_timeout_minutes: The maximum amount of time (in minutes) that the experiment is allowed to run before it is automatically stopped and results are automatically made availablemax_concurrent_iterations: The maximum number of concurrent training iterations allowed for the experiment.primary_metric: The primary metric used to determine the experiment's status.compute_target: The Azure Machine Learning compute target to run the Automated Machine Learning experiment on.task: The type of task to run. Values can be 'classification', 'regression', or 'forecasting' depending on the type of automated ML problem to solve.training_data: The training data to be used within the experiment. It should contain both training features and a label column (optionally a sample weights column).label_column_name: The name of the label column.path: The full path to the Azure Machine Learning project folder.enable_early_stopping: Whether to enable early termination if the score is not improving in the short term.featurization: Indicator for whether featurization step should be done automatically or not, or whether customized featurization should be used.debug_log:用于写入调试信息的日志文件。
from azureml.train.automl import AutoMLConfig project_folder = './aml-project' automl_settings = { "experiment_timeout_minutes": 20, "max_concurrent_iterations": 3, "primary_metric" : 'AUC_weighted' } automl_config = AutoMLConfig(compute_target=compute_target, task = "classification", training_data=dataset, label_column_name="DEATH_EVENT", path = project_folder, enable_early_stopping= True, featurization= 'auto', debug_log = "automl_errors.log", **automl_settings )
现在你已经设置了配置,可以使用以下代码训练模型。根据集群大小,这一步可能需要长达一个小时的时间。
remote_run = experiment.submit(automl_config)
你可以运行RunDetails小部件来显示不同的实验。
from azureml.widgets import RunDetails RunDetails(remote_run).show()
3. 使用Azure ML SDK部署模型并消费端点
3.1 保存最佳模型
remote_run an object of type AutoMLRun. This object contains the method get_output() 返回最佳运行和相应的拟合模型。
best_run, fitted_model = remote_run.get_output()
你可以通过打印拟合模型查看最佳模型使用的参数,并使用get_properties()方法查看最佳模型的属性。
best_run.get_properties()
现在使用register_model方法注册模型。
model_name = best_run.properties['model_name'] script_file_name = 'inference/score.py' best_run.download_file('outputs/scoring_file_v_1_0_0.py', 'inference/score.py') description = "aml heart failure project sdk" model = best_run.register_model(model_name = model_name, model_path = './outputs/', description = description, tags = None)
3.2 模型部署
一旦最佳模型被保存,我们可以使用InferenceConfig类部署它。InferenceConfig代表用于部署的自定义环境配置设置。AciWebservice类表示一个机器学习模型在Azure容器实例上的Web服务端点部署。部署的服务由模型、脚本及相关文件组成。生成的Web服务是一个负载均衡的HTTP端点,具有REST API。你可以向这个API发送数据并接收模型返回的预测结果。
模型使用deploy方法部署。
from azureml.core.model import InferenceConfig, Model from azureml.core.webservice import AciWebservice inference_config = InferenceConfig(entry_script=script_file_name, environment=best_run.get_environment()) aciconfig = AciWebservice.deploy_configuration(cpu_cores = 1, memory_gb = 1, tags = {'type': "automl-heart-failure-prediction"}, description = 'Sample service for AutoML Heart Failure Prediction') aci_service_name = 'automl-hf-sdk' aci_service = Model.deploy(ws, aci_service_name, [model], inference_config, aciconfig) aci_service.wait_for_deployment(True) print(aci_service.state)
此步骤可能需要几分钟时间。
3.3 端点消费
你可以通过创建样本输入来使用端点:
data = { "data": [ { 'age': "60", 'anaemia': "false", 'creatinine_phosphokinase': "500", 'diabetes': "false", 'ejection_fraction': "38", 'high_blood_pressure': "false", 'platelets': "260000", 'serum_creatinine': "1.40", 'serum_sodium': "137", 'sex': "false", 'smoking': "false", 'time': "130", }, ], } test_sample = str.encode(json.dumps(data))
然后你可以将此输入发送给模型进行预测:
response = aci_service.run(input_data=test_sample) response
这应该输出'{"result": [false]}'. This means that the patient input we sent to the endpoint generated the prediction false which means this person is not likely to have a heart attack.
Congratulations! You just consumed the model deployed and trained on Azure ML with the Azure ML SDK!
NOTE: Once you are done with the project, don't forget to delete all the resources.
Challenge
There are many other things you can do through the SDK, unfortunately, we can not view them all in this lesson. But good news, learning how to skim through the SDK documentation can take you a long way on your own. Have a look at the Azure ML SDK documentation and find the Pipeline class that allows you to create pipelines. A Pipeline is a collection of steps which can be executed as a workflow.
HINT: Go to the SDK documentation and type keywords in the search bar like "Pipeline". You should have the azureml.pipeline.core.Pipeline类在搜索结果中。
课后测验
复习与自学
在这节课中,你学习了如何在云中使用Azure ML SDK训练、部署和消费模型来预测心脏病风险。请查阅Azure ML SDK文档以获取更多关于Azure ML SDK的信息。尝试使用Azure ML SDK创建自己的模型。
作业
**声明**: 本文件灏天文库团队进行了翻译。尽管我们力求准确,但请注意,翻译可能包含错误或不准确之处。原文档以其原始语言为准。我们不对因使用此翻译而产生的任何误解或误译负责。