25.2简单阴影
文档摘要
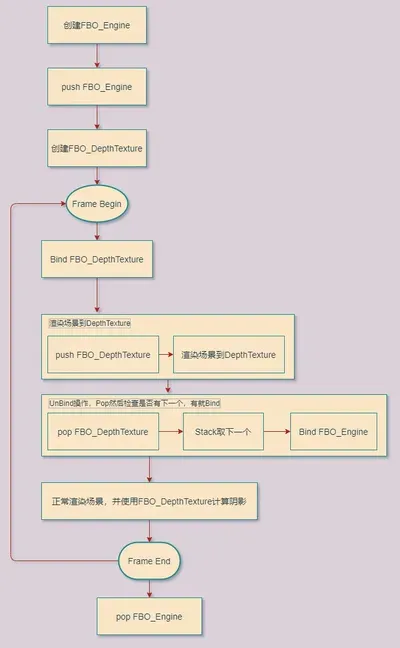
25.2 简单阴影 在OpenGL中获取DepthTexture很简单,只需要将场景渲染到FBO,并且设置DepthTarget为Texture。 但是实际想去使用它,却颇为困难。 还是先看下本小节实现的效果吧,Alt+鼠标左键旋转,可以看到飞机投影到后面的墙壁上。 FBO Stack 在上一节,将整个场景渲染到FBO,然后在ImGUI中显示出来DepthTexture,似乎很简单,这是只使用1个FBO的情况。 但这一节,我们使用Shadow Mapping,来实现阴影。 首先需要将场景渲染到FBO,得到DepthTexture,这个FBO先称之为FBODepthTexture。 然后再正常渲染一次场景到FBO,用于在Editor中显示,这个FBO称之为FBOEngine。
25.2 简单阴影
在OpenGL中获取DepthTexture很简单,只需要将场景渲染到FBO,并且设置DepthTarget为Texture。
但是实际想去使用它,却颇为困难。
还是先看下本小节实现的效果吧,Alt+鼠标左键旋转,可以看到飞机投影到后面的墙壁上。

1. FBO Stack
在上一节,将整个场景渲染到FBO,然后在ImGUI中显示出来DepthTexture,似乎很简单,这是只使用1个FBO的情况。
但这一节,我们使用Shadow Mapping,来实现阴影。
首先需要将场景渲染到FBO,得到DepthTexture,这个FBO先称之为FBO_DepthTexture。
然后再正常渲染一次场景到FBO,用于在Editor中显示,这个FBO称之为FBO_Engine。
那么如何去管理这多个FBO呢?
我们知道FBO其实是个虚拟的屏幕,当Bind一个FBO,后续所有的Draw结果都存储到了这个FBO里。
所以要按照先使用,先Bind的规则,依次对FBO进行Bind操作,然后再取消Bind。
先进先出,所以用Stack来存储。
两个FBO的使用规则如下图:
主要代码如下:
//file:source/render_device/render_target_stack.h /// 渲染目标栈 class RenderTargetStack { public: RenderTargetStack(); ~RenderTargetStack(); /// 压入渲染目标 /// \param frame_buffer_object_id 帧缓冲 void Push(GLuint frame_buffer_object_id); /// 弹出渲染目标 void Pop(); /// 检查是否为空 /// \return 是否为空 bool Empty(); /// 获取栈顶渲染目标 /// \return 栈顶渲染目标 GLuint Top(); private: std::stack<GLuint> fbo_stack_;// 帧缓冲栈 };
压入FBO_Engine
//file:source/render_device/render_task_consumer_editor.cpp line:77 void RenderTaskConsumerEditor::InitGraphicsLibraryFramework() { ...... //压入渲染目标栈 render_target_stack_.Push(frame_buffer_object_id); }
Bind并压入FBO_DepthTexture
//file:source/render_device/render_task_consumer_base.cpp line:459 /// 绑定使用FBO任务 void RenderTaskConsumerBase::BindFBO(RenderTaskBase* task_base){ RenderTaskBindFBO* task=dynamic_cast<RenderTaskBindFBO*>(task_base); GLuint frame_buffer_object_id = GPUResourceMapper::GetFBO(task->fbo_handle_); glBindFramebuffer(GL_FRAMEBUFFER, frame_buffer_object_id);__CHECK_GL_ERROR__ //检测帧缓冲区完整性,如果完整的话就开始进行绘制 GLenum status = glCheckFramebufferStatus(GL_FRAMEBUFFER);__CHECK_GL_ERROR__ if (status != GL_FRAMEBUFFER_COMPLETE) { DEBUG_LOG_ERROR("BindFBO FBO Error,Status:{} !",status); return; } //压入渲染目标栈 render_target_stack_.Push(frame_buffer_object_id); }
UnBind操作,Pop然后检查是否有下一个,有就Bind
//file:source/render_device/render_task_consumer_base.cpp line:476 /// 取消使用FBO任务 void RenderTaskConsumerBase::UnBindFBO(RenderTaskBase* task_base){ RenderTaskBindFBO* task=dynamic_cast<RenderTaskBindFBO*>(task_base); //弹出渲染目标栈 render_target_stack_.Pop(); //检查是否还有渲染目标 if(render_target_stack_.Empty()){ //如果没有渲染目标了,就使用默认的渲染目标 glBindFramebuffer(GL_FRAMEBUFFER, GL_NONE);__CHECK_GL_ERROR__ }else{ //如果还有渲染目标,就使用栈顶的渲染目标 GLuint frame_buffer_object_id = render_target_stack_.Top(); glBindFramebuffer(GL_FRAMEBUFFER, frame_buffer_object_id);__CHECK_GL_ERROR__ //检测帧缓冲区完整性 GLenum status = glCheckFramebufferStatus(GL_FRAMEBUFFER);__CHECK_GL_ERROR__ if (status != GL_FRAMEBUFFER_COMPLETE) { DEBUG_LOG_ERROR("UnBindFBO,BindFBO FBO Error,Status:{} !",status); return; } } }
2. 实现阴影
光线从光源发出后,被离光源近的物体遮挡,后面的物体受不到光,就显示为阴影。
我们在光源的位置放一个Camera,就叫它DepthCamera,对场景进行渲染,得到DepthTexture。
DepthTexture是一个二维数组,里面记录着离Camera最近的片段的距离。
当换成普通相机,进行普通渲染时,将当前渲染的片段与DepthCamera距离,与DepthTexture中记录的距离比较。
如果小,说明当前片段没有处在阴影中。
那么需要对现有的Shader做一些改变。
顶点Shader:
//file:data/shader/unlit_receive_shadow.vert #version 330 core uniform mat4 u_model; uniform mat4 u_view; uniform mat4 u_projection; uniform mat4 u_shadow_camera_view; uniform mat4 u_shadow_camera_projection; layout(location = 0) in vec3 a_pos; layout(location = 1) in vec4 a_color; layout(location = 2) in vec2 a_uv; out vec4 v_color; out vec2 v_uv; out vec4 v_shadow_camera_gl_Position; void main() { gl_Position = u_projection * u_view * u_model * vec4(a_pos, 1.0); v_color = a_color; v_uv = a_uv; v_shadow_camera_gl_Position=u_shadow_camera_projection * u_shadow_camera_view * u_model * vec4(a_pos, 1.0); }
因为要将当前渲染片段和DepthTexture中记录的距离进行比较,而DepthTexture是DepthCamera拍下来的,所以需要获取当前片段在DepthCamera空间下的位置 v_shadow_camera_gl_Position。
片段Shader:
//file:data/shader/unlit_receive_shadow.frag #version 330 core uniform sampler2D u_depth_texture; uniform sampler2D u_diffuse_texture; in vec4 v_color; in vec2 v_uv; in vec4 v_shadow_camera_gl_Position; layout(location = 0) out vec4 o_fragColor; float ShadowCalculation(vec4 shadow_camera_gl_Position) { //首先,将传入参数中的x,y,z三个分量除以第四个分量w,得到投影坐标proj_coords。 vec3 proj_coords = shadow_camera_gl_Position.xyz / shadow_camera_gl_Position.w; //将投影坐标映射到范围[0,1] proj_coords = proj_coords * 0.5 + 0.5; //从深度图纹理(u_depth_texture)中提取最近的深度closest_depth,这个深度代表着从光源位置到当前像素的最短距离。 float closest_depth = texture(u_depth_texture, proj_coords.xy).r; //获取当前像素的深度current_depth,即当前像素与光源之间的距离 float current_depth = proj_coords.z; //如果这个距离大于最近距离closest_depth,则说明当前像素在阴影之中,返回1.0,否则返回0.0,代表没有阴影。 float shadow = current_depth > closest_depth ? 1.0 : 0.0; return shadow; } void main() { float shadow = ShadowCalculation(v_shadow_camera_gl_Position); o_fragColor = texture(u_diffuse_texture,v_uv) * v_color * (1-shadow); }
创建DepthCamera的代码如下:
--file:example/login_scene.lua line:77 --- 创建深度相机 function LoginScene:CreateDepthCamera() --创建相机1 GameObject self.go_depth_camera_= GameObject.new("depth_camera") --挂上 Transform 组件 self.go_depth_camera_:AddComponent(Transform):set_position(glm.vec3(0, 0, 10)) self.go_depth_camera_:GetComponent(Transform):set_rotation(glm.vec3(0, 0, 0)) --挂上 Camera 组件 self.depth_camera_=self.go_depth_camera_:AddComponent(Camera) --设置为黑色背景 self.depth_camera_:set_clear_color(0,0,0,1) self.depth_camera_:set_depth(0) self.depth_camera_:SetView(glm.vec3(0.0,0.0,0.0), glm.vec3(0.0,1.0,0.0)) self.depth_camera_:SetPerspective(60, Screen.aspect_ratio(), 1, 1000) --设置RenderTexture self.depth_render_texture_ = RenderTexture.new() self.depth_render_texture_:Init(480,320) self.depth_camera_:set_target_render_texture(self.depth_render_texture_) end
然后需要给顶点Shader传入DepthCamera的投影、视图矩阵。
--file:example/login_scene.lua line:192 function LoginScene:Update() ...... --设置ShadowCamera的参数 self.material_wall_:SetUniformMatrix4f("u_shadow_camera_view",self.depth_camera_:view_mat4()) self.material_wall_:SetUniformMatrix4f("u_shadow_camera_projection",self.depth_camera_:projection_mat4()) ...... end
3. 测试
运行后效果如下图

Alt+鼠标左键旋转,可以看到飞机投影到后面的墙壁上。
4. 阴影失真
上面使用了最简单的方式来实现阴影,太过简陋以至于有很多问题。
最明显的就是旋转相机后,后面的墙壁就出现了各种黑线、甚至黑块,一般称这种情况为阴影失真(Shadow Acne)。
这是因为DepthCamera在渲染的时候并没有将墙壁排除在外,DepthTexture中也包含了墙壁的深度。
这就成了自己和自己比较。
解决方法就是添加一个 阴影偏移(shadow bias)。
//file:data/shader/unlit_receive_shadow.frag ...... float ShadowCalculation(vec4 shadow_camera_gl_Position) { ...... //使用偏移 float bias = 0.005; //如果这个距离大于最近距离closest_depth,则说明当前像素在阴影之中,返回1.0,否则返回0.0,代表没有阴影。 float shadow = current_depth - bias > closest_depth ? 1.0 : 0.0; return shadow; } ......
最终效果: