附录-环境配置
文档摘要
comments: true title: 环境配置 miniconda3 安装 Anaconda/Miniconda 下载 Miniconda 各大操作系统最新版本的 Minconda 都可以在下方网址进行下载: Miniconda — Anaconda documentation{.md-button} 注意:选择下载的 Miniconda3 版本需要和电脑处理器的架构吻合。为了方便,在此下方直接提供各大操作系统推荐的下载链接。 系统 | 下载地址 Windows | macOS(Intel) | macOS(M/ARM) | Linux(x64) | Linux(ARM) | 安装 Miniconda 下面我们分别介绍在 Windows 系统和 Linux 系统下的安装流程。
comments: true title: 环境配置

安装 Anaconda/Miniconda
下载 Miniconda
各大操作系统最新版本的 Minconda 都可以在下方网址进行下载:
Miniconda — Anaconda documentation{.md-button}
注意:选择下载的 Miniconda3 版本需要和电脑处理器的架构吻合。为了方便,在此下方直接提供各大操作系统推荐的下载链接。
安装 Miniconda
下面我们分别介绍在 Windows 系统和 Linux 系统下的安装流程。
Windows 系统安装 Miniconda
-
运行下载好的安装包
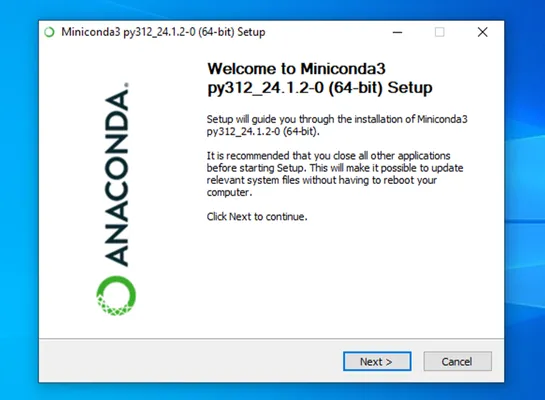 { width="600" }
 -
一路next和agree,直到选择路径,可以根据自己偏好选择路径,这里选择默认。
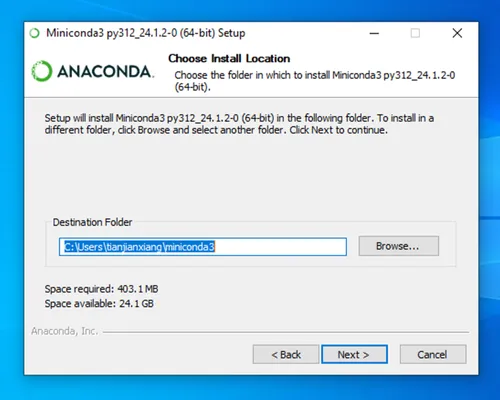 { width="600" }
- 保持默认配置即可,下一步。
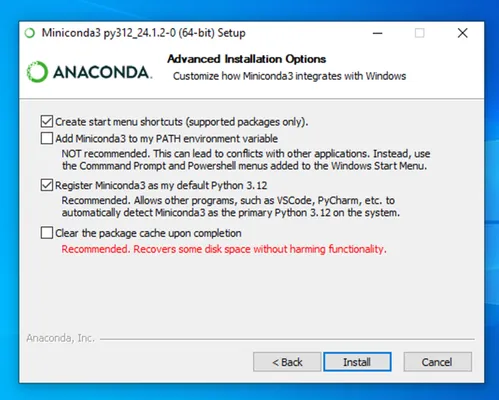 { width="600" }
- 完成,以后使用
conda从开始菜单点开即可。
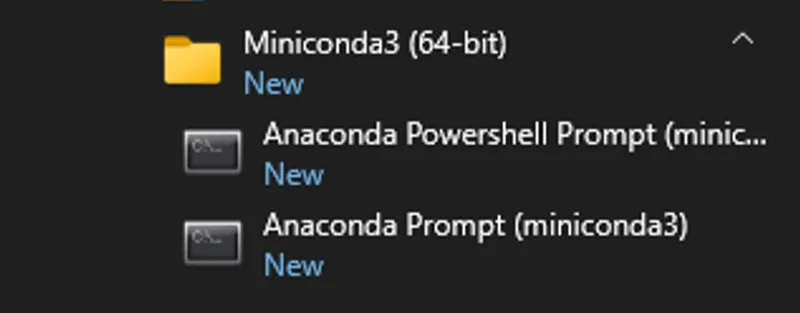 { width="600" }
Linux 系统安装 Miniconda
下载好的安装文件放在 Downloads 文件中
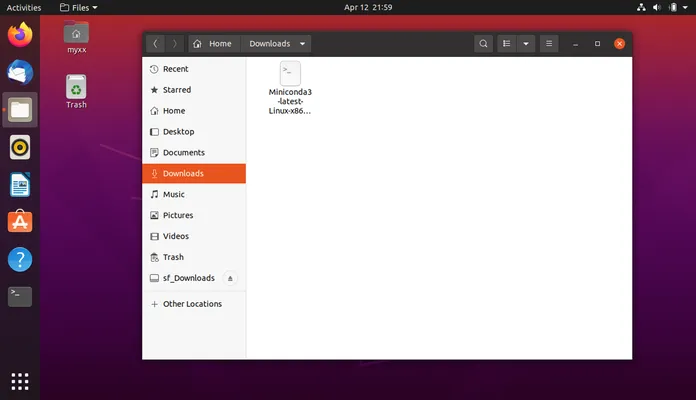 { width="600" }
在Miniconda3所在文件夹下打开终端
- 为文件添加执行权限(文件名称要和自己下载的版本一致)命令是:
chmod a+x ./Miniconda3-latest-Linux-x86_64.sh
 { width="600" }
- 运行安装程序命令,命令是
sh ./Miniconda3-latest-Linux-x86_64.sh,然后根据提示回车。
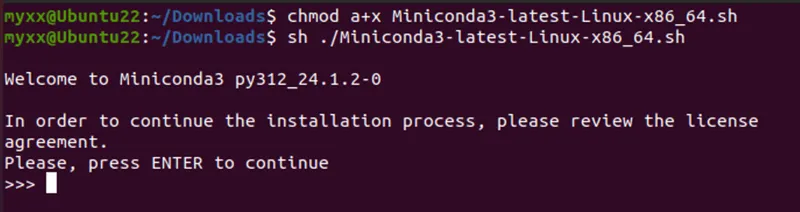 { width="600" }
- 这里会让阅读相关协议,直接按
q结束阅读,输入yes,然后回车。
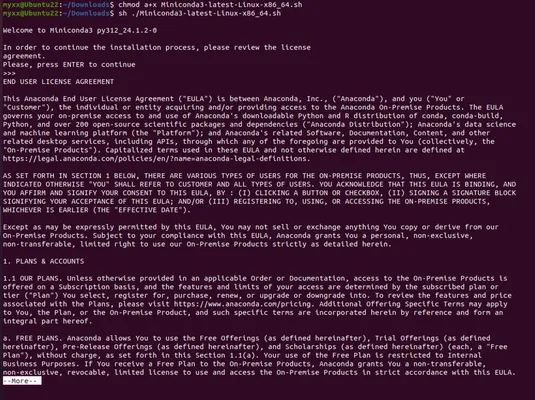 { width="600" }
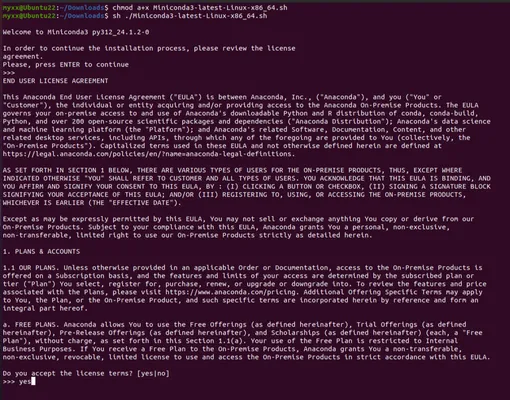 { width="600" }
- Press ENTER to confirm the location - Press CTRL-C to abort the installation - Or specify a different location below
- 在这里程序提示以下信息,这里有三种选择,分别是:
- 回车使用默认路径
\home\user\miniconda3 - 使用
ctrl c终止程序 - 用户自定义路径
- 回车使用默认路径
用户可以根据自己的需要选择安装目录。
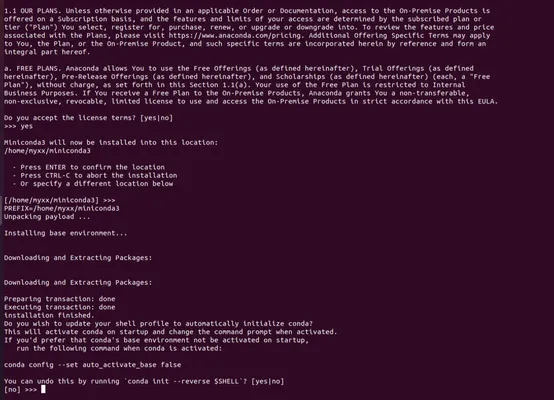 { width="600" }
- 程序经过安装后会询问是否每次启动终端是否自动启动
conda。输入yes然后回车。
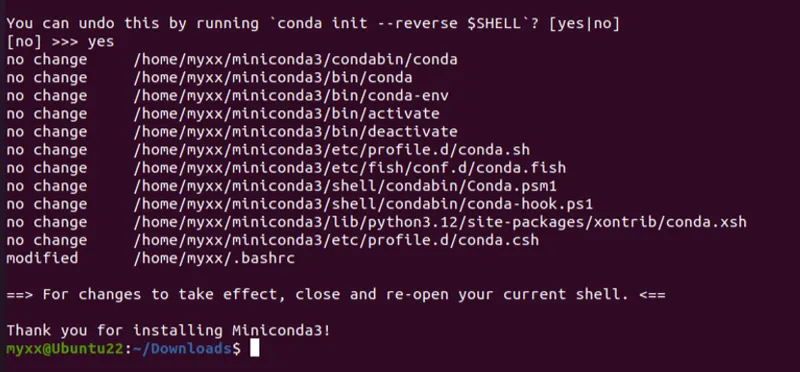 { width="600" }
- 根据提示重启终端,再次打开就会出现
(base)。以后就在终端操作conda。
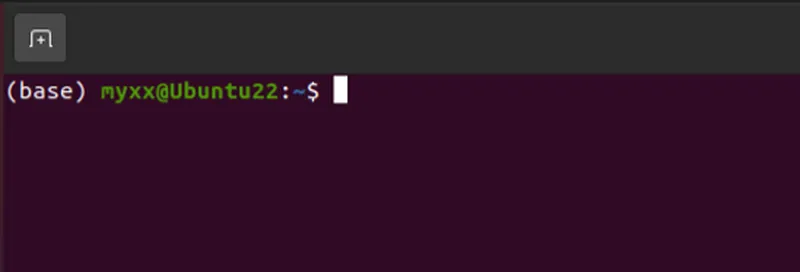 { width="600" }
换源
在安装package时,我们经常会使用pip install package_name和conda install package_name的命令,但是一些package下载速度会很慢,因此我们需要进行换源,换成国内源,加快我们的下载速度。以下便是两种对应方式的换源。
如果我们仅仅想为单次下载换源可以使用pip install package_name -i https://pypi.tuna.tsinghua.edu.cn/simple进行下载。
Windows 系统换源
pip换源
- 文件管理器文件路径地址栏敲:
%APPDATA%回车,快速进入C:\Users\User\AppData\Roaming文件夹。
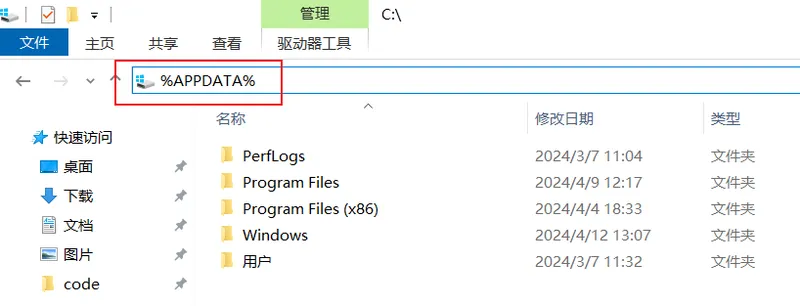 { width="600" }
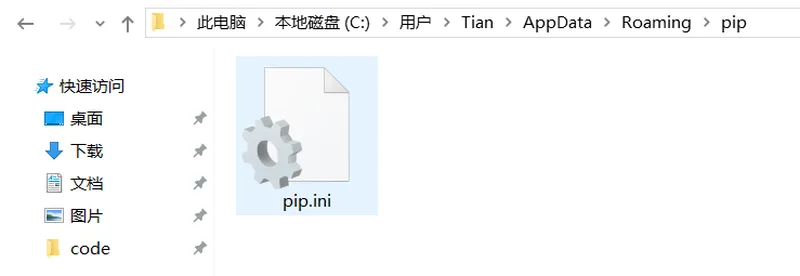
- 新建 pip 文件夹并在文件夹中新建
pip.ini配置文件。
 { width="600" }
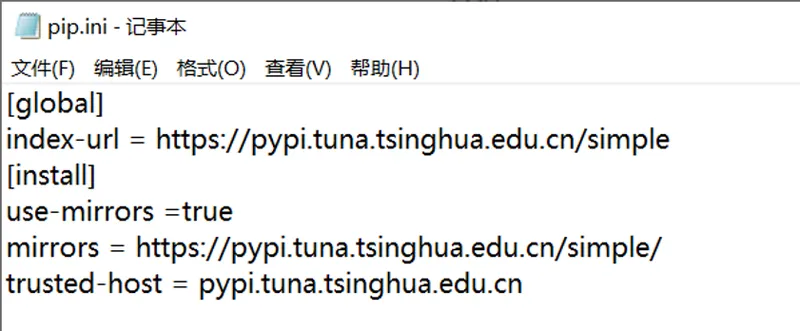
- 使用记事本打开,输入以下内容,并按下
ctrl+s保存。
[global] index-url = https://pypi.tuna.tsinghua.edu.cn/simple [install] use-mirrors =true mirrors = https://pypi.tuna.tsinghua.edu.cn/simple/ trusted-host = pypi.tuna.tsinghua.edu.cn
 { width="600" }
conda换源
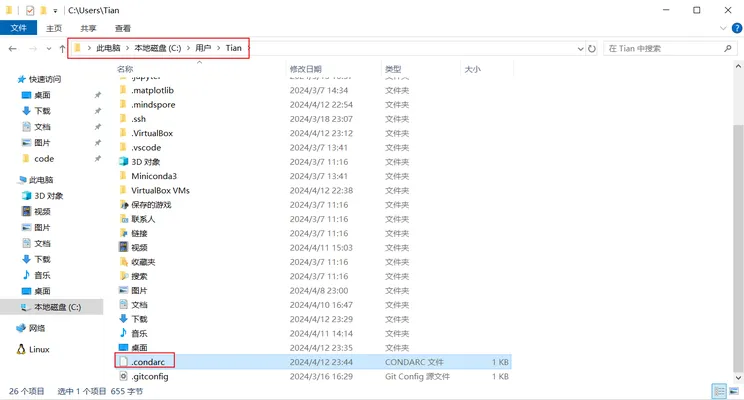
我们需要在.condarc文件内进行换源,但是Windows 用户无法直接创建名为 .condarc 的文件,可先执行conda config --set show_channel_urls yes生成该文件之后再修改。
- 执行完
conda config --set show_channel_urls yes后会在用户文件夹找到.condarc文件。
 { width="600" }
- 修改这个文件,替换为以下内容。
channels: - defaults show_channel_urls: true default_channels: - https://mirrors.tuna.tsinghua.edu.cn/anaconda/pkgs/main - https://mirrors.tuna.tsinghua.edu.cn/anaconda/pkgs/r - https://mirrors.tuna.tsinghua.edu.cn/anaconda/pkgs/msys2 custom_channels: conda-forge: https://mirrors.tuna.tsinghua.edu.cn/anaconda/cloud msys2: https://mirrors.tuna.tsinghua.edu.cn/anaconda/cloud bioconda: https://mirrors.tuna.tsinghua.edu.cn/anaconda/cloud menpo: https://mirrors.tuna.tsinghua.edu.cn/anaconda/cloud pytorch: https://mirrors.tuna.tsinghua.edu.cn/anaconda/cloud simpleitk: https://mirrors.tuna.tsinghua.edu.cn/anaconda/cloud auto_activate_base: false
Linux 系统换源
前情提示:在vim下,我们需要输入i进入编辑模式,将内容粘贴进去,按ESC退出编辑模式,输入:wq保存并退出。
pip换源
在终端执行以下命令
cd ~ mkdir .pip/ cd .pip vim pip.conf
在这个pip.conf文件下应该粘贴以下内容,直接复制粘贴到文件内即可,然后结束编辑。
[global] index-url = https://pypi.tuna.tsinghua.edu.cn/simple [install] use-mirrors =true mirrors = https://pypi.tuna.tsinghua.edu.cn/simple/ trusted-host = pypi.tuna.tsinghua.edu.cn
conda换源
在终端执⾏以下命令
cd ~ vim .condarc
在.condarc 文件内应该粘贴以下内容,直接复制粘贴到文件内即可。然后结束编辑
channels: - defaults show_channel_urls: true default_channels: - https://mirrors.tuna.tsinghua.edu.cn/anaconda/pkgs/main - https://mirrors.tuna.tsinghua.edu.cn/anaconda/pkgs/r - https://mirrors.tuna.tsinghua.edu.cn/anaconda/pkgs/msys2 custom_channels: conda-forge: https://mirrors.tuna.tsinghua.edu.cn/anaconda/cloud msys2: https://mirrors.tuna.tsinghua.edu.cn/anaconda/cloud bioconda: https://mirrors.tuna.tsinghua.edu.cn/anaconda/cloud menpo: https://mirrors.tuna.tsinghua.edu.cn/anaconda/cloud pytorch: https://mirrors.tuna.tsinghua.edu.cn/anaconda/cloud simpleitk: https://mirrors.tuna.tsinghua.edu.cn/anaconda/cloud auto_activate_base: false
最后使用conda clean -i 清除索引缓存。
conda/pip的使用
- 查看现有虚拟环境:
conda env list - 创建虚拟环境:
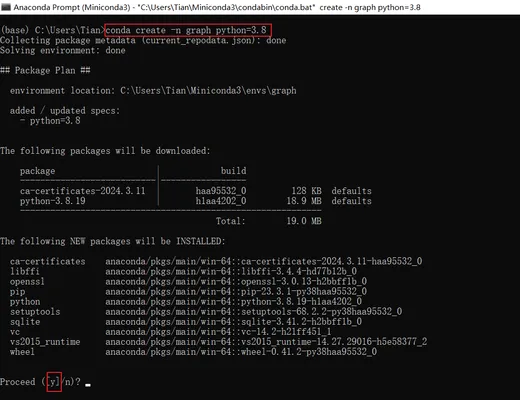
conda create -n env_name python=versioncreate: 创建环境命令n:-name缩写,后面紧接着是虚拟环境名称env_name:虚拟环境名称:见名知意,可以根据实际需求更改version:Python版本,例如3.8,以下是具体示例
 { width="600" }
- 激活虚拟环境:
conda activate env_name,激活虚拟环境后,终端将会在括号内显示当前环境名称。
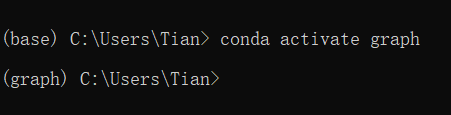 { width="600" }
- 安装包:
conda install package_name或者pip install package_name pip在安装包时临时更换镜像源:pip install package_name -i https://pypi.tuna.tsinghua.edu.cn/simple- 卸载包:
conda remove package_name或者pip uninstall package_name - 显示所有安装的包:
conda list - 删除指定虚拟环境:
conda remove -n env_name --all - 退出当前环境:
conda deactivate
更多的conda命令参考官网。
Commands — conda 24.3.1.dev30 documentation{.md-button}
安装函数库
???+ warning
当你想在虚拟环境安装包的时候,确认你正处在正确的虚拟环境中!!
pip install numpy pandas matplotlib transformers datasets peft evaluate diffusers gradio torch jupyterlab
参考
-
Datawhale 开源 PyTorch 教程
-
Miniconda 官方文档