RaspberryPi
Raspberry Pi
Raspberry Pi 是一款单板计算机。你可以使用各种设备和生态系统添加传感器和执行器,并在这些课程中使用一个名为 Grove 的硬件生态系统来操作这些设备。你将使用 Python 编程你的 Pi 并访问 Grove 传感器。
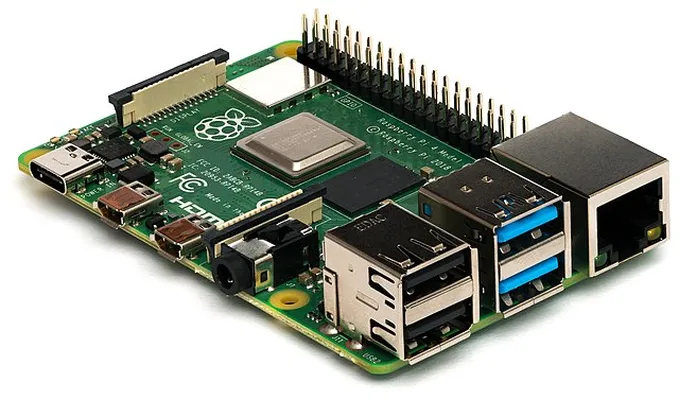
设置
如果你使用 Raspberry Pi 作为物联网硬件,你有两种选择——可以直接在 Pi 上进行所有课程的学习和编码,或者可以远程连接到一个“无头”(不带键盘、鼠标或显示器)的 Pi 并从你的电脑上进行编码。
开始之前,还需要将 Grove 基础帽连接到你的 Pi 上。
任务 - 设置
安装 Grove 基础帽并配置 Pi
-
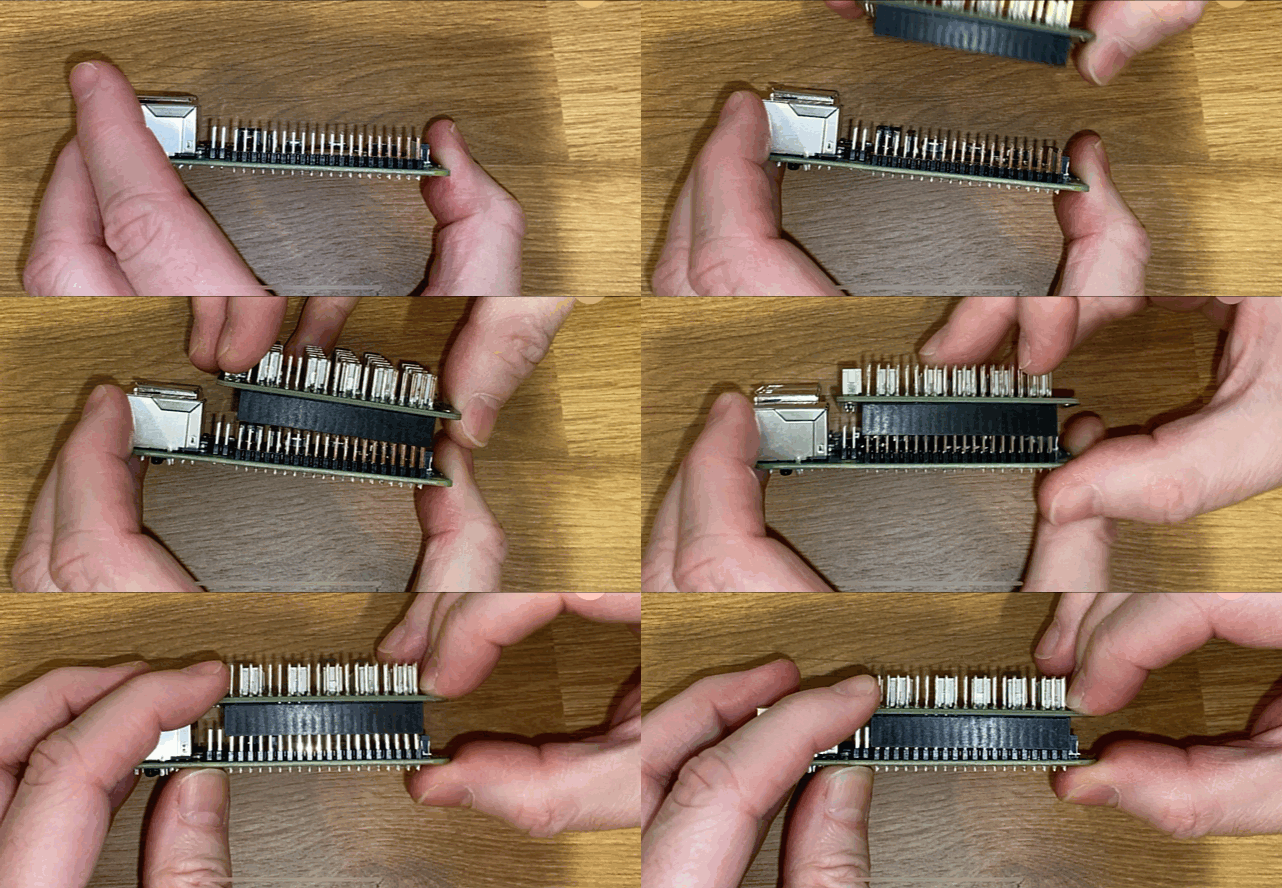
将 Grove 基础帽连接到你的 Pi 上。帽子上的插槽需要覆盖在 Pi 的所有 GPIO 引脚上,一直滑到引脚底部并牢固地固定在基座上。它会覆盖 Pi。
-
决定你想如何编程你的 Pi,然后转到下面的相关部分:
直接在你的 Pi 上工作
如果你想直接在你的 Pi 上工作,可以使用 Raspberry Pi OS 桌面版本并安装所有所需的工具。
任务 - 直接在你的 Pi 上工作
为开发设置你的 Pi。
- 按照Raspberry Pi 设置指南中的说明设置你的 Pi,将其连接到键盘/鼠标/显示器,连接到 Wi-Fi 或以太网网络,并更新软件。
要使用 Grove 传感器和执行器编程 Pi,你需要安装一个编辑器以允许你编写设备代码,以及各种与 Grove 硬件交互的库和工具。
-
当你的 Pi 重新启动后,通过点击顶部菜单栏的 Terminal 图标或选择 Menu -> Accessories -> Terminal 来启动终端。
-
运行以下命令以确保操作系统和已安装的软件是最新的:
sudo apt update && sudo apt full-upgrade --yes -
运行以下命令以安装所有 Grove 硬件所需的库:
sudo apt install git python3-dev python3-pip --yes git clone https://github.com/Seeed-Studio/grove.py cd grove.py sudo pip3 install . sudo raspi-config nonint do_i2c 0这首先安装了 Git 和用于安装 Python 包的 Pip。
Python 的一个强大功能是可以安装 Pip 包——这些是其他人编写的代码包并发布到互联网上的。你可以用一个命令在一个命令中安装一个 Pip 包,然后在你的代码中使用这个包。
Seeed Grove Python 包需要从源代码安装。这些命令将克隆包含此包源代码的仓库,然后本地安装它。
默认情况下,当你安装一个包时,它会在你的计算机上到处可用,这可能会导致包版本的问题——例如,一个应用程序依赖于一个包的某个版本,而当你为另一个应用程序安装新版本时会破坏它。为了解决这个问题,你可以使用一个 Python 虚拟环境,基本上是一个专用文件夹中的 Python 副本,当你安装 Pip 包时,它们只被安装到那个文件夹中。你使用你的 Pi 时不会使用虚拟环境。Grove 安装脚本全局安装 Grove Python 包,所以如果你要使用虚拟环境,你需要设置一个虚拟环境,然后手动在该环境中重新安装 Grove 包。使用全局包更容易,特别是因为许多 Pi 开发人员会为每个项目刷新干净的 SD 卡。
最后,这启用了 I2C 接口。
-
使用菜单或在终端中运行以下命令重启 Pi:
sudo reboot -
当 Pi 重新启动后,重新启动终端并运行以下命令以安装 Visual Studio Code (VS Code)——这是你将用来编写 Python 设备代码的编辑器。
sudo apt install code一旦安装完成,VS Code 将可以从顶部菜单中访问。
如果你有首选工具,你可以自由使用任何 Python IDE 或编辑器来进行这些课程,但课程将基于使用 VS Code 给出说明。
-
安装 Pylance。这是一个为 VS Code 提供 Python 语言支持的扩展。参考 Pylance 扩展文档 获取有关如何在 VS Code 中安装此扩展的说明。
远程访问以编程 Pi
而不是直接在 Pi 上编程,它可以运行“无头”,即没有连接键盘/鼠标/显示器,并从你的电脑上配置和编程它,使用 Visual Studio Code。
设置 Pi OS
为了远程编程,Pi OS 需要安装在 SD 卡上。
任务 - 设置 Pi OS
设置无头 Pi OS。
-
从Raspberry Pi OS 软件页面下载并安装 Raspberry Pi Imager。
-
将一张 SD 卡插入你的电脑,如有必要请使用适配器。
-
启动 Raspberry Pi Imager。
-
在 Raspberry Pi Imager 中,选择 CHOOSE OS 按钮,然后选择 Raspberry Pi OS (Other),接着选择 Raspberry Pi OS Lite (32-bit)。
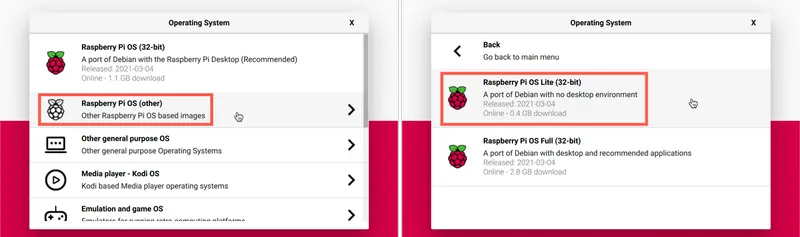
Raspberry Pi OS Lite 是没有桌面 UI 或基于 UI 的工具的 Raspberry Pi OS 版本。这些对于无头 Pi 不需要,使安装更小且启动时间更快。
-
选择 CHOOSE STORAGE 按钮,然后选择你的 SD 卡。
-
按
Ctrl+Shift+X. These options allow some pre-configuration of the Raspberry Pi OS before it is imaged to the SD card.-
Check the Enable SSH check box, and set a password for the
piuser. This is the password you will use to log in to the Pi later. -
If you are planning to connect to the Pi over WiFi, check the Configure WiFi check box, and enter your WiFi SSID and password, as well as selecting your WiFi country. You do not need to do this if you will use an ethernet cable. Make sure the network you connect to is the same one your computer is on.
-
Check the Set locale settings check box, and set your country and timezone
-
Select the SAVE button
-
-
Select the WRITE button to write the OS to the SD card. If you are using macOS, you will be asked to enter your password as the underlying tool that writes disk images needs privileged access.
The OS will be written to the SD card, and once complete the card will be ejected by the OS, and you will be notified. Remove the SD card from your computer, insert it into the Pi, power up the Pi and wait for about 2 mins for it to properly boot.
Connect to the Pi
The next step is to remotely access the Pi. You can do this using ssh 启动 高级选项,这在 macOS、Linux 和较新版本的 Windows 上可用。
任务 - 连接到 Pi
远程访问 Pi。
-
启动终端或命令提示符,并输入以下命令以连接到 Pi:
ssh pi@raspberrypi.local如果你在 Windows 上使用较旧版本,而
sshinstalled, you can use OpenSSH. You can find the installation instructions in the OpenSSH installation documentation. -
This should connect to your Pi and ask for the password.
Being able to find computers on your network by using
<hostname>.local是较新版本的 Linux 和 Windows 的一项新增功能。如果你使用 Linux 或 Windows 并收到关于主机名找不到的任何错误,请需要安装额外的软件以启用零配置网络(也称为 Apple 的 Bonjour):-
如果你使用 Linux,使用以下命令安装 Avahi:
sudo apt-get install avahi-daemon -
如果你使用 Windows,最简单的方法是安装 Bonjour Print Services for Windows。你也可以安装 iTunes for Windows 以获取更新版的实用程序(该实用程序不可单独提供)。
如果无法使用
raspberrypi.local, then you can use the IP address of your Pi. Refer to the Raspberry Pi IP address documentation for instructions on a number of ways to get the IP address. -
-
Enter the password you set in the Raspberry Pi Imager Advanced Options
Configure software on the Pi
Once you are connected to the Pi, you need to ensure the OS is up to date, and install various libraries and tools that interact with the Grove hardware.
Task - configure software on the Pi
Configure the installed Pi software and install the Grove libraries.
-
From your
ssh会话连接,运行以下命令以更新并重新启动 Pi:sudo apt update && sudo apt full-upgrade --yes && sudo rebootPi 将被更新并重新启动。
sshsession will end when the Pi is rebooted, so leave it for about 30 seconds then reconnect. -
From the reconnected
ssh会话,运行以下命令以安装所有 Grove 硬件所需的库:sudo apt install git python3-dev python3-pip --yes git clone https://github.com/Seeed-Studio/grove.py cd grove.py sudo pip3 install . sudo raspi-config nonint do_i2c 0这首先安装了 Git 和用于安装 Python 包的 Pip。
Python 的一个强大功能是可以安装 Pip 包——这些是其他人编写的代码包并发布到互联网上的。你可以用一个命令在一个命令中安装一个 Pip 包,然后在你的代码中使用这个包。
Seeed Grove Python 包需要从源代码安装。这些命令将克隆包含此包源代码的仓库,然后本地安装它。
默认情况下,当你安装一个包时,它会在你的计算机上到处可用,这可能会导致包版本的问题——例如,一个应用程序依赖于一个包的某个版本,而当你为另一个应用程序安装新版本时会破坏它。为了解决这个问题,你可以使用一个 Python 虚拟环境,基本上是一个专用文件夹中的 Python 副本,当你安装 Pip 包时,它们只被安装到那个文件夹中。你使用你的 Pi 时不会使用虚拟环境。Grove 安装脚本全局安装 Grove Python 包,所以如果你要使用虚拟环境,你需要设置一个虚拟环境,然后手动在该环境中重新安装 Grove 包。使用全局包更容易,特别是因为许多 Pi 开发人员会为每个项目刷新干净的 SD 卡。
最后,这启用了 I2C 接口。
-
通过运行以下命令重启 Pi:
sudo rebootsshsession will end when the Pi is rebooted. There is no need to reconnect.
Configure VS Code for remote access
Once the Pi is configured, you can connect to it using Visual Studio Code (VS Code) from your computer - this is a free developer text editor you will be using to write your device code in Python.
Task - configure VS Code for remote access
Install the required software and connect remotely to your Pi.
-
Install VS Code on your computer by following the VS Code documentation
-
Follow the instructions in the VS Code Remote Development using SSH documentation to install the components needed
-
Following the same instructions, connect VS Code to the Pi
-
Once connected, follow the managing extensions instructions to install the Pylance extension remotely onto the Pi
Hello world
It is traditional when starting out with a new programming language or technology to create a 'Hello World' application - a small application that outputs something like the text "Hello World" to show that all the tools are correctly configured.
The Hello World app for the Pi will ensure that you have Python and Visual Studio code installed correctly.
This app will be in a folder called nightlight, and it will be re-used with different code in later parts of this assignment to build the nightlight application.
Task - hello world
Create the Hello World app.
-
Launch VS Code, either directly on the Pi, or on your computer and connected to the Pi using the Remote SSH extension
-
Launch the VS Code Terminal by selecting *Terminal -> New Terminal, or pressing
CTRL+`. It will open to thepiusers home directory. -
Run the following commands to create a directory for your code, and create a Python file called
app.py在该目录内:mkdir nightlight cd nightlight touch app.py -
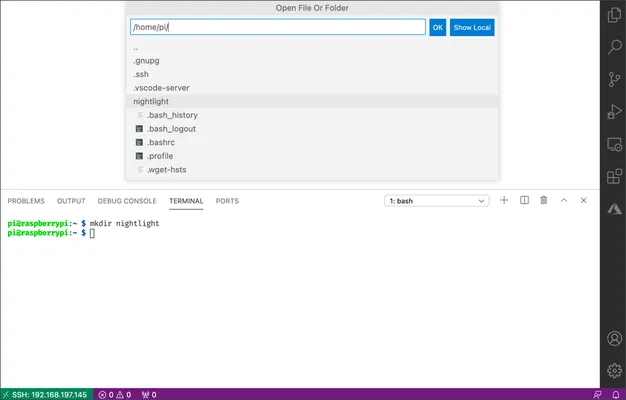
通过选择 File -> Open... 并选择 nightlight 文件夹,然后选择 OK 在 VS Code 中打开此文件夹。
-
从 VS Code 浏览器中打开
app.py文件,并添加以下代码:print('Hello World!')print函数会将传递给它的内容打印到控制台。 -
在 VS Code 终端中运行以下命令以运行你的 Python 应用程序:
python app.py你可能需要明确调用
python3to run this code if you have Python 2 installed in addition to Python 3 (the latest version). If you have Python2 installed then callingpython将使用 Python 2 而不是 Python 3。默认情况下,最新的 Raspberry Pi OS 版本仅安装了 Python 3。
以下输出将出现在终端中:
```output pi@raspberrypi:~/nightlight $ python3 app.py Hello World! ```
你可以在 code/pi 文件夹中找到此代码。
你的“Hello World”程序成功了!
声明:
本文件灏天文库团队进行了翻译。尽管我们力求准确,但请注意,翻译可能包含错误或不准确之处。原文档以其原始语言为准。我们不对因使用此翻译而产生的任何误解或误译负责。