将您的应用程序逻辑迁移到云端
文档摘要
将您的应用程序逻辑迁移到云端 本课概览的草图笔记 草图笔记由 Nitya Narasimhan 制作。点击图片查看大图。 本课程是作为 IoT 基础项目 2 - 数字农业系列 的一部分,在 Microsoft Reactor 教授的。 使用无服务器代码控制您的 IoT 设备 预习测验 预习测验 引言 在上一课中,您学习了如何将植物土壤湿度监测和继电器控制连接到基于云的 IoT 服务。下一步是将控制继电器定时的服务器端代码迁移到云端。在本课程中,您将学习如何使用无服务器函数来实现这一点。 本课程将涵盖以下内容: 什么是无服务器? 创建无服务器应用 创建 IoT Hub 事件触发器 从无服务器代码发送直接方法请求 将您的无服务器代码部署到云端 什么是无服务器?
将您的应用程序逻辑迁移到云端

草图笔记由 Nitya Narasimhan 制作。点击图片查看大图。
本课程是作为 IoT 基础项目 2 - 数字农业系列 的一部分,在 Microsoft Reactor 教授的。
预习测验
引言
在上一课中,您学习了如何将植物土壤湿度监测和继电器控制连接到基于云的 IoT 服务。下一步是将控制继电器定时的服务器端代码迁移到云端。在本课程中,您将学习如何使用无服务器函数来实现这一点。
本课程将涵盖以下内容:
- 什么是无服务器?
- 创建无服务器应用
- [创建 IoT Hub 事件触发器](#创建 IoT Hub 事件触发器)
- 从无服务器代码发送直接方法请求
- 将您的无服务器代码部署到云端
什么是无服务器?
无服务器或无服务器计算涉及创建小块代码,这些代码根据不同的事件在云端运行。当事件发生时,您的代码会被运行,并且会收到关于该事件的数据。这些事件可以来自许多不同的事物,包括网页请求、队列中的消息、数据库中的数据更改,或者由 IoT 设备发送到 IoT 服务的消息。
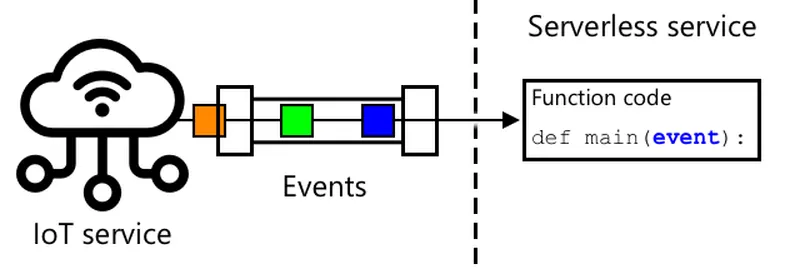
如果您之前使用过数据库触发器,您可以将其视为相同的概念,即代码被事件触发,例如插入一行。
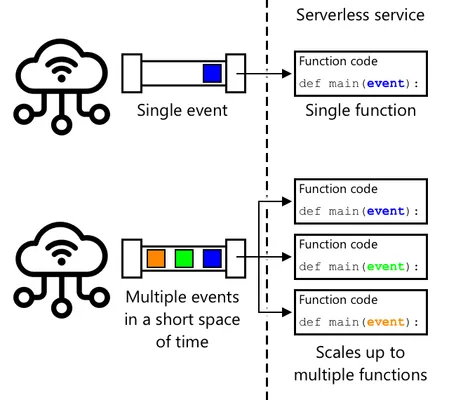
只有当事件发生时,您的代码才会运行;在其他时间,没有任何东西会让您的代码保持活跃状态。事件发生时,您的代码会被加载并运行。这使得无服务器非常可扩展——如果许多事件同时发生,云供应商可以在同一时间跨其拥有的任何服务器多次运行您的函数。但缺点是,如果您需要在事件之间共享信息,您需要将其保存到像数据库这样的地方,而不是存储在内存中。
您的代码被编写为一个函数,该函数接收有关事件的详细信息作为参数。您可以使用广泛的编程语言来编写这些无服务器函数。
无服务器也被称为函数即服务(FaaS),因为每个事件触发器都是用代码实现为一个函数的。
尽管名字叫无服务器,但实际上它确实使用了服务器。命名的原因是因为作为开发人员,您不需要关心运行代码所需的服务器,您只需要关心您的代码会在事件发生时运行。云提供商有一个无服务器运行时,负责分配服务器、网络、存储、CPU 和内存等资源来运行您的代码。这种模式意味着您不能按服务器付费,因为没有服务器。相反,您支付的是代码运行的时间以及所使用的内存数量。
无服务器是云中运行代码最便宜的方式之一。例如,在撰写本文时,一个云提供商允许您每月免费执行 1,000,000 次无服务器函数调用,超过这个数量后,每次 1,000,000 次调用收费 US$0.20。当您的代码未运行时,您不会支付费用。
作为 IoT 开发者,无服务器模型非常适合。您可以编写一个响应任何连接到您托管在云端的 IoT 服务的 IoT 设备所发送消息的函数。您的代码将处理所有发送的消息,但仅在需要时运行。
✅ 回顾您编写的监听 MQTT 消息的服务器端代码。您认为它如何在云端使用无服务器运行?您认为代码可能会如何改变以支持无服务器计算?
除了运行代码外,无服务器模型正在扩展到其他云服务。例如,您可以使用无服务器定价模型获得无服务器数据库,其中您按对数据库的请求支付费用,如查询或插入操作,通常根据服务请求的工作量进行定价。例如,使用主键选择单行的成本将低于复杂的操作,涉及多个表的联接并返回数千行。
创建无服务器应用
Microsoft 的无服务器计算服务称为 Azure 函数。
下面的简短视频概述了 Azure 函数。
点击上面的图像观看视频
✅ 花点时间研究一下,并阅读 Microsoft Azure 函数文档 中的 Azure 函数概述。
要编写 Azure 函数,您需要从一种语言开始,创建一个 Azure 函数应用。开箱即用的 Azure 函数支持 Python、JavaScript、TypeScript、C#、F#、Java 和 Powershell。在本课程中,您将学习如何使用 Python 编写 Azure 函数应用。
Azure 函数还支持自定义处理程序,因此您可以使用任何支持 HTTP 请求的语言编写函数,包括较旧的语言,如 COBOL。
函数应用由一个或多个触发器组成——这些函数响应事件。您可以在一个函数应用内有多个触发器,它们共享公共配置。例如,在您的函数应用的配置文件中,您可以包含 IoT Hub 的连接详情,所有函数都可以使用这些详情来连接并监听事件。
任务 - 安装 Azure 函数工具
在撰写本文时,Azure 函数代码工具在带有 Python 项目的 Apple Silicon 上尚未完全正常工作。您需要使用 Intel-based Mac、Windows PC 或 Linux PC。
Azure 函数的一大特点是您可以本地运行它们。与在云端运行相同的运行时可以在您的计算机上运行,使您能够编写响应 IoT 消息的代码并在本地运行。您甚至可以在处理事件时调试代码。一旦您满意代码,它可以部署到云端。
Azure 函数工具作为命令行界面 (CLI) 可用,称为 Azure 函数核心工具。
-
通过访问 Azure 函数核心工具文档 来安装 Azure 函数核心工具。
-
安装 VS Code 的 Azure 函数扩展。此扩展提供了创建、调试和部署 Azure 函数的支持。参考 Azure 函数扩展文档 中关于如何在 VS Code 中安装此扩展的说明。
当您将 Azure 函数应用部署到云端时,它需要使用少量的云存储来存储应用程序文件和日志文件。当您在本地运行函数应用时,您仍然需要连接到云存储,但不是使用实际的云存储,而是使用名为 Azurite 的存储模拟器。它在本地运行但表现得像云存储。
在 Azure 中,Azure 函数使用的存储是一种 Azure 存储帐户。这些帐户可以存储文件、Blob、表格中的数据或队列中的数据。您可以将一个存储帐户共享给多个应用,如一个函数应用和一个 Web 应用。
-
Azurite 是一个 Node.js 应用程序,因此您需要安装 Node.js。您可以在 Node.js 网站 上找到下载和安装说明。如果您使用的是 Mac,也可以从 Homebrew 安装。
-
使用以下命令安装 Azurite(
npm是在安装 Node.js 时安装的工具):npm install -g azurite -
创建一个名为
azurite的文件夹供 Azurite 使用以存储数据:mkdir azurite -
运行 Azurite,传入此新文件夹:
azurite --location azuriteAzurite 存储模拟器将启动并准备好让本地函数运行时连接。
➜ ~ azurite --location azurite Azurite Blob service is starting at http://127.0.0.1:10000 Azurite Blob service is successfully listening at http://127.0.0.1:10000 Azurite Queue service is starting at http://127.0.0.1:10001 Azurite Queue service is successfully listening at http://127.0.0.1:10001 Azurite Table service is starting at http://127.0.0.1:10002 Azurite Table service is successfully listening at http://127.0.0.1:10002
任务 - 创建 Azure 函数项目
Azure 函数 CLI 可用于创建新的函数应用。
-
为您的函数应用创建一个文件夹并导航到该文件夹。将其命名为
soil-moisture-triggermkdir soil-moisture-trigger cd soil-moisture-trigger -
在此文件夹内创建一个 Python 虚拟环境:
python3 -m venv .venv -
激活虚拟环境:
-
在 Windows 上:
-
如果您使用的是命令提示符或通过 Windows 终端的命令提示符,请运行:
.venv\Scripts\activate.bat -
如果您使用的是 PowerShell,请运行:
.\.venv\Scripts\Activate.ps1
-
-
在 macOS 或 Linux 上,请运行:
source ./.venv/bin/activate
这些命令应在创建虚拟环境时所在的同一位置运行。您永远不需要导航到
.venv文件夹,您应该始终从创建虚拟环境的位置运行激活命令以及安装包或运行代码的任何命令。 -
-
运行以下命令以在此文件夹中创建一个函数应用:
func init --worker-runtime python soil-moisture-trigger这将在当前文件夹中创建三个文件:
host.json- this JSON document contains settings for your Functions app. You won't need to modify these settings.local.settings.json- this JSON document contains settings your app would use when running locally, such as connection strings for your IoT Hub. These settings are local only, and should not be added to source code control. When you deploy the app to the cloud, these settings are not deployed, instead your settings are loaded from application settings. This will be covered later in this lesson.requirements.txt- this is a Pip requirements file that contains the Pip packages needed to run your Functions app.
-
The
local.settings.json文件具有函数应用将使用的存储帐户的设置。默认情况下,此值为空,因此需要设置。要连接到 Azurite 本地存储模拟器,请将此值设置为以下内容:"AzureWebJobsStorage": "UseDevelopmentStorage=true", -
使用 requirements 文件安装必要的 Pip 包:
pip install -r requirements.txt需要的 Pip 包应在此文件中列出,以便在将函数应用部署到云端时,运行时可以确保安装正确的包。
-
为了测试一切是否正常工作,您可以启动函数运行时。运行以下命令以执行此操作:
func start您将看到运行时启动并报告未找到任何作业函数(触发器)。
(.venv) ➜ soil-moisture-trigger func start Found Python version 3.9.1 (python3). Azure Functions Core Tools Core Tools Version: 3.0.3442 Commit hash: 6bfab24b2743f8421475d996402c398d2fe4a9e0 (64-bit) Function Runtime Version: 3.0.15417.0 [2021-05-05T01:24:46.795Z] No job functions found.⚠️ 如果收到防火墙通知,请授予访问权限,因为
func应用程序需要能够读取和写入您的网络。⚠️ 如果您使用的是 macOS,输出中可能会出现警告:
(.venv) ➜ soil-moisture-trigger func start Found Python version 3.9.1 (python3). Azure Functions Core Tools Core Tools Version: 3.0.3442 Commit hash: 6bfab24b2743f8421475d996402c398d2fe4a9e0 (64-bit) Function Runtime Version: 3.0.15417.0 [2021-06-16T08:18:28.315Z] Cannot create directory for shared memory usage: /dev/shm/AzureFunctions [2021-06-16T08:18:28.316Z] System.IO.FileSystem: Access to the path '/dev/shm/AzureFunctions' is denied. Operation not permitted. [2021-06-16T08:18:30.361Z] No job functions found.只要函数应用正确启动并列出正在运行的函数,您可以忽略这些警告。正如在 Microsoft 文档问答 中提到的那样,可以忽略这些警告。
-
通过按
ctrl+c停止函数应用。 -
在 VS Code 中打开当前文件夹,可以通过打开 VS Code 然后打开此文件夹,或者通过运行以下命令:
code .VS Code 将检测到您的函数项目并显示一条通知说:
Detected an Azure Functions Project in folder "soil-moisture-trigger" that may have been created outside of VS Code. Initialize for optimal use with VS Code?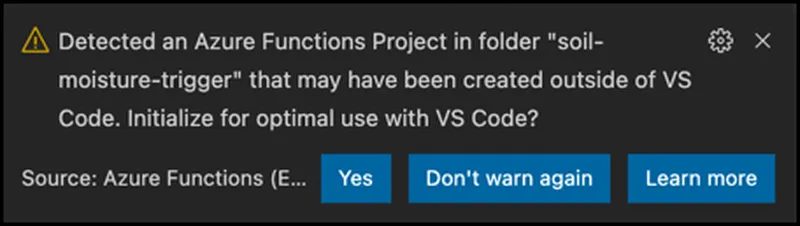
从这个通知中选择是。
-
确保 Python 虚拟环境在 VS Code 终端中运行。如有必要,终止并重新启动它。
创建 IoT Hub 事件触发器
函数应用是您的无服务器代码的外壳。要响应 IoT Hub 事件,您可以在该应用中添加一个 IoT Hub 触发器。此触发器需要连接到发送到 IoT Hub 的消息流,并对它们做出响应。要获取此消息流,您的触发器需要连接到 IoT Hub 的事件中心兼容端点。
IoT Hub 基于另一个 Azure 服务 Azure 事件中心。事件中心是一个允许您发送和接收消息的服务,而 IoT Hub 则在此基础上增加了面向 IoT 设备的功能。连接到 IoT Hub 以读取消息的方式与使用事件中心的方式相同。
✅ 进行研究:阅读 Azure 事件中心文档 中的事件中心概述。基本功能与 IoT Hub 相比如何?
对于 IoT 设备连接到 IoT Hub,它必须使用一个秘密密钥来确保只有授权设备才能连接。连接以读取消息时也是如此,您的代码需要一个包含秘密密钥的连接字符串,以及 IoT Hub 的详细信息。
默认连接字符串具有iothubowner权限,这意味着任何使用它的代码都对 IoT Hub 具有完全权限。理想情况下,您应该使用最低级别的权限连接。这将在下一课中介绍。
一旦触发器连接成功,函数中的代码将针对 IoT Hub 发送的每条消息被调用,无论哪台设备发送了该消息。触发器将该消息作为参数传递。
任务 - 获取事件中心兼容端点连接字符串
-
从 VS Code 终端运行以下命令以获取 IoT Hub 的事件中心兼容端点的连接字符串:
az iot hub connection-string show --default-eventhub \ --output table \ --hub-name <hub_name>将
<hub_name>with the name you used for your IoT Hub. -
In VS Code, open the
local.settings.jsonfile. Add the following additional value inside theValues部分:"IOT_HUB_CONNECTION_STRING": "<connection string>"将
<连接字符串>with the value from the previous step. You will need to add a comma after the line above to make this valid JSON.
Task - create an event trigger
You are now ready to create the event trigger.
-
From the VS Code terminal run the following command from inside the
soil-moisture-trigger文件夹:func new --name iot-hub-trigger --template "Azure Event Hub trigger"这将创建一个新的函数,称为
iot-hub-trigger. The trigger will connect to the Event Hub compatible endpoint on the IoT Hub, so you can use an event hub trigger. There is no specific IoT Hub trigger.
This will create a folder inside the soil-moisture-trigger folder called iot-hub-trigger that contains this function. This folder will have the following files inside it:
-
__init__.py- 这是包含触发器的 Python 代码文件,遵循标准的 Python 文件名约定将此文件夹转换为 Python 模块。此文件将包含以下代码:
import logging import azure.functions as func def main(event: func.EventHubEvent): logging.info('Python EventHub trigger processed an event: %s', event.get_body().decode('utf-8'))触发器的核心部分是
mainfunction. It is this function that is called with the events from the IoT Hub. This function has a parameter calledeventthat contains anEventHubEvent. Every time a message is sent to IoT Hub, this function is called passing that message as theevent, along with properties that are the same as the annotations you saw in the last lesson.The core of this function logs the event.
-
function.json- this contains configuration for the trigger. The main configuration is in a section calledbindings. A binding is the term for a connection between Azure Functions and other Azure services. This function has an input binding to an event hub - it connects to an event hub and receives data.You can also have output bindings so that the output of a function is sent to another service. For example you could add an output binding to a database and return the IoT Hub event from the function, and it will automatically be inserted into the database.
✅ Do some research: Read up on bindings in the Azure Functions triggers and bindings concepts documentation.
The
bindingssection includes configuration for the binding. The values of interest are:-
"type": "eventHubTrigger"- this tells the function it needs to listen to events from an Event Hub -
"name": "events"- this is the parameter name to use for the Event Hub events. This matches the parameter name in themainfunction in the Python code. -
"direction": "in"- this is an input binding, the data from the event hub comes into the function -
"connection": ""- this defines the name of the setting to read the connection string from. When running locally, this will read this setting from thelocal.settings.jsonfile.The connection string cannot be stored in the
function.jsonfile, it has to be read from the settings. This is to stop you accidentally exposing your connection string.
-
-
Due to a bug in the Azure Functions template, the
function.jsonhas an incorrect value for thecardinalityfield. Update this field frommanytoone:"cardinality": "one", -
更新
"connection"in thefunction.jsonfile to point to the new value you added to thelocal.settings.json文件中的值:"connection": "IOT_HUB_CONNECTION_STRING",记住 - 这需要指向设置,而不是包含实际的连接字符串。
-
连接字符串包含
eventHubNamevalue, so the value for this in thefunction.json文件需要清除。更新此值为空字符串:"eventHubName": "",
任务 - 运行事件触发器
-
确保您没有运行 IoT Hub 事件监视器。如果此应用在同一时间运行,则函数应用将无法连接并消费事件。
多个应用可以使用不同的消费者组连接到 IoT Hub 端点。这些将在后续课程中介绍。
-
要运行函数应用,请从 VS Code 终端运行以下命令
func start函数应用将启动,并发现
iot-hub-trigger函数。然后,它将处理过去一天内发送到 IoT Hub 的任何事件。(.venv) ➜ soil-moisture-trigger func start Found Python version 3.9.1 (python3). Azure Functions Core Tools Core Tools Version: 3.0.3442 Commit hash: 6bfab24b2743f8421475d996402c398d2fe4a9e0 (64-bit) Function Runtime Version: 3.0.15417.0 Functions: iot-hub-trigger: eventHubTrigger For detailed output, run func with --verbose flag. [2021-05-05T02:44:07.517Z] Worker process started and initialized. [2021-05-05T02:44:09.202Z] Executing 'Functions.iot-hub-trigger' (Reason='(null)', Id=802803a5-eae9-4401-a1f4-176631456ce4) [2021-05-05T02:44:09.205Z] Trigger Details: PartitionId: 0, Offset: 1011240-1011632, EnqueueTimeUtc: 2021-05-04T19:04:04.2030000Z-2021-05-04T19:04:04.3900000Z, SequenceNumber: 2546-2547, Count: 2 [2021-05-05T02:44:09.352Z] Python EventHub trigger processed an event: {"soil_moisture":628} [2021-05-05T02:44:09.354Z] Python EventHub trigger processed an event: {"soil_moisture":624} [2021-05-05T02:44:09.395Z] Executed 'Functions.iot-hub-trigger' (Succeeded, Id=802803a5-eae9-4401-a1f4-176631456ce4, Duration=245ms)对于每次调用函数,都会围绕
Executing 'Functions.iot-hub-trigger'/Executed 'Functions.iot-hub-trigger'block in the output, so you can how many messages were processed in each function call. -
Make sure your IoT device is running, You will see new soil moisture messages appearing in the Functions app.
-
Stop and restart the Functions app. You will see that it won't process messages previous messages again, it will only process new messages.
VS Code also supports debugging your Functions. You can set break points by clicking on the border by the start of each line of code, or putting the cursor on a line of code and selecting Run -> Toggle breakpoint, or pressing
F9. You can launch the debugger by selecting Run -> Start debugging, pressingF5,或者选择“运行和调试”面板并选择开始调试按钮。通过这样做,您可以查看正在处理的事件的详细信息。
排错
-
如果遇到以下错误:
The listener for function 'Functions.iot-hub-trigger' was unable to start. Microsoft.WindowsAzure.Storage: Connection refused. System.Net.Http: Connection refused. System.Private.CoreLib: Connection refused.检查 Azurite 是否正在运行,并且已将
AzureWebJobsStoragein thelocal.settings.jsonfile toUseDevelopmentStorage=true设置。 -
如果遇到以下错误:
System.Private.CoreLib: Exception while executing function: Functions.iot-hub-trigger. System.Private.CoreLib: Result: Failure Exception: AttributeError: 'list' object has no attribute 'get_body'检查是否已将
cardinalityin thefunction.jsonfile toone设置。 -
如果遇到以下错误:
Azure.Messaging.EventHubs: The path to an Event Hub may be specified as part of the connection string or as a separate value, but not both. Please verify that your connection string does not have the `EntityPath` token if you are passing an explicit Event Hub name. (Parameter 'connectionString').检查是否已将
eventHubNamein thefunction.json文件设置为空字符串。
从无服务器代码发送直接方法请求
到目前为止,您的函数应用正在使用事件中心兼容端点监听来自 IoT Hub 的消息。现在,您需要向 IoT 设备发送命令。这是通过使用 IoT Hub 的不同连接来完成的,即注册管理器。注册管理器是一种工具,允许您查看哪些设备已注册到 IoT Hub,并通过发送云到设备的消息、直接方法请求或更新设备孪生来与这些设备通信。您还可以使用它来注册、更新或删除 IoT Hub 中的 IoT 设备。
要连接到注册管理器,
添加手动继电器控制请从左到右撰写输出。
请注意,这里的“撰写输出”可能需要根据上下文进行调整,因为原始文本似乎是在指示某个操作步骤,但没有提供足够的上下文来确定确切的含义。如果这是一个技术文档或指南的一部分,请确保理解整个文档的上下文后再做翻译。
声明:
本文件灏天文库团队进行了翻译。尽管我们力求准确,但请注意,翻译可能包含错误或不准确之处。原文档以其原始语言为准。我们不对因使用此翻译而产生的任何误解或误译负责。