通过您的物联网设备计算库存-虚拟物联网硬件和RaspberryPi
文档摘要
通过您的物联网设备计算库存 - 虚拟物联网硬件和Raspberry Pi 可以使用预测及其边界框来计算图像中的库存数量。 显示边界框 作为有用的调试步骤,您可以不仅在控制台上打印出边界框,还可以将它们绘制在捕获的图像上写入磁盘的图像上。 任务 - 打印边界框 确保在VS Code中打开了项目 stock-counter ,并且如果使用虚拟物联网设备,则激活了虚拟环境。 将 print 语句更改为以下内容,以将边界框打印到控制台: 使用相机对准货架上的库存运行应用程序。边界框将以左、上、宽和高值(范围为0-1)的形式打印到控制台。 任务 - 在图像上绘制边界框 可以使用Pip包Pillow来在图像上绘图。使用以下命令安装此包: 如果您使用的是虚拟物联网设备,请确保从激活的虚拟环境中运行此命令。
通过您的物联网设备计算库存 - 虚拟物联网硬件和Raspberry Pi
可以使用预测及其边界框来计算图像中的库存数量。
显示边界框
作为有用的调试步骤,您可以不仅在控制台上打印出边界框,还可以将它们绘制在捕获的图像上写入磁盘的图像上。
任务 - 打印边界框
-
确保在VS Code中打开了项目
stock-counter,并且如果使用虚拟物联网设备,则激活了虚拟环境。 -
将
print语句更改为以下内容,以将边界框打印到控制台:print(f'Bounding box: {prediction["boundingBox"]}') -
使用相机对准货架上的库存运行应用程序。边界框将以左、上、宽和高值(范围为0-1)的形式打印到控制台。
Bounding box: {'left': 0.123, 'top': 0.456, 'width': 0.234, 'height': 0.345}
任务 - 在图像上绘制边界框
-
可以使用Pip包Pillow来在图像上绘图。使用以下命令安装此包:
pip install Pillow如果您使用的是虚拟物联网设备,请确保从激活的虚拟环境中运行此命令。
-
在
app.py文件顶部添加以下导入语句:from PIL import Image, ImageDraw这会导入编辑图像所需的代码。
-
在
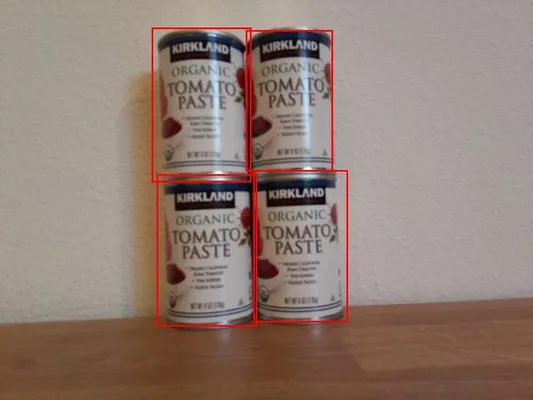
app.py文件末尾添加以下代码:# Open the image for editing image = Image.open(image_path) # Initialize ImageDraw draw = ImageDraw.Draw(image) # Loop through the predictions and get the bounding boxes for prediction in predictions: left = prediction["boundingBox"]["left"] top = prediction["boundingBox"]["top"] width = prediction["boundingBox"]["width"] height = prediction["boundingBox"]["height"] # Calculate the bottom right coordinate using the bounding box values right = left + width bottom = top + height # Convert the coordinates to image dimensions left = int(left * image.width) top = int(top * image.height) right = int(right * image.width) bottom = int(bottom * image.height) # Draw the bounding box on the image draw.rectangle([left, top, right, bottom], outline="red") # Save the edited image, overwriting the original image image.save(image_path)这段代码打开之前保存的图像以进行编辑。然后遍历预测并获取边界框,使用0-1范围内的边界框值计算右下角坐标。这些值通过乘以图像的相关维度转换为图像坐标。例如,如果左值为0.5且图像宽度为600像素,则这将转换为300(0.5 x 600 = 300)。
每个边界框都用红线绘制在图像上。最后,编辑后的图像被保存,覆盖原始图像。
https://www.aiknowledge.cn/images/初学者的IOT开发课程/1. 使用相机对准货架上的库存运行应用程序。您将在VS Code资源管理器中看到`image.webp
计算库存
在上面显示的图像中,边界框之间有轻微的重叠。如果这种重叠更大,则边界框可能会指示同一个物体。为了正确计数,您需要忽略具有显著重叠的边界框。
任务 - 忽略重叠计数库存
-
可以使用Pip包Shapely来计算交集。如果您使用的是Raspberry Pi,则需要先安装一个库依赖项:
sudo apt-get install python3-dev -
安装Shapely Pip包:
pip install Shapely如果您使用的是虚拟物联网设备,请确保从激活的虚拟环境中运行此命令。
-
在
app.py文件顶部添加以下导入语句:from shapely.geometry import Polygon这会导入创建多边形以计算重叠所需的代码。
-
在绘制边界框的代码上方添加以下代码:
overlap_threshold = 0.20 # Define 20% overlap as the threshold这定义了在认为边界框是同一对象之前的允许重叠百分比。0.20定义了一个20%的重叠。
-
使用Shapely计算重叠时,需要将边界框转换为Shapely多边形。添加以下函数以实现此目的:
def get_polygon(prediction): left = prediction["boundingBox"]["left"] top = prediction["boundingBox"]["top"] width = prediction["boundingBox"]["width"] height = prediction["boundingBox"]["height"] # Calculate the bottom right coordinate using the bounding box values right = left + width bottom = top + height # Convert the coordinates to image dimensions left = int(left * image.width) top = int(top * image.height) right = int(right * image.width) bottom = int(bottom * image.height) # Create a polygon using the bounding box return Polygon([(left, top), (right, top), (right, bottom), (left, bottom)])这使用预测的边界框创建一个多边形。
-
移除重叠对象的逻辑涉及比较所有边界框,如果任何预测对的边界框重叠超过阈值,则删除其中一个预测。要比较所有预测,您需要将预测1与2、3、4等进行比较,然后将预测2与3、4等进行比较。以下代码执行此操作:
to_delete = [] for i, pred1 in enumerate(predictions): for j, pred2 in enumerate(predictions): if i != j: poly1 = get_polygon(pred1) poly2 = get_polygon(pred2) if poly1.intersects(poly2) and poly1.intersection(poly2).area / min(poly1.area, poly2.area) > overlap_threshold: to_delete.append(j) predictions = [pred for idx, pred in enumerate(predictions) if idx not in to_delete]使用Shapely的
Polygon.intersection方法计算重叠,并将overlap_threshold值用于查看被忽略的预测。
您可以在code-count/pi或code-count/virtual-iot-device文件夹中找到此代码。
您的库存计数程序成功了!
声明:
本文件灏天文库团队进行了翻译。尽管我们力求准确,但请注意,翻译可能包含错误或不准确之处。原文档以其原始语言为准。我们不对因使用此翻译而产生的任何误解或误译负责。