4.2 批量图像处理
4.2 批量图像处理
本节摘要:批量处理是 Pillow 最高频的生产场景——把一套处理逻辑应用到成千上万张图。本节讲清批量流水线的骨架(遍历→处理→保存→错误隔离)、多进程/多线程加速的取舍、进度反馈,以及"处理失败不中断"的健壮设计。
本节导航
阅读完本节,你应当能够:
- 编写健壮的批量处理流水线
- 用多进程加速 CPU 密集任务
- 理解多进程与多线程的取舍
- 实现错误隔离(单张失败不影响整体)
- 添加进度反馈与断点续传
问题与直觉:一张图会了,一万张怎么办
单张图加水印你 10 秒学会,但要处理一万张呢?问题不再是"怎么处理",而是"怎么组织处理":遍历文件、统一流程、失败隔离、速度优化、进度可见。批量处理考的不是 Pillow API,是工程组织能力。
import os from PIL import Image, ImageOps def process_one(src, dst): """单张处理:缩略+水印""" with Image.open(src) as img: thumb = ImageOps.fit(img, (800, 800)) thumb.save(dst, quality=85) return True src_dir = "photos" dst_dir = "output" os.makedirs(dst_dir, exist_ok=True) for fname in os.listdir(src_dir): if fname.lower().endswith((".jpg", ".jpeg", ".png", ".webp")): src = os.path.join(src_dir, fname) dst = os.path.join(dst_dir, os.path.splitext(fname)[0] + ".jpg") process_one(src, dst)
这是最朴素的批量——能跑,但有问题:单张失败会中断整体、没有进度、速度只用一个核。
核心原理:健壮流水线三要素
1. 错误隔离——单张失败不影响整体
def run_batch(src_dir, dst_dir, process_fn): os.makedirs(dst_dir, exist_ok=True) files = [f for f in os.listdir(src_dir) if f.lower().endswith((".jpg", ".png", ".webp"))] ok, fail = 0, [] for fname in files: try: process_fn(os.path.join(src_dir, fname), os.path.join(dst_dir, os.path.splitext(fname)[0] + ".jpg")) ok += 1 except Exception as e: fail.append((fname, str(e))) # 记录失败,不中断 print(f"成功 {ok} 张, 失败 {len(fail)} 张") for f, e in fail[:10]: print(f" {f}: {e}") return ok, fail
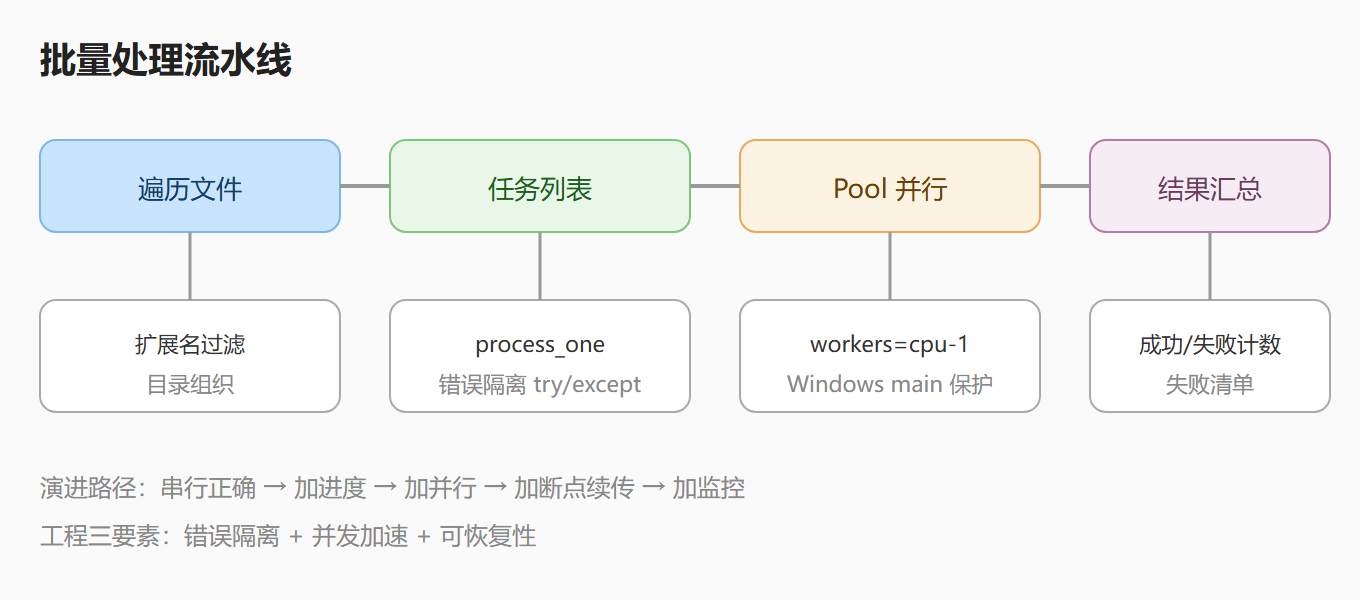
try/except 包住单张处理,失败只记录不中断——这是批量处理的铁律。真实项目里"有一张坏图"很常见,不能因为一张坏图毁掉整个任务。
2. 多进程加速——CPU 密集任务
from multiprocessing import Pool def process_wrapper(args): src, dst = args return process_one(src, dst) def run_parallel(src_dir, dst_dir, workers=4): os.makedirs(dst_dir, exist_ok=True) tasks = [] for fname in os.listdir(src_dir): if fname.lower().endswith((".jpg", ".png", ".webp")): src = os.path.join(src_dir, fname) dst = os.path.join(dst_dir, os.path.splitext(fname)[0] + ".jpg") tasks.append((src, dst)) with Pool(workers) as pool: results = pool.map(process_wrapper, tasks) print(f"完成 {sum(results)}/{len(tasks)}")
多进程 vs 多线程的取舍:
| 维度 | 多进程 | 多线程 |
|---|---|---|
| 适合 | CPU 密集(图像处理) | IO 密集(网络/磁盘) |
| GIL | 不受影响 | 受影响 |
| 进程数建议 | CPU 核数 | 核数 x 数倍 |
| 内存 | 每进程独立,开销大 | 共享,开销小 |
💡 关键直觉:图像处理是 CPU 密集任务,多进程才是正解;多线程在 Python 里受 GIL 限制,加速有限。workers 数量用
os.cpu_count()或略少。
3. 进度反馈——长任务的"呼吸感"
def run_batch_with_progress(src_dir, dst_dir, process_fn): files = [f for f in os.listdir(src_dir) if f.lower().endswith((".jpg", ".png", ".webp"))] total = len(files) for i, fname in enumerate(files, 1): try: process_fn(...) except Exception: pass if i % 100 == 0 or i == total: print(f"进度: {i}/{total} ({i/total*100:.0f}%)")
处理上千张图时没有进度反馈,人会怀疑"是不是卡死了"。每 N 张或每完成一屏打印一次进度,是长任务的基本素养。
工程实践要点:完整流水线
import os from multiprocessing import Pool from PIL import Image, ImageOps, ImageDraw, ImageFont def process_one(args): src, dst, watermark_text = args try: with Image.open(src) as img: img = ImageOps.exif_transpose(img) thumb = ImageOps.fit(img, (800, 800)) thumb_rgba = thumb.convert("RGBA") overlay = Image.new("RGBA", thumb_rgba.size, (0, 0, 0, 0)) draw = ImageDraw.Draw(overlay) font = ImageFont.truetype("C:/Windows/Fonts/arial.ttf", 40) draw.text((10, 10), watermark_text, fill=(255, 255, 255, 160), font=font) result = Image.alpha_composite(thumb_rgba, overlay).convert("RGB") result.save(dst, quality=85) return (src, True) except Exception as e: return (src, False, str(e)) def batch(src_dir, dst_dir, workers=None): os.makedirs(dst_dir, exist_ok=True) workers = workers or max(1, os.cpu_count() - 1) tasks = [] for f in os.listdir(src_dir): if f.lower().endswith((".jpg", ".png", ".webp")): tasks.append((os.path.join(src_dir, f), os.path.join(dst_dir, os.path.splitext(f)[0] + ".jpg"), "© MySite")) with Pool(workers) as pool: results = pool.map(process_one, tasks) ok = sum(1 for r in results if r[1]) print(f"完成 {ok}/{len(tasks)},失败 {len(tasks)-ok}") for r in results: if not r[1]: print(f" {os.path.basename(r[0])}: {r[2]}") batch("photos", "output")
这个流水线集合了全部要点:exif 方向修复、缩略、水印、多进程、失败记录。
⚠️ 常见坑 1:多进程 + 大图 = 内存爆炸。每个进程都加载大图,4 进程 x 100MB 图 = 400MB+。控制并发数、用缩略图 API 缓解。
⚠️ 常见坑 2:Windows 下多进程要放 main 保护。
if __name__ == "__main__":包裹调用,否则 Windows 会无限启动子进程。
动手实验:速度对比
import os, time from multiprocessing import Pool from PIL import Image, ImageOps def shrink(args): src, dst = args with Image.open(src) as img: ImageOps.fit(img, (400, 400)).save(dst, quality=80) return True # 造 20 张测试图 os.makedirs("test_imgs", exist_ok=True) for i in range(20): Image.new("RGB", (1200, 800), (i*10 % 255, 100, 200)).save(f"test_imgs/img_{i}.jpg") # 串行 vs 并行 tasks = [(f"test_imgs/img_{i}.jpg", f"out_{i}.jpg") for i in range(20)] t0 = time.time() for t in tasks: shrink(t) print(f"串行: {time.time()-t0:.2f}s") t0 = time.time() with Pool(4) as p: p.map(shrink, tasks) print(f"并行(4): {time.time()-t0:.2f}s")
跑一遍你就知道:同样的任务,并行可能快 2-4 倍。
进阶:任务队列与断点续传
处理上万张图时,一次性跑完不现实(可能中断、可能失败)。进阶方案:
增量处理(跳过已完成的)
def incremental_batch(src_dir, dst_dir): """已处理过的文件自动跳过(断点续传)""" os.makedirs(dst_dir, exist_ok=True) done, skipped, failed = 0, 0, [] for fname in os.listdir(src_dir): if not fname.lower().endswith((".jpg", ".png", ".webp")): continue dst = os.path.join(dst_dir, os.path.splitext(fname)[0] + ".jpg") # 核心:输出已存在且时间晚于输入 → 跳过 if os.path.exists(dst) and os.path.getmtime(dst) >= os.path.getmtime(os.path.join(src_dir, fname)): skipped += 1 continue try: with Image.open(os.path.join(src_dir, fname)) as img: ImageOps.fit(img, (800, 800)).save(dst, quality=85) done += 1 except Exception as e: failed.append((fname, str(e))) print(f"完成 {done}, 跳过 {skipped}, 失败 {len(failed)}")
断点续传的核心:比较输出文件与输入文件的修改时间,输出"足够新"就跳过——中断后重跑,只处理未完成的。
失败清单落盘
import json failures = [{"file": f, "error": e} for f, e in failed_list] with open("failures.json", "w", encoding="utf-8") as fp: json.dump(failures, fp, ensure_ascii=False, indent=2)
失败清单落盘的意义:批量任务结束后能精准排查"哪几张坏了、为什么"。
实战:文件夹重命名+统一规格
综合案例:把素材文件夹统一成"编号_规格"命名,并统一处理:
def organize_assets(src_dir, dst_dir, size=(800, 800), prefix="asset"): os.makedirs(dst_dir, exist_ok=True) files = sorted(f for f in os.listdir(src_dir) if f.lower().endswith((".jpg", ".png", ".webp"))) for i, fname in enumerate(files, 1): try: with Image.open(os.path.join(src_dir, fname)) as img: img = ImageOps.exif_transpose(img) img = ImageOps.fit(img, size) out_name = f"{prefix}_{i:03d}.jpg" img.save(os.path.join(dst_dir, out_name), quality=85) except Exception as e: print(f"跳过 {fname}: {e}") organize_assets("raw", "organized", size=(800, 800))
统一命名 + 统一规格是素材整理的标准需求:编号有序、尺寸一致、格式统一。
FAQ:批量处理高频问题
问:多进程在 Windows 上报错怎么办?
Windows 必须把主逻辑放 if __name__ == "__main__": 里,否则 Pool 会反复创建子进程报错。
问:处理 10 万张图,多进程还慢怎么办?
先定位瓶颈:IO 慢(读网络盘)→ SSD/缓存;CPU 慢 → 增加进程数到核数。极端场景考虑 C++ 扩展或 GPU。
问:批处理会不会把原图覆盖?
看代码。输出到独立目录(dst 与 src 分离)就不会覆盖。若要覆盖,先备份原图。
问:为什么有的图处理结果不对?
大概率是"坏图"(文件损坏、格式伪装)。批量处理的错误隔离(try/except)就是为了兜住这些。
动手演练:批量水印工具
把"水印 + 批量"组合成实用工具:
from multiprocessing import Pool def watermark_one(args): src, dst, text = args try: with Image.open(src) as img: img = ImageOps.exif_transpose(img).convert("RGBA") overlay = Image.new("RGBA", img.size, (0, 0, 0, 0)) draw = ImageDraw.Draw(overlay) font_size = max(20, int(min(img.size) * 0.04)) font = ImageFont.truetype("C:/Windows/Fonts/msyh.ttc", font_size) bbox = draw.textbbox((0, 0), text, font=font) tw, th = bbox[2]-bbox[0], bbox[3]-bbox[1] draw.text((img.width - tw - 20, img.height - th - 20), text, fill=(255, 255, 255, 160), font=font) result = Image.alpha_composite(img, overlay).convert("RGB") result.save(dst, quality=90) return True except Exception: return False def batch_watermark(src_dir, dst_dir, text="© MySite"): os.makedirs(dst_dir, exist_ok=True) tasks = [(os.path.join(src_dir, f), os.path.join(dst_dir, f), text) for f in os.listdir(src_dir) if f.lower().endswith((".jpg", ".png"))] if __name__ == "__main__": with Pool(4) as pool: results = pool.map(watermark_one, tasks) print(f"完成 {sum(results)}/{len(tasks)}") batch_watermark("photos", "watermarked")
批量水印的要点:字体随图自适应、位置右下角、半透明——"水印逻辑与批量框架分离",改水印样式只动 watermark_one。
进阶:批量处理的失败重试
真实场景中"一次跑完"很少见,需要失败重试机制:
def batch_with_retry(src_dir, dst_dir, max_retries=2): """带重试的批量处理:失败自动重试,仍失败记录""" os.makedirs(dst_dir, exist_ok=True) files = [f for f in os.listdir(src_dir) if f.lower().endswith((".jpg", ".png"))] pending = files final_failures = [] for attempt in range(max_retries + 1): if not pending: break still_pending = [] for fname in pending: src, dst = os.path.join(src_dir, fname), os.path.join(dst_dir, fname) try: with Image.open(src) as img: ImageOps.fit(img, (800, 800)).save(dst, quality=85) except Exception as e: if attempt < max_retries: still_pending.append(fname) else: final_failures.append((fname, str(e))) pending = still_pending print(f"第 {attempt+1} 轮: 剩余 {len(pending)} 张待重试") print(f"完成,最终失败 {len(final_failures)} 张")
重试的价值:临时性失败(文件占用、瞬时 IO 错误)第二轮就通过了。**"分级重试 + 最终失败清单"**是健壮批处理的标准结构。
动手演练:任务监控与报告
长批量任务需要"可观测"——进度、指标、报告:
import time class BatchReporter: """批量任务监控器""" def __init__(self, total): self.total = total self.done = 0 self.failed = [] self.start = time.time() def tick(self, ok, fname=None, error=None): self.done += 1 if not ok: self.failed.append((fname, error)) if self.done % 50 == 0 or self.done == self.total: self.report() def report(self): elapsed = time.time() - self.start speed = self.done / max(elapsed, 0.001) pct = self.done / self.total * 100 print(f"[{self.done}/{self.total}] {pct:.0f}% " f"速度 {speed:.1f}张/s 耗时 {elapsed:.0f}s") def summary(self): print(f"完成 {self.done}/{self.total}, 失败 {len(self.failed)}") for f, e in self.failed[:5]: print(f" {f}: {e}") def batch_with_report(src_dir, dst_dir): os.makedirs(dst_dir, exist_ok=True) files = [f for f in os.listdir(src_dir) if f.lower().endswith((".jpg", ".png"))] reporter = BatchReporter(len(files)) for fname in files: src, dst = os.path.join(src_dir, fname), os.path.join(dst_dir, fname) try: with Image.open(src) as img: ImageOps.fit(img, (800, 800)).save(dst, quality=85) reporter.tick(True) except Exception as e: reporter.tick(False, fname, str(e)) reporter.summary() batch_with_report("photos", "output")
监控器的价值:进度(百分比)、速度(张/秒)、失败清单(可复现)——"可观测"是批处理工程化的标志。
批量处理的常见误区
| 误区 | 正确认知 |
|---|---|
| "并行一定更快" | 小批量/IO 密集并行收益小 |
| "一个进程处理所有" | 要按 CPU 核数分 |
| "失败就重跑全部" | 增量/断点续传更好 |
| "内存足够就全加载" | 大图全加载必然爆 |
| "批量=多进程" | 串行正确后再优化并行 |
误区根源:把"批量"当"技术炫技"而非"工程组织"。批量的本质是"组织大量小任务"——正确性(错误隔离)、可恢复性(断点)、效率(并行)三者平衡。
批量处理的完整知识地图
把批量处理的知识组织成"决策地图":
决策逻辑:任务量决定方案——小批量别过度设计、大批量必须工程化。"串行正确 → 加进度 → 加并行 → 加恢复"是批处理进化的标准路径。
实战:批处理模板速查
给"批处理"一个可复用的模板,任何场景直接套用:
def process_one(args): """单张处理函数(修改这里实现你的逻辑)""" src, dst = args try: with Image.open(src) as img: result = ImageOps.fit(img, (800, 800)) result.save(dst, quality=85) return (src, True) except Exception as e: return (src, False, str(e)) def batch_template(src_dir, dst_dir, workers=None): """批处理模板:遍历 + 并行 + 错误隔离 + 报告""" os.makedirs(dst_dir, exist_ok=True) files = [f for f in os.listdir(src_dir) if f.lower().endswith((".jpg", ".png", ".webp"))] tasks = [(os.path.join(src_dir, f), os.path.join(dst_dir, f)) for f in files] workers = workers or max(1, os.cpu_count() - 1) if __name__ == "__main__" or os.name == "posix": with Pool(workers) as pool: results = pool.map(process_one, tasks) ok = sum(1 for r in results if r[1]) print(f"完成 {ok}/{len(tasks)}") for r in results: if not r[1]: print(f" 失败: {r[0]}: {r[2]}") batch_template("photos", "output")
模板的价值:"改 process_one 一个函数,就得到一个新的批处理工具"——加水印改一行、加滤镜改一行、换格式改一行。
本节小结:批量处理考的不是 API,而是工程组织——错误隔离保证"单张失败不中断",多进程让 CPU 密集任务提速数倍,断点续传让超大批量可控可恢复,监控报告让进度与问题一目了然。记住批量演进路径:串行正确 → 加进度 → 加并行 → 加恢复。
批量处理的项目实战:相册整理工具
把批量处理知识用于"相册整理"——按日期归档、生成缩略图:
import os, shutil def organize_album(src_dir, dst_dir, thumb=True): """相册整理:按日期归档 + 缩略图""" os.makedirs(dst_dir, exist_ok=True) if thumb: os.makedirs(os.path.join(dst_dir, "thumbs"), exist_ok=True) stats = {"moved": 0, "thumb": 0, "failed": 0} for f in os.listdir(src_dir): if not f.lower().endswith((".jpg", ".jpeg")): continue src = os.path.join(src_dir, f) try: # 读 EXIF 日期 date = "unknown" with Image.open(src) as img: exif = img.getexif() for tag_id, value in exif.items(): if TAGS.get(tag_id) == "DateTime": date = str(value)[:10].replace(":", "-") break # 归档 date_dir = os.path.join(dst_dir, date) os.makedirs(date_dir, exist_ok=True) shutil.move(src, os.path.join(date_dir, f)) stats["moved"] += 1 # 缩略图 if thumb: with Image.open(os.path.join(date_dir, f)) as img: ImageOps.fit(img, (300, 300)).save( os.path.join(dst_dir, "thumbs", f), quality=85) stats["thumb"] += 1 except Exception as e: stats["failed"] += 1 print(f"失败 {f}: {e}") print(f"归档 {stats['moved']} 张, 缩略图 {stats['thumb']} 张, 失败 {stats['failed']}") organize_album("camera", "album")
相册整理工具的价值:EXIF 日期归档 + 缩略图生成——一个工具完成"整理+预览"两件事。这个实战展示了批量处理(遍历+错误隔离)、EXIF(读取日期)、缩略图(ImageOps)的组合应用,是"批量"思想的真实落地。
批量处理的常见问题补充
问:多进程和异步(asyncio)哪个好?
多进程适合 CPU 密集(图像处理);asyncio 适合 IO 密集(网络请求)。图片处理用多进程,别混用。
问:处理结果如何保证可复现?
固定随机种子(如需随机)、固定参数、记录处理日志(输入/输出/参数)。"可复现"是批处理的工程要求。
问:批量任务如何监控?
进度(百分比)、速度(张/秒)、失败清单(可复现)——用 BatchReporter 类(见 4.2 监控小节)统一管理。
问:批处理适合放服务器吗?
大规模批处理建议异步化(任务队列)+ 独立 worker;不要在请求线程里同步跑长时间批量任务。
批量处理的项目实战:图片素材整理
把批量处理知识用于"素材整理"——统一规格、重命名、归档:
def organize_assets(src_dir, dst_dir, size=(800, 800), prefix="asset"): """素材整理:统一规格 + 编号命名""" os.makedirs(dst_dir, exist_ok=True) files = sorted(f for f in os.listdir(src_dir) if f.lower().endswith((".jpg", ".png", ".webp"))) done, failed = 0, 0 for i, fname in enumerate(files, 1): try: with Image.open(os.path.join(src_dir, fname)) as img: img = ImageOps.exif_transpose(img) img = ImageOps.fit(img, size) out_name = f"{prefix}_{i:03d}.jpg" img.save(os.path.join(dst_dir, out_name), quality=85) done += 1 except Exception as e: failed += 1 print(f"跳过 {fname}: {e}") print(f"整理完成: {done} 张, 失败 {failed} 张") organize_assets("raw", "organized", size=(800, 800))
素材整理的价值:统一命名(编号)、统一规格(尺寸)、统一格式(JPG)——"三统一"是素材管理的标准需求。这个工具是批量处理(遍历+错误隔离)与基本操作(exif/fit)的组合应用,可直接用于设计稿、产品图、相册的批量整理。
批量处理的常见误区
演进路径:串行正确 → 加进度 → 加并行 → 加恢复 → 加监控。**"先正确、再高效、后可恢复"**是批处理工程化的标准路径。
批量处理完整知识地图
把批量处理的知识组织成"决策地图":
决策逻辑:任务量决定方案——小批量别过度设计、大批量必须工程化。"串行正确 → 加进度 → 加并行 → 加恢复"是批处理进化的标准路径。**"先正确、再高效、后可恢复"**是批处理工程化的最高准则。
图:批量处理流水线架构
一节小结
- 批量三要素:遍历、处理、错误隔离
- 错误隔离铁律:try/except 单张隔离,失败不中断
- 多进程适合 CPU 密集:图像处理加速正解
- 多线程受 GIL 限制:适合 IO 密集而非计算
- workers 用 CPU 核数-1:避免内存爆炸
- 进度反馈:长任务基本素养
- 断点续传:比较修改时间跳过已完成
- 失败清单落盘:精准排查坏图
- 重试机制:临时失败自动重试
- 批量水印:逻辑与框架分离
- 监控报告:进度+速度+失败清单
- 分片恢复:状态持久化+增量处理
- 性能分析:三段耗时定位瓶颈
- 决策地图:按任务量选方案
- 模板速查:改一个函数得到新工具
- 归档整理:EXIF 日期+目录组织
- Windows 加 main 保护:多进程跨平台差异
批量处理能"规模化改图",下一节换方向——从"改图"到"读图":用 Pillow 做像素统计与数据可视化。
练习提示:学完本节后,建议用批量模板(batch_template)做一个"批量加水印"工具,把 process_one 改成水印逻辑。亲手完成一次"改一个函数得到新工具"的练习,你会真正理解批量处理的工程价值——这也是从"会批量"走向"会组织批量"的关键一步。
进阶方向:批量处理之后,可继续探索任务调度(Celery/RQ)、分布式处理(Ray)、GPU 加速(cupy/cv2.cuda)等方向——它们让"批量"从单机扩展到集群,是批处理工程化的自然延伸。